Cisco AnyConnect SSL/TLS Trustpoint

I wanted to put together a quick tutorial for setting up a Cisco ASA – AnyConnect with SSL/TLS. I’ve done it a few times and I always have to re-lookup each step and the order in which to do it, so why not make a quick post about it to remember!

Optional: Destroy Current Trustpoint

You will have to destroy or clear out the current trustpoint if it already exists. This must be done if you are going to re-generate the key, which is best practice when renewing a Certificate due to expiration or one that has been compromised.

asa01(conf)# no crypto ca trustpoint oldtrustpoint.trustpoint
  • It will warn you that it will destroy any certificates within the trustpoint.
Generate a Key

Here we start with the generation of our key, using 2048 bits. the key name can be anything you want, but I like call it by the service I will be putting it on, for my case for this tutorial is accessthejimmahknowscom.key

asa01(conf)# crypto key generate rsa label accessthejimmahknowscom.key modulus 2048
Setting up the trustpoint locale and generate a CSR for submission

    First we need to set up a trustpoint object, with our locale properties, etc

asa01(conf)# crypto ca trustpoint newtrustpoint.trustpoint
asa01(config-ca-trustpoint)# subject-name CN=access.thejimmahknows.com,O=thejimmahknows,C=US,St=Connecticut,L=Wethersfield
asa01(config-ca-trustpoint)# keypair accessthejimmahknowscom.key
asa01(config-ca-trustpoint)# fqdn access.thejimmahknows.com
asa01(config-ca-trustpoint)# enrollment terminal
asa01(config-ca-trustpoint)# exit
  • newtrustpoint.trustpoint — The name I gave to this trustpoint which will tie everything together.
  • subject-name This command holds the distinguished name of the Certificate’s profile, see RFC3039
  • keypair — This is what key to pair the trustpoint with, we generated this in the previous step.
  • fqdn — This is the main FQDN of our service that will use the trustpoint
  • enrolment terminal — This tells the Cisco ASA to output the CSR (which we will create in the next step) to the terminal screen. Otherwise you will have to SFTP to the ASA and download it.

Continue reading…

F5 BIGIP and HAProxy — Masking 2-Way “Mutual” SSL Authentication

Hello folks,

So a recent post I published talked about 1-Way vs 2-way SSL Authentication in some decent detail. We learned that 2-Way “Mutual” SSL Authentication can be used to enforce both parties attempting to communicate securely to provide authenticity. In other words, prove to each other that they are who they say they are. This can be very powerful from a security standpoint, but is it practical? The answer is, yes and no. The constraint comes from the aspect of administration (actually create certificates for each client) and manageability (keep accounting and maintaining actively lists of trusts) with the trade-off of proper authenticity. For example at first administering and managing 10 client certificates may be okay, but then imaging 100, or even a 1,000! So in this post I wanted to approach the idea of utilizing some tools we can use to offload some of this administration and management while maintaining Mutual Authentication with another entity. The idea revolves around one major assumption, users of a particular service (In this case a web-server) reside on a privately controlled and trusted network

My idea is if we have a group of clients residing on an internal privately addressed network, we can use either an F5 LTM or HAProxy to proxy our users’s connections destined for a service that is enforcing 2-Way SSL “Mutual” Authentication. The F5 LTM or HAProxy would perform the 2-Way SSL Mutual Authentication on behalf of each connecting user, eliminating the technical need to generate certificates for each client, while maintaining an element of mutual trust to the end service.

The basic idea is: (notice only our F5 LTM/HAproxy and the web-server perform 2-Way “Mutual” Authentication)

Continue reading…

TLS and mTLS authentication

Table of Contents

  1. About SSL Authentication
  2. Quick Review
  3. Creating a Certificate Authority
  4. 1-way “Standard” SSL Authentication
  5. 2-way “Mutual” SSL Authentication
  6. Advanced SSL Authentication: CRLs, CDP, and OCSP
  7. Concept Review

About SSL Authentication:

TLS Authentication or SSL authentication is nothing more than proving the authenticity of one or both parties in the formation of an TLS “Secure”  connection.

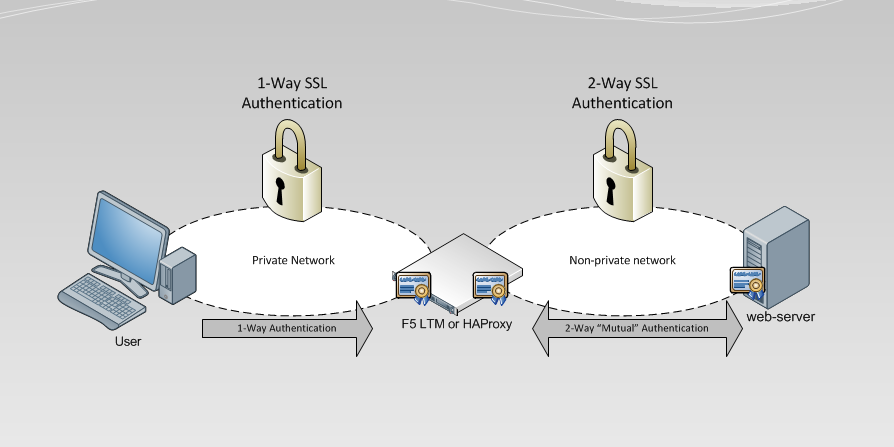
1-way “Standard” TLS Authentication is the most common, you use this every time you log into Facebook, your bank website, google, etc. The point of this type of authentication is for you (as the client) to verify the authenticity of the web site you are connecting to and form a secure channel of communication.

2-way “Mutual” mTLS Authentication is less common than the traditional “one-way” TLS authentication we are a custom to when visiting secured websites. When we connect to our banking website or our favorite web e-mail site, we as the client are verifying the identify of the site we are requesting content from. This “one-way” authentication allows us as the client to connect with confidence that the web site we are receiving content from has been verified. this authenticity check is performed by our client browser with a little help from a third-party certificate authority.

Let’s first review a one-way TLS connection.

  1. The Client browsers receives https://google.com in it’s address barf
  2. Client browsers knows based on https:// that this connection will require an SSL handshake and sends a CLIENT_HELLO to the destined web server (google). This includes other things like SSL/TLS version, acceptable ciphers, etc
  3. The web server receives the CLIENT_HELLO request and sends a SERVER_HELLO back to the client. SERVER_HELLO contains SSL version, acceptable ciphers, and the server certificate.
  4. The client receives the servers certificate and it is verified against a list of known Certificate Authorities.
  5. If the certificate is proven to be in good standing, the client sends back a pre-master secret is encrypted inside the server’s certificate. Remember only the server can decrypt anything encrypted with it’s certificate because only the server has the decryption key. Server Certificate encrypts, Server Key decrypt’s.
  6. At this point both client and server have the pre-master secret and can calculate a master secret to use to symmetrically encrypt and decrypt data between them.

So as we can see from a traditional TLS handshake, the client is never verified as authentic. Now, in most situations this is fine, as most connect types of this nature only need to verify the server because that is where the content is coming from.

The difference: In a 2-way mutual authenticated TLS handshake, the server will ask the client to send its own certificate for verification. Just like the client asking for the server’s certificate in the 1-way TLS handshake above, the server will perform verification of the client certificate before continuing to the pre-master and master secret phase of the SSL handshake. If authenticity of the client cannot be verified the server closes the connection.

How is mutual trust obtained? Both the server and client must generate their own TLS certificate and keys, and both must be signed by the same Certificate Authority. This ensures that both the server and the client’s certificate are trusted. This allows authentication to remain asymmetrical, instead of symmetrical. For example, rather than have a shared password that 3 clients and the server use to encrypt and decrypt data. Each client and the server have their own certificates and keys that will be used for communication with the server. Asymmetrical authentication and encryption is better at enforcing authenticity because everyone has their own cert and key used to establish a secure connection with the server. Symmetrical authentication is faster at encrypting and decrypting but suffers from having every client use the same key.

What happens if a client key is compromised? In the symmetrical authentication scenario, mentioned previously, you would have a serious security issue on your hands. Each client would be at risk and the likely hood of eavesdropping would increase. An attacker only has to obtain one key to gain visibility into every connection. Asymmetrical on the other hand has a different way of handling this. Because each client has it’s own certificate and key pair, and the signing of each certificate is performed by a third-party Certificate Authority, one simply has to revoke the compromised client in the form of a CRL certificate(more on this later). Other client connections will not be compromised or have to be re-generated. The server verifying the client certificate will fail only for the revoked for the compromised client.

What happens if my Certificate Authority’s key is compromised? This is the worst case scenario that can happen in your PKI infrastructure.An attacker can impose and generate a new certificate authority certificate and start signing certificates that can be used to fake authenticity. In essence break the certificate authority’s trust.  Keep in mind a Certificate Authority key cannot decrypt your connections.

Continue reading…

APC UPS — Replacing RBC43 Batteries in a SUA3000RM2U UPS

So it finally happened. The Batteries in my APC SUA3000RM2U finally went bad. I’ve had them for over 5 years so I am happy with there life. I’ve had to replace UPS Battery Cartridges and Packs before when working as a Data Center consultant. It is usually a simple and straight forward task. I would RMA the Battery Cartridge or Pack, if it’s under warranty, and then the manufacturer would send me back a new Battery Cartridge or Pack already filled with new batteries. Hot swap it with the old one and you are done.

However, this time it was my home unit and I don’t have warranty coverage or the extended one(usually purchased by an enterprise). So I went online looking for a Battery Cartridge replacement, $300-400!!!, o my! So I decided to try and replace the batteries themselves rather than the entire Battery Cartridge. I was able to find a pack of 8 batteries for around $83 with free expedite shipping. The following steps were what I did to replace each APC RBC43 battery inside the battery cartridge.

    1. Tools needed, New Batteries, Sharpie, Phillips Screwdriver, Utility knife(was in picture for cutting the new box of batteries open only, haha).

Continue reading…

Java Code — Blocklist2ACL 2.0 Released!!

**Updated 2.0.1 (rc1)**

Hey all, due to the success of the Blocklist2ACL.hta script from this previous post, I decided to port the code over from VBscript to Java. In effort to make the program more stable, cross-platform comparable, and future proof. I’ve received a few comments and PMs from users explaining that the Internet Explorer requirement was giving them issues. This is true, the old script relied heavily on Internet Explorer and what version you were running. Well enough of that, as I was able to port the code over to Java (no, not JavaScript), which has it’s own runtime objects and classes that I was able to utilize.

Here are some screenshots:

 Requirements:
JRE1.7+, grab it here.

Download:
Blocklist2ACL20rc1

SHA1      = 9DD863BBF0A5BC2EE110EF6C6F899F7AAC2A0ABD
SHA-256 = 245CA6DE2A93800742BD16B6506C6C3241A9E62410E294B76734875AB89A636C

F5 BIGIP — iRule Server Selection based on Client Source Address and Port

A interesting request came up today regarding a Web Service we provide to multiple clients, all of whom have peering points connecting their IP network to ours using private address. The request was to have certain clients hit a particular Web box in a Server Pool, while others hitting the other. At the same time only for certain ports. Some of our web applications use a variety of ports because of the proprietary application running. Ports include, all TCP, 80, 443, 5555, 6050.  So I set off to create an iRule to handle this and have it log to show how everything is being mapped, start to finish for each connection.

A Service little info:

  • Client PAT = 10.99.29.10
  • PrimaryWebCluster = 10.43.1.6
  • Web01 = 10.43.4.231
  • Web02 = 10.43.4.232
  • Ports = 80, 443, 5555, 6050

iRule: irule_SrvSelection_byClientSrcAndPort

when CLIENT_ACCEPTED {    
     if { [TCP::local_port] == 80 } {  
        if { [IP::addr [IP::client_addr] equals 10.99.29.10] } {        
        pool pool_ct_primarywebcluster_80 member 10.43.4.231 80
        log local0. "[IP::client_addr] is Web01"            
        } else {        
         pool pool_ct_primarywebcluster_80 member 10.43.4.232 80    
        log local0. "[IP::client_addr] is Web02"          
        }
    }
    if { [TCP::local_port] == 443 } {
        if { [IP::addr [IP::client_addr] equals 10.99.29.10] } {        
        pool pool_ct_primarywebcluster_443 member 10.43.4.231 443
        log local0. "[IP::client_addr] is Web01"            
        } else {        
         pool pool_ct_primarywebcluster_443 member 10.43.4.232 443
        log local0. "[IP::client_addr] is Web02"  
        }
    }
if { [TCP::local_port] == 5555 } {
        if { [IP::addr [IP::client_addr] equals 10.99.29.10] } {        
        pool pool_ct_primarywebcluster_5022 member 10.43.4.231 5022
        log local0. "[IP::client_addr] is Web01"   
        } else {        
         pool pool_ct_primarywebcluster_5022 member 10.43.4.232 5022
        log local0. "[IP::client_addr] is Web02"  
        }
    }
}

if { [TCP::local_port] == 6050 } {
        if { [IP::addr [IP::client_addr] equals 10.99.29.10] } {        
        pool pool_ct_primarywebcluster_5022 member 10.43.4.231 5022
        log local0. "[IP::client_addr] is Web01"   
        } else {        
         pool pool_ct_primarywebcluster_5022 member 10.43.4.232 5022
        log local0. "[IP::client_addr] is Web02"  
        }
    }
}
when SERVER_CONNECTED {
  log local0. "Connection from [IP::client_addr]:[TCP::client_port]. \
    Mapped to F5 Floating IP [serverside {IP::local_addr}]:[serverside {TCP::local_port}] \
    -->> [IP::server_addr]:[serverside {TCP::remote_port}]"
}


And to check, SSH into the Primary F5 in the pair and type bash to give you shell access. (BIGIP v11.5+),

tailf /var/log/ltm
tmm3[14225]: Rule /Common/irule_SrvSelection_byClientSrcAndPort : 10.99.29.10 is Web02
tmm3[14225]: Rule /Common/irule_SrvSelection_byClientSrcAndPort : Connection from 10.99.29.10:22524. to VIP 10.43.1.6  -->> 10.43.4.232:443
tmm3[14225]: Rule /Common/irule_SrvSelection_byClientSrcAndPort : 10.99.29.10 is Web02
tmm3[14225]: Rule /Common/irule_SrvSelection_byClientSrcAndPort : Connection from 10.99.29.10:10972. to VIP 10.43.1.6  -->> 10.43.4.232:443
tmm[14225]: Rule /Common/irule_SrvSelection_byClientSrcAndPort : 10.99.29.10 is Web02
tmm[14225]: Rule /Common/irule_SrvSelection_byClientSrcAndPort : Connection from 10.99.29.10:53187. to VIP 10.43.1.6  -->> 10.43.4.232:443
tmm2[14225]: Rule /Common/irule_SrvSelection_byClientSrcAndPort : 10.99.29.10 is Web02
tmm2[14225]: Rule /Common/irule_SrvSelection_byClientSrcAndPort : Connection from 10.99.29.10:15709. to VIP 10.43.1.6  -->> 10.43.4.232:443
tmm3[14225]: Rule /Common/irule_SrvSelection_byClientSrcAndPort : 10.99.29.10 is Web02
tmm3[14225]: Rule /Common/irule_SrvSelection_byClientSrcAndPort : Connection from 10.99.29.10:62364. to VIP 10.43.1.6  -->> 10.43.4.232:443
tmm3[14225]: Rule /Common/irule_SrvSelection_byClientSrcAndPort : 10.99.29.10 is Web02
tmm3[14225]: Rule /Common/irule_SrvSelection_byClientSrcAndPort : Connection from 10.99.29.10:62496. to VIP 10.43.1.6  -->> 10.43.4.232:443
tmm[14225]: Rule /Common/irule_SrvSelection_byClientSrcAndPort : 10.99.29.10 is Web02
tmm[14225]: Rule /Common/irule_SrvSelection_byClientSrcAndPort : Connection from 10.99.29.10:42691. to VIP 10.43.1.6  -->> 10.43.4.232:443
tmm1[14225]: Rule /Common/irule_SrvSelection_byClientSrcAndPort : 10.99.29.10 is Web02
tmm1[14225]: Rule /Common/irule_SrvSelection_byClientSrcAndPort : Connection from 10.99.29.10:28510. to VIP 10.43.1.6  -->> 10.43.4.232:443
tmm3[14225]: Rule /Common/irule_SrvSelection_byClientSrcAndPort : 10.99.29.10 is Web02
tmm3[14225]: Rule /Common/irule_SrvSelection_byClientSrcAndPort : Connection from 10.99.29.10:40464. to VIP 10.43.1.6  -->> 10.43.4.232:443
tmm1[14225]: Rule /Common/irule_SrvSelection_byClientSrcAndPort : 10.99.29.10 is Web02
tmm1[14225]: Rule /Common/irule_SrvSelection_byClientSrcAndPort : Connection from 10.99.29.10:4082. to VIP 10.43.1.6  -->> 10.43.4.232:443
tmm[14225]: Rule /Common/irule_SrvSelection_byClientSrcAndPort : 10.99.29.10 is Web02

Nice!!

VoIP:101 — Getting started with your VoIP Network — Part 1

VoIP networks, VoIP phones, VoIP extensions, VoIP everything. VoIP seems to be one of those black box buzz words that IT pros toss around, like the “CLOUD!” But what is really going on behind the scenes? How does VoIP protocols actually work? How can I setup a Call System? How do I get an outside number people can use to dial me?

This next series of blog posts (Part1, Part2, Part3) are dedicated to walking through the many aspects related to VoIP(Voice over Internet Protocol) and it’s features.

PART #1 — Laying the foundation for our VoIP network
  • The Lab — Our Network pieces.
  • SIP — Life blood of VoIP
  • FreePBX/Asterisk — Call System Exchange
  • Phone Provisioning (Manual/Auto)
    • Manual Provisioning with Zoiper, Liphone, UbiPhone
    • Auto-provisioning with Cisco 7941G and 7945G (7961G,7965G)
  • Making your first VoIP call!
PART #2 — Call routing, Call numbers, SIP Trunks
  • VoIP SIP Termination — Where VoIP ends and PSTN begins
  • SIP Trunks and DID(external PTSN numbers)
  • Outbound and Inbound Call Routing
  • Optional: Install g729 codec
PART #3 — Ring Groups, Extension Shortcuts, Call Centers, Voicemails, Secure SIP with TLS, etc
  • Ring Groups
  • Extension Speed Dialing
  • IVR (Interactive Voice Response) — useful for Business Directory Prompt
  • Advanced Voicemail Services
  • Securing SIP (TLS and SRTP)
  • Other Cool Features

Continue reading…

Linux — HP Proliant SNMP Agent setup

I wanted to put together a quick post on configuring the hp-snmp-agent and hp-health agents on HP ProLiant servers using Linux. I stumbled across the need for this while working on a project to implement Icinga to monitor server hardware via SNMP.

First things first, check that you are running a compatible HP ProLiant G series. The current stable release of both hp-snmp-agent and hp-helath only work with G5+. This is important to keep in mind because I ran into this issue when trying to install both agents on a G4 Proliant. The dpkg install would fail because it cannot start the hp-health agent under a G4 Proliant. I am installing the agents ontop of Debian 7.

Let’s download the packages, check http://downloads.linux.hp.com/SDR/repo/mcp/debian/pool/non-free/ for latest versions

cd /root 
mkdir hp-agents 
cd hp-agents 
wget http://downloads.linux.hp.com/SDR/repo/mcp/debian/pool/non-free/hp-health_10.0.0.1.3-4._amd64.deb 
wget http://downloads.linux.hp.com/SDR/repo/mcp/debian/pool/non-free/hp-snmp-agents_10.0.0.1.23-21._amd64.deb

You will need snmp, snmpd, and some other library files before install the packages.

apt-get install snmpd snmp lib32gcc1 libc6-i386 libsnmp30

Now install the two(2) agents. Start with hp-health first, then install hp-snmp-agent

dpkg -i hp-health*.deb 
dpkg -i hp-snmp-agents*.deb

Continue reading…

CiscoASA — AnyConnect SSL VPN Setup

As promised here is my article on how to setup a SSL remote VPN, an alternative to IPSec Remote VPN from this article. What’s great is the steps to setup an SSL remote VPN service are very similar to IPSec remote VPN!! So let’s get started.

As with IPSec remote VPN we will need similar design considerations for SSL remote VPN.

  • First, a subnet is required for client’s to be put on when successfully authenticated and authorized via the SSL remote VPN. This can be the same subnet as one already existing on your network or a separate one with a firewall in-between The later being best in practice and security.
  • Secondly, deciding on split-tunneling vs all-tunneling. The difference being on the client would you like all traffic to be forced across the tunnel or allow clients to communicate with both their local network and the networks on the otherside of the VPN. For best practice and security, all-tunneling is recommended.
  • Third, Access Lists and tunneled networks. Here we will decided what SSL remote VPN users will have have access to in our other networks. We will also, in the case of split-tunneling, create an access-list of what networks to tunnel for the Remote VPN user.
  • Fourth, provisioning standard network services for VPN user’s. Remote VPN user’s will need a default gateway, DNS servers, domain suffix, an address pool, proxy settings, etc.

Continue reading…