Welcome back to Part #2 of this series on setting up your VoIP network!. (Part #1, Part #2, Part #3)
PART #2 — Call routing, Call numbers, SIP Trunks
- VoIP SIP Termination — Where VoIP ends and PSTN begins
- SIP Trunks and DID(external PTSN numbers)
- Inbound and Outbound Call Routing
- Optional: Install g729 codec
As you can see we have a lot to cover, so let’s get ready for ROUND 2!!!
VoIP SIP Termination
Where does VoIP ends and PSTN beings? This is a tough question, even tougher now-a-days, because even PSTN looking numbers may be carried over a VoIP backbone. In a traditional sense, VoIP for a small business or even an enterprise usually ends at the Demarcation area of where the PSTN physical lines come in to the building. This isn’t an exact science, but the two do meet somewhere to create, for lack of a better word, a peering point. (Can you tell I’m a network guy? :-p). This can be as simple as a modem card in your PBX that ties you into the PSTN Network. For example, your PBX has a standard telephone modem card where the telephone company has assigned you a POTs line. You in effect, have bridge your VoIP network and PSTN. Your VoIP users can use the PSTN number you were assigned to make outbound calls. Pretty neat!, but not the most efficient. What happens if 2 of your VoIP users want to make outbound calls?? No dice. You could have 2 lines with a 4-pair wire, etc. If you had a spare T1 line you could use that to gain multiple outside lines into your VoIP network. I am not going to get into all the different combinations of how to go from VoIP to PSTN and achieve an outside number, but I will go over achieving an outside number by using a SIP trunk to a DID provider. The difference between using a SIP trunk and a Telecom Trunk is one is achieved over standard IP and the Internet, the other over a Telecom technology (POTs, ISDN, T1, E1, PRI, etc).
I will go over the method of using a SIP trunk to DID(Direct Inward Dialing) and DOD(Direct Outward Dialing) provider to terminate SIP and begin your telephone number(s). Imaging you have a Telephone Trunk with a telephone provider and they give you 10 lines. Using a PBX with let’s say 100 users, how do you divide up those 10 lines to be used by the 100 users. Obviously there is a change of over subscription here, but you get the point. We need a way to map the lines of the VoIP system to the lines of the Telephone system. This is where DID and DOD comes in. The telepone company assigns you the 10 lines with their respected Telephone numbers and forwards those numbers to your system. Your system has no way of differentiating the different lines unless we use some sort of signally identifier such as DID. So if you have a telephone number of 585-555-1234 that reaches your PBX, your DID provider will assign the DID identifier to the signal so that our PBX can differentiate it and pass it up to the Inbound Call Routing rules. (more on that later in this article). The same principle apply to Outbound calls using DOD. Our PBX is responsible for setting the DOD and pass it up to the DID provider. Here are Some Diagrams to hopefully help.
 *Image owned by phoneinstallers.net
 *
*SIP Trunks and DID(external PTSN numbers)
The two DID provides(List Here) I will be looking at are DIDLogic and CallWithUs. (You could strictly use a SIP trunking provider without DID, but that would only be useful if all your branch offices and SIP users didn’t need to make any calls to a phone number on a Telecom network.)
The first thing I look for when looking at DID providers is how geo-diverse they are. This may not be the primary attribute yo ulook for, but for me I want to make sure I will be able to have a Telecom presence in multiple parts of the world. If the DID proivder has a termination point in that area, usually, the calling rate is reduced because it is a direct interface to the Local PTSN there. Check out DIDLogics map https://didlogic.com/business/network and CallWithUs list of Available DIDs. Another is DIDWW Coverage List.
I ended up going with CallWithUs because of the pricing model for DIDs and call rate. They seem to be the cheapest for the areas I wanted to have DID presence. Their calling rates are pay as you go, sortof… You Sign up for an account for Free, and load funds via PayPal into it. There is a monthly charge for each DID (Telecom Number) and you get 3000 minutes a month received calls and outbound calls depend on what area you are calling, see their call rate list. I felt this was the easiest to set up. You may notice in your DID provider comparision that 99% of them including either a lot of inbound call minutes, sometimes unlimited, but charge for outbound calls. The reason for this is, there is little or not cost for them to receive calls, but in order to set up a outbound call route through their network and others, there is a cost depending on how many paths have to be activated and channels need to be reserved across the path. There is probably a more detailed reason for this, but that is beyond my understanding of it. Just remember, generating a outbound call cost money, receiving inbound calls cost very little.
Let’s set one up. Pick the location you want, I am going to pick calling code +1 (United States), Area code 860, Local Exchange — MIddletown, and finally Pick a Number (4.49).

- Setup Price = $3 to reserve the number, one time fee.
- Month Price = $4.49/mo, duh!
- Free Incoming Minutes = 3000 minutes a month on inbound calls. (Remember Inbound calls don’t cost them that much)
- After Free Minute = $0.008/min after you use the 3000 minutes included.
- Channels = This is important, each channel you have means you can open a line up. So with this
- Vendor Rating = Rating system for PTSN vendors. See here.
After you signed up and purchased your first number, log into the CallWithUs Admin portal. First go to VoIP menu to grab your account number (this was also emailed to you when you set up your CallWithUs account. In our case it is 123456789

Here Click edit and fill in a passowrd. This Username (123456789) and Password will be used in the SIP trunking/peering process. More on this in a bit.
Go to DID menu, click on the DID you just bought and select add. A new window will come up, here fill in as follows:
- Destination = SIP/123456789/18607400223 , this is used by CallWithUs to know what account SIP should be forwarded to. Think if you had 10 FreePBX hosts all different.
- DID = 18607400223 , This is the DID field to fill in when forwarding the call, and it will be received by FreePBX

Now back to FreePBX Admin Portal and go to Connectivity ==> Trunks and click Add Trunk
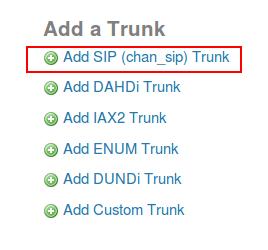
- General Settings
- Fill in a Trunk Name for this Trunk. I chose TRUNK-callwithus, so I know it’s a SIP Trunk with the callwithus provider.
- Max Channels reflects the max number of channels that Asterisk will try to open based on the demand. For example if you put 10 channels max and 11 users want to open a call to the outside, Asterisk will prompt them saying “All circuits are busy”
- Dialed Number Manipulation Rules. Here is where we filter the outgoing numbers to pass over the trunk. This allows us to prevent users from making international calls, etc. CallWithUs doesn’t care where destination is. For example, if a user dialed something like 27727161571 (which is South Africa), CallWithUs will process the request.
- Example Dialed Number Rules for 1NXXNXXXXXX
- {1-9} = number has to be present
- {X} = match any number 0-9
- {Z} = match any number 1-9
- {N} = match any number 2-9
- Notes: = This dialed number rule will allow any call within the US to be passed to CallWithUs. The US using country code is “1”, list of codes here. Another example from above is South Africa which country code is “27”.
- Example Dialed Number Rules for 1NXXNXXXXXX
- Outgoing Settings
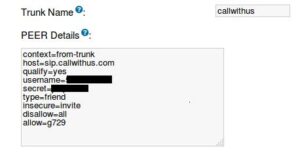
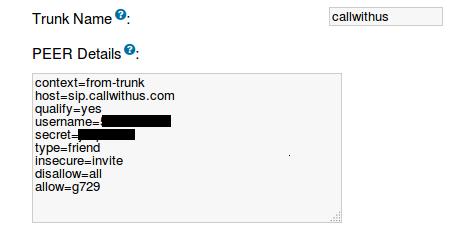
- Trunk Name = will show up in Asterisk Peer Status, can be any string, I chose “callwithus”
- PEER Details = here is where we set the CallWithUs peer login info, Asterisk PBX configuration
Notice: g729 is not installed with the default Asterisk installation.
- Incoming Settings = Make sure nothing in in the USER Details textfield
- Register String = get from here Asterisk PBX configuration
- {user account}:{user password}@sip.callwithus.com
- Click Submit Changes!
Let’s check to see if the TRUNK was successfully connected.
- Click Reports –> Asterisk Info
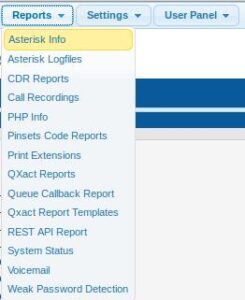
- On the Right hand side, click Peers


Nice work! We’ve got our Trunk up. Almost ready to make external calls. Next stop, Outbound and Inbound Calling Routes
Inbound and Outbound Calling Routes
Calling routes is the logic behind how our PBX determines when a user dials a number if it is destined for a external PBX or an external PSTN, or whatever. When users call each other using their extensions the PBX knows that these are calls within the same PBX domain. However when a user wants to pick up there phone and order a pizza at the shop down the street, we need to tell the PBX how to intercept and process these calls differently. The difference between Inbound and Outbound Routes is direction of the call from the PBX’s perspective. Inbound routes are calls coming into the PBX from an External source, in our setup it will be coming from CallWithUs. Outbound routes are used when the call originates from one of our local users/extensions and is destined to an External source (Like when ordering pizza).
Inbound Routes:
Let’s get started by going to Connectivty –> Inbound Routes
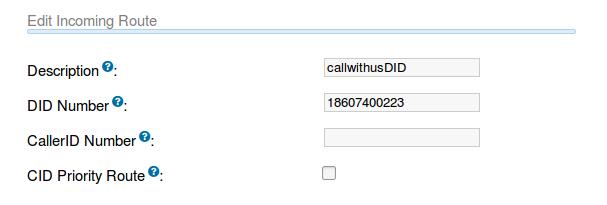
- Description = Something like IncomingFromCallwithUs or callwithusDID
- DID Number = This is the DID to match on for this Incoming Route, for our example it will be the number we purchased from CallWithUs (18607400223)
- Caller ID Number = Here you can manually set the Caller ID that shows up on the destined phone. For example, setting it to “External Call” will show on the destined phone. It is best to keep this blank. Most SIP providers will try to maintain the DID from which they were sent from, that way the number calling in will show on the Caller ID.
- CID Priority Route = Use as a catch all when the incoming DID is not recongized.
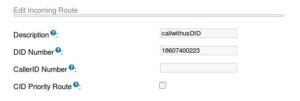
- Skip down to “Set Destination”
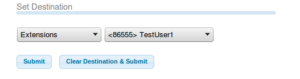
- Set Destination = this is where we tell the PBX what we want to do with the incoming call with this DID. There are many options:
- Terminate Call = hangs up call, Could be used in provisioning until destined extension is ready.
- Extensions = set the destination as an internal extension.
- Ring Groups = set destination as a defined Ring Group. Use this to ring multiple extensions, like in a call center.
- Voicemail = set the destination as an extension’s Voicemail. Could be useful if you are away for a long time.
- Conferences = set the destination as a conference extension, like a meetme or gotomeeting.
- Directory = set the destination as a pre-recorded audio directory.
- IVR = set the destination as a Interactive Voice Response, this is similar to when you call into a business and you are prompted to make a selection.

Outbound Routes:
Go to Connectivity –> Outbound Routes
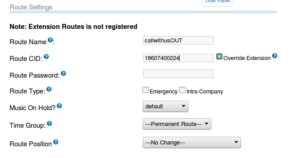
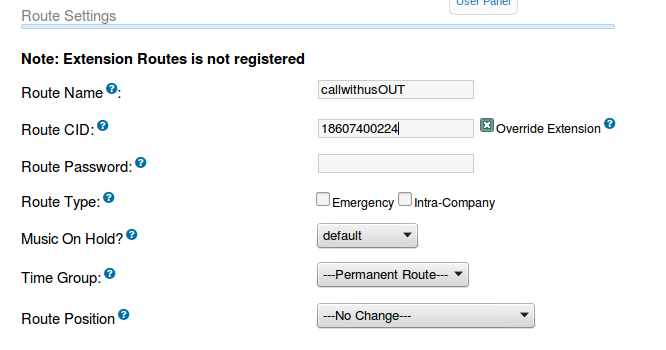
- Route Settings
- Route Name = a way to distinguish the outbound route, I put callwithusOUT
- Route CID = this is the caller ID to set on the outbound call when it leaves our local PBX domain. Set this to the 18607400223
- Override Extension = by default Asterisk will try to set the outbound CID as the extension generating the call. This will not work in 99% of cases since it is not a complete number including country code. Override ensure Asterisk will inject the CID we specified here.
- Route Password = PIN sequence that must be entered to allow the Outbound Route to be used.
- Additional Settings
- Call Recording = whether or not to record the call based on conditions. Set to “Don’t Care”.
- PIN Set = you can set a pre-defined PIN here that must be entered to use this Outbound Route, handy for making sure not anyone can dial out. (Similar to Route Password, except you can have multiple PINs)
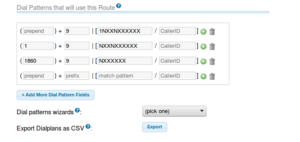
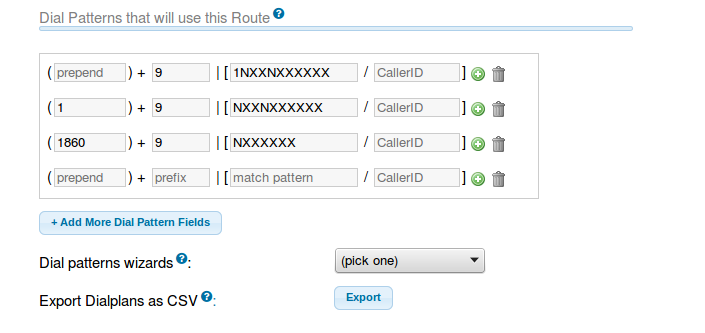
- Dial Patterns that will use this Route:
- Prepend = Numbers taht will be prepended to the OUtbound route when passing it to the CallWithUs Trunk. This is usful for when users use the short version of a telephone number, like 740-0224 instead of 1-860-740-0224.
- Prefix = This is the number the user must dial to reach an outside line. This is set on the phones themselves, so here we have to make sure we remove it or the number will be sent like this 91-860-740-0224
- Match Patter = Simlar to the Dialed Number Filter, we have to match based on the pattern which dialed numbers to act on with this Outbound Route.
- Caller ID = Can be used in conjuction with the Match Patter
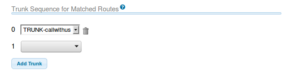
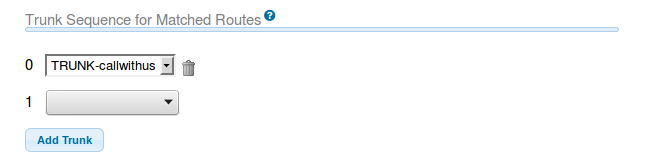
- Trunk Sequence for Matched Routes = used to select Trunk to use.
- Select TRUNK-callwithus
- Select TRUNK-callwithus
- Outbound Congestion Destionation = where to send the user if there is congestion, aka too many channels are being used.


Optional: Install g729 codec
Better call quality and lower cost for call routes. g729 is an efficient codec that is used to encode and decode a calls audio. It is used by many SIP hubs/exchanges and will lower the cost of a call route. I’ve seen this personally the cost of a call route go down drastically if g729 is available as a codec.
Following Ahmed El-Gamil’s blog, I was able to install g729 codec on my FreePBX system. You can see what codecs you have installed by issuing a asterisk -rx “core show codecs” on your Asterisk server.
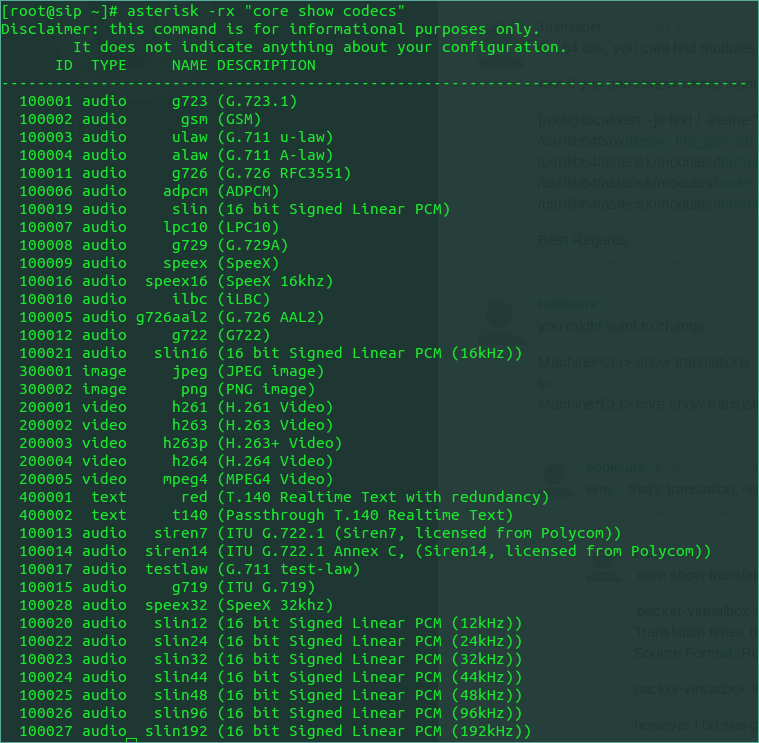
Then just add disallow=all and allow=g729 to the PEER details in your CallWithUs TRUNK settings.

Go back to PART#1…..or………Continute to PART#3

1 Response
[…] next series of blog posts (Part1, Part2, Part3) are dedicated to walking through the many aspects related to VoIP(Voice over Internet […]