As promised here is my article on how to setup a SSL remote VPN, an alternative to IPSec Remote VPN from this article. What’s great is the steps to setup an SSL remote VPN service are very similar to IPSec remote VPN!! So let’s get started.
As with IPSec remote VPN we will need similar design considerations for SSL remote VPN.
- First, a subnet is required for client’s to be put on when successfully authenticated and authorized via the SSL remote VPN. This can be the same subnet as one already existing on your network or a separate one with a firewall in-between The later being best in practice and security.
- Secondly, deciding on split-tunneling vs all-tunneling. The difference being on the client would you like all traffic to be forced across the tunnel or allow clients to communicate with both their local network and the networks on the otherside of the VPN. For best practice and security, all-tunneling is recommended.
- Third, Access Lists and tunneled networks. Here we will decided what SSL remote VPN users will have have access to in our other networks. We will also, in the case of split-tunneling, create an access-list of what networks to tunnel for the Remote VPN user.
- Fourth, provisioning standard network services for VPN user’s. Remote VPN user’s will need a default gateway, DNS servers, domain suffix, an address pool, proxy settings, etc.
Configuring the Server Side (Cisco ASA):
-
-
First Step: Create an Address Pool for SSL VPN clients.
Decided on the subnet you will be assigning to SSLremote VPN clients. For this article I will choose 172.21.1.0/24, staring at .10 and ending at .250.
ciscoasa(config)# ip local pool pool-AnyConnect l 172.21.0.10-172.21.0.250 mask 255.255.255.0
-
Second Step: Make ACLs for allowed communication and networks to push across the tunnel for the client. (assuming networks we want to allow communication with are 192.168.1.0/24 and we will force it to be tunnelled as well
ciscoasa(config)# object-group network obj-AnyConnect
ciscoasa(config-network-object-group)# network-object 172.21.0.0 255.255.255.0

ciscoasa(config)# object-group network obj-PROTECTED-NETWORK
ciscoasa(config-network-object-group)# network-object 192.168.1.0 255.255.255.0

ciscoasa(config)# access-list vpnACL extened permit ip object-group obj-AnyConnect object-group obj-PROTECTED-NETWORK/pre>
-
Next step: Make an additional ACL to identify the traffic we would like the remote client to know about on the other side of the tunnel (For Split-Tunneled scenarios).
ciscoasa(config)# access-list tunneledNets standard permit 192.168.1.0 255.255.255.0
ciscoasa(config)# access-list tunneledNets standard permit 192.168.2.0 255.255.255.0
ciscoasa(config)# access-list tunneledNets standard permit 192.168.3.0 255.255.255.0
-
Moving on: We have to create an identify NAT because our VPN traffic communicating with our Protected networks will traverse two different interfaces on the Cisco ASA. We will not be performing NAT manipulation, but the statement is required because of Cisco ASA standard security policy when traversing traffic between different interfaces.
ciscoasa(config)# nat (outside,inside) source static obj-AnyConnect obj-AnyConnect destination obj-PROTECTED-NETWORK obj-PROTECTED-NETWORK
-
VPN Attributes: Let’s set up group-policy to tie together all the attributes we are going to send to the remote client when they connect.
ciscoasa(config)# group-policy AnyConnect_GroupPolicy attributes
ciscoasa(config-group-policy)# banner value Welcome to thejimmahknows VPN
ciscoasa(config-group-policy)# vpn-idle-timeout 30
ciscoasa(config-group-policy)# vpn-session-timeout none
ciscoasa(config-group-policy)# vpn-filter value vpnACL
ciscoasa(config-group-policy)# vpn-tunnel-protocol ssl-client
ciscoasa(config-group-policy)# split-tunnel-policy tunnelspecified
ciscoasa(config-group-policy)# split-tunnel-network-list value tunneledNets
ciscoasa(config-group-policy)# dns-server value 192.168.1.3 192.168.3.4
ciscoasa(config-group-policy)# default-domain value internaldomain.local
ciscoasa(config-group-policy)# split-tunnel-all-dns enable
ciscoasa(config-group-policy)# address-pools value  pool-AnyConnect
ciscoasa(config-group-policy)# ipv6-address-pools none
Let’s step thru this:
- AnyConnect_GroupPolicy {internal/external} — Where to get attributes from? Internal = from this ASA, External = from external server like RADIUS or Cisco ACS
- AnyConnect_GroupPolicy attributes — First we have to create a new group policy which will push down to the client all the network services we want to assign them.
- banner value {your text} — This is not technically needed, however I like it because it gives the user a pop-up from their VPN software that they have successfully connected.
- vpn-idle-time {min} — Helpful to terminate VPN connections that are idle for too long.
- vpn-session-timeout {min} —
- vpn-filter value {your ACL} — This is where you set the ACL with the networks your VPN Network is allowed to communicate with others inside your network.
- vpn-tunnel protocol {ssl-client} — SSL Client or SSL Web Cilentless
- split-tunnel-policy {tunnelspecified/tunnelall} — Sets the split-tunneling policy, if any.
- split-tunnel-network-list {standard ACL} — what networks on far side to tell the client about.
- dns-server value {dns servers} — Specify the DNS servers to have your remote VPN clients use.
- default-domain value {windows domain name} — Supplied to client for DNS suffix.
- split-tunnel-all-dns {enable/disable} — Tells client whet hers to ask far end of the tunnel for DNS resolution or use local network DNS. Best practice is to enable this and force SSL remote VPN clients to always ask far end for DNS resolution.
- address-pools value {IP pool object} — Where to get IPs for SSL remote VPN clients from.
- ipv6-address-pools {IP pool object/none} — IPv6 pools? Nah.
- NOTE:For more information and other attributes, see the Cisco documentation here.
-
SSL VPN Service : Here we set up ASA to enable the SSL VPN service
ciscoasa(config)# webvpn
ciscoasa(config-webvpn)# port 443
ciscoasa(config-webvpn)# enable outside
ciscoasa(config-webvpn)# anyconnect-essentials
ciscoasa(config-webvpn)# anyconnect enable
ciscoasa(config-webvpn)# tunnel-group-list enable
- port 443 = what port the service listens on. Both Client application and Web page listen on this port.
- enable outside = this will enable the service on the interface you specify. Keep in mind, it will assign it to the primary IP of the interface only.
- anyconnect-esstentials = this is the basic license for AnyConnect, it is limited to the Cisco ASA platform. Do a show version to see how many seats your ASA versiion supports.
- tunnel-group-list enable = This is handy, when enabled it appears on the SSL web page to your users. It is a drop-down box listing the different tunnel-groups they can choose from. Handy on geo-diverse data centers. Have users connect to the closest Data center, or pull down different tunnel-group attributes.
-
AnyConnect Client images: Set which version of the AnyConnect client you will offer to your users for download.
ciscoasa(config-webvpn)# anyconnect image disk0:/anyconnect-win-4.0.000061-k9.pkg 1 regex "Windows NT"
ciscoasa(config-webvpn)# anyconnect image disk0:/anyconnect-macosx-i386-4.0.00061-k9.pkg 2 regex "PPC Mac OS X"
NOTE: You can download the AnyConnect images from Cisco’s support and download page. Download the Full Instatallation .pkg versions so you can upload them onto your ASA. The regex part matches the user-agent sent by the client. This is helpful when providing Windows, Mac, and Linux with AnyConnect clients.
-
Last Step: Putting it all together with a Tunnel Group object.
ciscoasa(config)# tunnel-group AnyConnect-TunnelGroup type remote-access
ciscoasa(config)# tunnel-group AnyConnect-TunnelGroup general-attributes
ciscoasa(config-tunnel-general)# default-group-policy AnyConnect-GroupPolicy

ciscoasa(config)# tunnel-group AnyConnect-TunnelGroup webvpn
ciscoasa(config-tunnel-webvpn)# group-alias thejimmahknows Group
NOTE: Type remote-access = tells ASA this is a remote-access tunnel and not a Site-to-Site tunnel. We also bind what Group Policy to use with this tunnel here. The group-alias part is the name that will appear in the dropdown list to the user. Remember when I said you can have multiple group-policies, this is where you would give them the names that would appear to the users for selection.
-
Creating users within the LOCAL user-table on your Cisco ASA
ciscoasa(config)# username testuser password *****

ciscoasa(config)# username testuser attributes
ciscoasa(config-username)# vpn-framed-ip-address 172.21.0.55
NOTE: vpn-gramed-ip-address = sets the IP address the user will get. Kinda of like DHCP reservation.
Configuring the Client Side
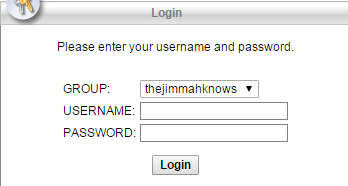
Windows — Using SSL remote VPN Client
- Browse to your Cisco ASA interface. In my case it was the outside interface.
- Configuration:
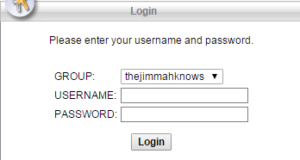


- Wahoo!!
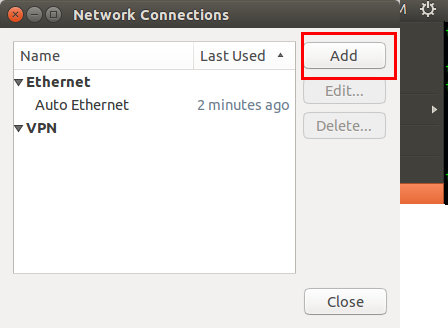
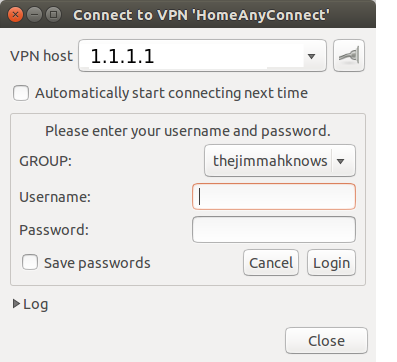
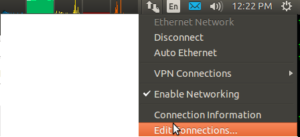
Ubuntu — Using openconnect package
- Install :
sudo apt-get install network-manager-openconnect
- Configure:

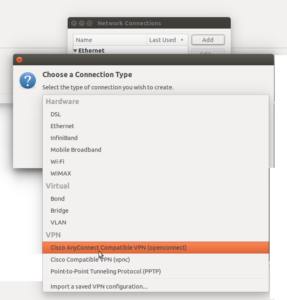
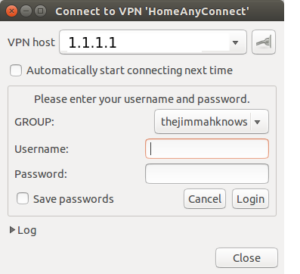
- Tada!!
Sources:
-