I come from a strong BIG IP F5 background and wanted to explorer alternatives to their LTM product line. BIG IP F5 LTMs are their Highly Availability and Load-Balancing network products, see here. They are primarily used as a means to mitigate infrastructure failover across server clusters. How this is done is by use of a floating IP address that is shared between two independent devices, in this case LTMs. One LTM is always active and responds to request for this Floating IP from client devices. In the event of a device failure, the secondary LTM will sense this via a variety of means and take over as the Active LTM. This essentially is how the High-Availability or failover is maintained at an infrastructure connectivity perspective. The second piece to these devices is their load-balancing functionality. Load-balancing has many forms, for this case, we are talking about network service load balancing (pretty much layer 4 and above. This allows more intelligence into the distribution of request to a server farm or cluster.
Now as I stated previously, I was looking into alternative solutions and I came across a GNU free software called keepalived which seemed to do exactly what I needed. Remember their are two pieces I wanted to fullfill as an alternative solution to LTM; it has to be able to maintain Network failover (seamlessly) and provide load-balancing for serivce endpoints. Also, surprisingly, much of the configuration statements in the keepalived.conf look very simlar to F5 LTM bigip.conf file.
Let’s get started. We will need;
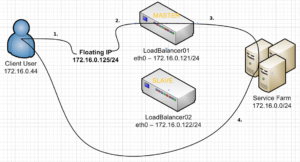
- 2 Test Web Servers with an IP address for each (172.16.0.101 and 172.16.0.102)
- 2 LoadBalancers which will run Keepalived, each with an IP (172.16.0.121 and 172.16.0.122)
- 1 Floating IP that each LoadBlaancer will share. (172.16.0.125)
Now, go ahead and set up your Test Web Servers. IP them and change each’s default index.html to say Test Web 1 and Test Web 2 respectively.


Setting up our 1st Load Balancer
-
- I am install keepalived on Debian 7 and using apt-get
LoadBalancer01apt-get install keepalived vim tcpdump - Next we have to start a new keepalived.conf file
LoadBalancer01vi /etc/keepalived/keepalived.conf - Enable no binding of IPs to interfaces, this allows multiple IPs on a single interface
LoadBalancer01echo "net.ipv4.ip_nonlocal_bind = 1" >> /etc/sysctl.conf
- I am install keepalived on Debian 7 and using apt-get
- Paste the following:
global_defs {
        lvs_id LoadBalancer01 #Unique Name of this Load Balancer
}

vrrp_sync_group VG1 {
        group {
                FloatIP01
        }
}

vrrp_instance FloatIP01 {
        state MASTER
        interface eth0
        virtual_router_id 1
        priority 101
        advert_int 1
        virtual_ipaddress {
                172.16.0.125/25 #floating IP
        }
}

virtual_server 172.16.0.125 80 { #Here is our Floating IP configuration Object
        delay_loop 10
        lb_algo rr
        lb_kind DR
        persistence_timeout 9600
        protocol TCP

        real_server 172.16.0.101 80 {
                weight 10
                TCP_CHECK {
                        connect_timeout 3
                        connect_port 80
                }
        }
       real_server 172.16.0.102 80 {
                weight 10
                TCP_CHECK {
                        connect_timeout 3
                        connect_port 80
                }
        }
}
Let’s go over some of these configuration items:
- lvs_id {String} — This is the unique name of the Load Balancer, each Load balancer should have a unique name.
- vrrp_sync_group {String} — This is the sync group shared by all Load Balancers in the Highly Available cluster, in here we identify which Floating IP Objects to keep track of.Note FloatIP01 can be whatever you want, but it has to match the vrrp_instance below!
- vrrp_instance {String} — This is declaration of the Floating IP Object, remember to put this in the above sync group.
- state {MASTER|SLAVE} — We can explicitly set MASTER or SLAVE of this Load Balancer, this will be overriden if you use the Priority option.
- interface ethX — Here we have to instruct which local NIC to use to advertise the Floating IP address.
- virtual_router_id ## — We have to set a unique number for this Floating IP, it will be the same on all Load Balancers that particiapte with this Floating IP
- priority ### — Highest number get’s precedence on being the MASTER. This is only useful if you have 2 or more Load Balancers. This is useful to make the election of who will be the MASTER.
- advert_int ### — Number in seconds of when to vote again on which Load Balancer should be master. The lower the number the better the High-Availability will be, but more CPU demanding on each Load-Balancer.
- virtual_ipaddress — This block is where we declare the Floating IP or Virtual IP. You can have multiple IPs in here.
- virtual_server IP PORT — Declare a new Virtual IP configuration object, you should have one of these for every Floating IP.
- delay_loop ## — In seconds when to check the reported status of each Real Server.—
- lb_algo {String} — Here we have to set which Load Balance Algorithm to use. they are;
- rr = round robin
- wrr = weighted round robin
- lc = least connection (I like this one the best!)
- wlc = weighted least connection scheduling>
- sh = shortest expected delay
- dh = destination hashing
- lblc = locality based least connection
- lb_kind {String} — How will we pass along the requests to the service endpoints;
- dr = direct routing
- nat = nat forwarding
- tun = IP-to-IP tunnel
- persistence_timeout #### — In seconds how long should new connections be persisted to the same service endpoint. This may not be needed. Work with your app teams for this
- protocol {UDP|TCP} — What Layer 4 protocol will this Virtual Server use.
- real_server IP PORT — Service Endpoint IP and PORT
- weight ## — Will only work when using a weighted Load balance Algorithm, higher the number the more likely it will be picked.
- TCP_CHECK — Declare a new TCP healthcheck
- connect_timeout ## — Seconds before service endpoint will be declared dead.
- connect_port ## — Which port to do the TCP CHECK on, can have multiple!!
- Wow! That was a lot to go over, but it just goes to show how much you can modify the configuration to suite your needs. Let’s copy this config to the other Load Balancer(assuming you already installed keepalived);
scp /etc/keepalived/keepalived.conf root@172.16.0.122:/etc/keepalived/keepalived.conf - Change the lvsid, State, Priority options on LoadBalancer02;
vi /etc/keepalived/keepalived.confFind and change these lines….
[...]
lvs_id LoadBalancer02 #Unique Name of this Load Balancer
state SLAVE
priority 100
[...]
DR/NAT Forwarding the Issue
In order to use keepalived’s load-balancing functionality we must understand how these two Forwarding methods are working. We must keep in mind that keepalived is a VRRP router first and a load-balancer second.
In our Direct Route setup above, a IP packet traverses the following path:
- Client A –> Submits request with DST IP of 172.16.0.125
- An ARP is request to figure out whose MAC 172.16.0.125 belongs to
- The MASTER LoadBalancer01 replies with “That’s me!”
- a Layer 2 communication occurs between ClientA and LoadBalancer01
- LoadBalancer01 sees in it’s config file to Directly Route this packet to 1 of the 2 Web servers
- Web Server 01 is selected and the packet is routed from LoadBalancer01 to the Web server
- Web Server 01 recieves the packet, and upon de-encapsulating it, sees that the DST IP is 172.16.0.125, but Web Server 01’s IP is 172.16.0.101
- Web Server 01 discards the packet!!!!
NOTICE: As you can see, we have a problem with this set up. In order to remedy this, for each Floating IP you use, each service endpoint (real_server) will require a static IP definition for it. So if Web Server 01 is a Linux box, you will need to enter this command on each Web Server.
WebServer01 ip addr add 172.16.0.125 dev loWebServer02 ip addr add 172.16.0.125 dev loWhat we have done here is given an loopback IP address to each Web Server of the Floating IP, that way when a packet arrives on either Web Server’s interface it will not discard it, but say hey! that’s me and process the request.
DR Forwarding in Action
- Client sends IP Packet with DST IP of 172.16.0.125 and a SRC IP of 172.16.0.44
- LoadBalancer01(MASTER) accepts Packet
- LoadBalancer01(MASTER) Routes/Forwards Packet Directly to WebServer01(172.16.0.101)
- WebServer01 examines Packet with DST IP of 172.16.0.125, which belongs to it’s Loopback Interface, response to request by sending an IP Packet to DST IP of 172.16.0.44
NOTE: The return path bypasses the LoadBalancer, this may be a security concern, check with your infrastructure team. ***This setup will only work if both clients, LoadBalancers, and service endpoints are on the same subnet! ***
NAT Forwarding in Action
Make sure you perform this on each LoadBalancer:
echo "1" > /proc/sys/net/ipv4/ip_forwardNote: This enables IP Forwarding/Routing on the LoadBalancers
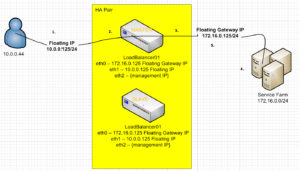
- Client sends IP Packet with destination of the Floating IP (10.0.0.125)
- Packet is received by MASTER (LoadBalancer01)
- LoadBalancer01 decides which Web server to Forward the packet to, in this case Web Server01 (172.16.0.101)
- WebServer01 recieces packet from Client (10.0.0.44) responds to request, however it does not have a direct link to the 10.0.0.0 network, so it is forwarded to it’s default gateway. In this case the Floating Gateway IP (172.16.0.125) NOTE: This allows keepalived to handle the routing
- Finally, the Client recieves a packet back from the Floating IP (10.0.0.125). This makes it look to the client that 10.0.0.125 is the WebServer
NOTE: See Wireshark Screen-shot from Client

We need something else….
So as you can see Keepalived is great for maintaining High availability and connectivity from a IP network perspective. However, having to make manually changes on service endpoints (Web Server01 +02) creates a management and scalability problem. If for every service endpoint you had to either add a loopback IP address or change it’s default gateway(you could also add a static route) to each server, the idea of keepalived might not be as appealing. We need another piece of software that can bridge the gap between routing redundancy that keepalived provides, and service endpoint independence. For that we turn to HAProxy. HAProxy is a Full Reverse-Proxy application, it does not route/forward requests to service endpoints, instead it takes what a client is requesting and on behalf of the client connects to the service endpoint itself!
Sources:
- http://www.keepalived.org/pdf/UserGuide.pdf
- http://translate.google.com/translate?hl=en&sl=zh-CN&u=http://my.opera.com/sonbka2002/blog/2012/07/13/centos6-2-lvs-dr-keepalived-2&prev=/search%3Fq%3Dkeepalived%2Bdr%26client%3Dubuntu%26channel%3Dfs%26biw%3D1920%26bih%3D923
- http://archive.org/help/HOWTO.loadbalancing.html


Thank you so much for the information, I found your article through google, I used digital ocean to run some testing VPS. I was interested to have my VPSs at digital ocean highly available but they don’t provide extra IP as floating IP address, all they have public IP address assigned to VPS and optional they can assign private IP as well from their private pool internal network.
I need little bit more info if you don’t mind about the concept. If I build one load balancer as this article stated https://www.digitalocean.com/community/articles/how-to-use-haproxy-to-set-up-http-load-balancing-on-an-ubuntu-vps do I still need keepalive? meaning, if my web1 server shuts down, won’t the HAproxy route the traffic to Web2 server since HAproxy aware of both of them? If it’s not possible, is it logically possible to have keepalive and HAproxy run at the same machine without the floating IP address? the digital ocean article didn’t mention about keepalive, so what do you think? What are my choices?
And what do you think about using AWS instead of Digital Ocean? They do have Virtual Private Cloud (VPC) where you can build your own network and have internal IP addresses as much as you want, but they are expensive, however, do you believe they can be good alternative for digital ocean?
By they way, AWS do have elastic public IP address as well, is it similar to the floating IP address you mentioned but at the public side instead? is it used to balance between sites in this case, rather, balance between servers using floating private IP address?
Finally, cloudflare can provide me with round-robin DNS, they said, if you have 2 web servers and each one of them got its own public IP address, then you can insert 2 A records pointing to the same domain name. Can round-robin be an alternative to keepalive and HAProxy?
I am so sorry for my long list of questions, but I am pretty sure there will be some folks out there like myself passed through your article and answering these questions will be help for all of us.
Thank you.
Hi Imad! thank you for the great comment.
I have to apologize as I can see how the title is misleading. I don’t mention HAProxy in the title at all and that is the application that I am using to do Load Balancing. See Part 2 of this Article https://techjockey.net/high-availability-using-haproxy-and-keepalived/ .
So HAProxy is NOT a complete High-Availability solution. HAProxy is a Load Balancer and the method that it does load balancing mimics High-availability locally within itself. It may appear as such because as you have stated, If I have a cluster of servers, let’s say 2 web servers. I can lose 1 and HAProxy will be smart enough to forward requests to the “alive” server. If we look at it only this way it is acting as a HA. However, take a step back look at it from an IP perspective. HAProxy utilizes a one-to-many methodology. Meaning we have 1 Virtual IP that spreads load across multiple backend IPs (our web servers). If you take the failure point from above away from the Web Server and onto the VIP address, then HAProxy does not provide High-Availability.
Let me explain it with a different example. You have the same setup as the previous example. 1 HAProxy server (with 1 VIP) and two(2) web servers. What happens if we lose connectivity to that VIP? We lose the entire solution.
Then you might be saying, “well wait a minute, why don’t I have 2 VIPs on this HAProxy server just in case the path/route goes down to get to 1 of them. Here we are solving the VIP as the single point of failure, however we lost sight of another potential failure point. Hardware/Software, what if the HAProxy device dies? then our 2 VIP on the same server setup wouldn’t matter.
this is where keepalived comes in. keepalived gives us the ability to “share” an IP address between multiple devices through a common network medium. In the articles case sharing a VIP used between 2 individual HAProxy servers.
In the eyes of disaster recovery and high-availability you never are 100% protected, but you try to get as close as possible by injecting HA at different layers.
Digital Ocean describes setting up a Load Balancer, not a HA solution. If you are using a single VPC to run HAproxy to load balancer, you are still susceptible to failure as VPCs are a virtual abstraction which may increase reliability, but does NOT remove the potential for a VPC to fail.
DNS round robin, is a no no. LOL. I’ve had engineers swear by it, but there is no node healthchecking and it works based on TTL. So for example you could have a node fail, but still serve up resolutions to that node. To make matters worse, even if you catch the failure and remove the DNS record, your clients will have to wait for their TTL to die out before they ask again for a DNS resolution. DNS round robin is a cheap way to do load balancing by referral, instead of using HAProxy where traffic actually passes thru the HAProxy device.
Really useful, thanks for the post.
How do you think bigIP advance over keepalived?
Thanks!