Linux

Apt-Get HTTP Proxy — One-Liner

I have a few Debian servers that are behind a firewall and they don’t have direct access to the internet. “Protected Servers”.  I occasionally have to update their packages via a web proxy in the DMZ. I know there a countless ways to do this, but I wanted a one-liner that i can use without having to modify the apt-get application or my hosts default proxy settings.

Hope this helps someone else, cheers!

http_proxy="http://172.16.0.5:3128" apt-get update


Linux — HP Proliant SNMP Agent setup

I wanted to put together a quick post on configuring the hp-snmp-agent and hp-health agents on HP ProLiant servers using Linux. I stumbled across the need for this while working on a project to implement Icinga to monitor server hardware via SNMP.

First things first, check that you are running a compatible HP ProLiant G series. The current stable release of both hp-snmp-agent and hp-helath only work with G5+. This is important to keep in mind because I ran into this issue when trying to install both agents on a G4 Proliant. The dpkg install would fail because it cannot start the hp-health agent under a G4 Proliant. I am installing the agents ontop of Debian 7.

Let’s download the packages, check http://downloads.linux.hp.com/SDR/repo/mcp/debian/pool/non-free/ for latest versions

cd /root 
mkdir hp-agents 
cd hp-agents 
wget http://downloads.linux.hp.com/SDR/repo/mcp/debian/pool/non-free/hp-health_10.0.0.1.3-4._amd64.deb 
wget http://downloads.linux.hp.com/SDR/repo/mcp/debian/pool/non-free/hp-snmp-agents_10.0.0.1.23-21._amd64.deb

You will need snmp, snmpd, and some other library files before install the packages.

apt-get install snmpd snmp lib32gcc1 libc6-i386 libsnmp30

Now install the two(2) agents. Start with hp-health first, then install hp-snmp-agent

dpkg -i hp-health*.deb 
dpkg -i hp-snmp-agents*.deb

Continue reading…

Linux — Reset ethX naming for Ubuntu/Debian

I stumbled across this issue a long time ago and it is still present today. Adding or removing NIC’s from a Linux box, or even replacing them renumbers or messes with the numbering for each NIC. For example if you have 1 NIC and add a second, sometimes it won’t show up as eth0 and eth1, it will show up as eth0 and rename1. Or even sometimes, your original eth0 will be renamed to rename1 and the new NIC will be named eth0 when added. Yikes! Talk about confusion.

It appears that this naming information is stored in a file located in  /etc/udev/rules.d/70-persistent-net.rules

So if you want to reset the numbering completely, delete this file and reboot! Now you have clean eth# numbering again!

rm /etc/udev/rules.d/70-persistent-net.rules 
reboot


NOTE: You can also manipulate and edit this file rather than deleting it.

F5 BIGIP — Alternative using HAProxy and keepalived — Part 2

Okay we’re back!! Welcome to Part#2. If you’ve read my last post in this high availability and load balancing series(Part#1) you understand the need for HAProxy to complete our setup. If you recall, I am looking for a alternative solution to BIGIP F5 LTMs products. These products provide both high-availability fail-over via a Floating IP between LTMs, and the Load Balancing of requests to service endpoints. In the previous post, we managed to tackle the former part and provide High Availability, but not the Load Balancing part.

To complete this alternative we now add HAProxy into our setup.
Continue reading…

F5 BIGIP — Alternative using HAProxy and keepalived — Part 1

I come from a strong BIG IP F5 background and wanted to explorer alternatives to their LTM product line. BIG IP F5 LTMs are their Highly Availability and Load-Balancing network products, see here. They are primarily used as a means to mitigate infrastructure failover across server clusters. How this is done is by use of a floating IP address that is shared between two independent devices, in this case LTMs. One LTM is always active and responds to request for this Floating IP from client devices. In the event of a device failure, the secondary LTM will sense this via a variety of means and take over as the Active LTM. This essentially is how the High-Availability or failover is maintained at an infrastructure connectivity perspective. The second piece to these devices is their load-balancing functionality. Load-balancing has many forms, for this case, we are talking about network service load balancing (pretty much layer 4 and above. This allows more intelligence into the distribution of request to a server farm or cluster.

Now as I stated previously, I was looking into alternative solutions and I came across a GNU free software called keepalived which seemed to do exactly what I needed. Remember their are two pieces I wanted to fullfill as an alternative solution to LTM; it has to be able to maintain Network failover (seamlessly) and provide load-balancing for serivce endpoints. Also, surprisingly, much of the configuration statements in the keepalived.conf look very simlar to F5 LTM bigip.conf file.
Continue reading…

Linux — MRTG in Minutes!

MRTG is one of those tools a Network Engineer has on his/her toolbelt. MRTG allows the graphing of trending network activity for a wide range of devices. It uses SNMP to query a host and poll it’s network information and statistics. It can be used with Routers, Switches, Linux Hosts, etc.

I’m going to run MRTG against a Linux Router(running IPtables), a HP PowerConnect Switch, a Cisco Router, and an ESXi host. Anyway….Let’s get started.

Continue reading…

Squid Proxy — Splash Page

Hi All! So after my last article regarding securing a guest network web access with Squid and SquidGuard, I wanted to share how I came about creating a Splash Page for Guest users of my Free WiFi hotspot. My goal was to present new Guests with a splash page identifying certain Terms of Usage, etc. Basically we will need a HTML or PHP Splash Page, an ACL identifying the Guests by IP, an external ACL program (squid_session), and a Deny with Information (deny_info).
Continue reading…

Linux — dd Operations Notes

I recently was helping a friend with some computer trouble which resulting in me first creating a full disk Image backup using “dd”. I’ve done this before years ago, but I wanted to add some of the common dd backup/restore methods to my notepad. There are so many articles online on how to use dd to do a Full disk backup and restore it. I will be using similar methods.

dd Terms

  • if — input device (file,hardware,CD,etc).
  • of — output device (file,hardware,CD,etc).
  • bs — sets “dd” read and write size.
  • noerror — continues after read errors.
  • readom — CD to ISO utility.
  • mount — Linux command to mount file-systems
  • gz — gunzip is a compression utility which helps to reduce the size of images created with dd.
  • md5sum — a checksum utility to ensure integrity when moving large image files.

Continue reading…

Linux — IPTABLES Network Firewall

Most firewalls in the consumer world are ones that are either bought at Bestbuy or supplied by your ISP as an all-in-one type of network device. These devices, such as the Linksys WRT54GL, are good enough for most user’s home setups. Providing Wireless and Wired network access with built in Firewall security. Blocking most inbound network threats , and other unwanted requests that are not pre-established (i.e. return path from an outbound request). Some of these consumer routers can be even further enhance with a rich set of plugins and network tools by using custom firmwares. DD-WRT, Tomato, or openWRT are all interdependent communities, who develop custom firmware to be used with these consumer all-in-one routers. You can check your devices compatibility with their firmware at each of their websites.

I for one own a Linksys WRT54GL router and have used both DD-WRT and Tomato. Both of these custom firmwares as well as the stock firware(Linksys) provide enough security, accessibly, and capacity for a typical consumer. However, that’s not what this article is about! This article is how to setup your own Network Firewall using a standalone Linux box! Woot!.

Why build a standalone Network Firewall?

Continue reading…

Inter-VLAN routing with Linux & PowerConnect 5324

I recently purchased a 24-port Gigabit Layer 2 Switch that supports VLAN tagging and trunking. Dell PowerConnect 5324, see here, has 24 Ethernet ports and is capable of tagging and untagging Frames at wire speed. It is a discontinued model, however doing some googling I found a updated firmware and IOS image!

Physical Topology

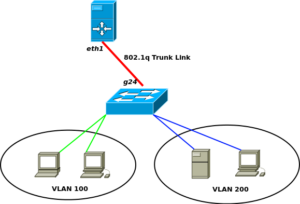
The topology is pretty typical of “routing-on-a-stick” for Multiple VLANs. I have a Linux server running Ubuntu 12.04 with a single NIC and the Dell PowerConnect switch.

Port configuration:
Network 1 = g1 – g16
Network 2 = g17 -g23

802.1q Information:
Switch Trunk Port = g24
Router Trunk Port = eth1

Logical Topology

I have a single LAN I want logically separated using a single switch. The VLAN IDs are 100 & 200. The VLAN subnets and ports will be as follows;

Subnets:
VLAN 100 = 192.168.1.1/24
VLAN 200 = 192.168.2.1/24

VLAN Access Ports:
VLAN 100 = g1 – g16
VLAN 200 = g17 -g23

Continue reading…