Table of Contents
- About SSL Authentication
- Quick Review
- Creating a Certificate Authority
- 1-way “Standard” SSL Authentication
- 2-way “Mutual” SSL Authentication
- Advanced SSL Authentication: CRLs, CDP, and OCSP
- Concept Review
About SSL Authentication:
TLS Authentication or SSL authentication is nothing more than proving the authenticity of one or both parties in the formation of an TLS “Secure” connection.
1-way “Standard” TLS Authentication is the most common, you use this every time you log into Facebook, your bank website, google, etc. The point of this type of authentication is for you (as the client) to verify the authenticity of the web site you are connecting to and form a secure channel of communication.
2-way “Mutual” mTLS Authentication is less common than the traditional “one-way” TLS authentication we are a custom to when visiting secured websites. When we connect to our banking website or our favorite web e-mail site, we as the client are verifying the identify of the site we are requesting content from. This “one-way” authentication allows us as the client to connect with confidence that the web site we are receiving content from has been verified. this authenticity check is performed by our client browser with a little help from a third-party certificate authority.
Let’s first review a one-way TLS connection.
- The Client browsers receives https://google.com in it’s address barf
- Client browsers knows based on https:// that this connection will require an SSL handshake and sends a CLIENT_HELLO to the destined web server (google). This includes other things like SSL/TLS version, acceptable ciphers, etc
- The web server receives the CLIENT_HELLO request and sends a SERVER_HELLO back to the client. SERVER_HELLO contains SSL version, acceptable ciphers, and the server certificate.
- The client receives the servers certificate and it is verified against a list of known Certificate Authorities.
- If the certificate is proven to be in good standing, the client sends back a pre-master secret is encrypted inside the server’s certificate. Remember only the server can decrypt anything encrypted with it’s certificate because only the server has the decryption key. Server Certificate encrypts, Server Key decrypt’s.
- At this point both client and server have the pre-master secret and can calculate a master secret to use to symmetrically encrypt and decrypt data between them.
So as we can see from a traditional TLS handshake, the client is never verified as authentic. Now, in most situations this is fine, as most connect types of this nature only need to verify the server because that is where the content is coming from.
The difference: In a 2-way mutual authenticated TLS handshake, the server will ask the client to send its own certificate for verification. Just like the client asking for the server’s certificate in the 1-way TLS handshake above, the server will perform verification of the client certificate before continuing to the pre-master and master secret phase of the SSL handshake. If authenticity of the client cannot be verified the server closes the connection.
How is mutual trust obtained? Both the server and client must generate their own TLS certificate and keys, and both must be signed by the same Certificate Authority. This ensures that both the server and the client’s certificate are trusted. This allows authentication to remain asymmetrical, instead of symmetrical. For example, rather than have a shared password that 3 clients and the server use to encrypt and decrypt data. Each client and the server have their own certificates and keys that will be used for communication with the server. Asymmetrical authentication and encryption is better at enforcing authenticity because everyone has their own cert and key used to establish a secure connection with the server. Symmetrical authentication is faster at encrypting and decrypting but suffers from having every client use the same key.
What happens if a client key is compromised? In the symmetrical authentication scenario, mentioned previously, you would have a serious security issue on your hands. Each client would be at risk and the likely hood of eavesdropping would increase. An attacker only has to obtain one key to gain visibility into every connection. Asymmetrical on the other hand has a different way of handling this. Because each client has it’s own certificate and key pair, and the signing of each certificate is performed by a third-party Certificate Authority, one simply has to revoke the compromised client in the form of a CRL certificate(more on this later). Other client connections will not be compromised or have to be re-generated. The server verifying the client certificate will fail only for the revoked for the compromised client.
What happens if my Certificate Authority’s key is compromised? This is the worst case scenario that can happen in your PKI infrastructure.An attacker can impose and generate a new certificate authority certificate and start signing certificates that can be used to fake authenticity. In essence break the certificate authority’s trust. Keep in mind a Certificate Authority key cannot decrypt your connections.
Let’s review….
- Certificate Authority is a trustpoint used as a third-party between the parties trying to validate each other’s authenticity.
- Asymmetrical encryption allows us to form a protected trust between two parties that do not need to know anything about each other.
- TLS/SSL Certificates are used for authentication and for the remote party to use to encrypt it’s first message sent back
- TLS/SSL CA Key is used to sign certificates authorized by a Certificate Authority
- TLS/SSL Key used to decrypt data encrypted by the corresponding SSL Certificate
- pre-master secret is used as a starting point in the calculation of the master secret
- master secret is used as a symmetrical encryption/decryption key between both parties, making the process of encryption/decryption faster
I want to show a few scenarios on how to configure 2-way “Mutual” authentication. But first, we have to create our Certificate authority trust-point using openssl. There are otherways to do this, however for demonstration purposes of this post I will be using openssl.
Creating our Certificate Authority:
-
Housekeeping, create a openssl-rootca.conf file with defaults in it so you don’t have to re-type them everytime you issue an openssl command.
Create a openssl-rootca.conf file, vi /opt/openssl-rootca.conf
dir                     = /opt

[ ca ]
default_ca              = root_ca       #what stanza to use when issueing openssl ca -cofig openssl-rootca.conf command

[ root_ca ]
#openssl ca -config openssl-rootca.conf
database                = $dir/index.db
serial                  = $dir/serial
crlnumber               = $dir/crlnumber
certificate             = $dir/rootCA.crt
private_key             = $dir/rootCA.key
new_certs_dir           = $dir/
default_days            = 365           #default certificate duration
default_md              = sha256        #MD to use
default_crl_days        = 30            #How long before next CRL to check for
email_in_dn             = no
unique_subject          = no            #Certs can be signed if a subject with the same name already exists
crl_extensions          = ca_crl_ext    #default CRL extensions
x509_extensions         = ca_req_ext
policy                  = MatchingPolicy #Name of policy to enforce when signing certificates with this CA

[ req ]
#openssl req -config openssl-rootca.conf
default_bits            = 2048
encrypt_key             = no            #only to make things easier for this demonstration
default_md              = sha256
utf8                    = yes
string_mask             = utf8only
prompt                  = yes          #Prompt for DN input
distinguished_name      = ca_dn        #How to handle the distingushied name when requesting a certificate
x509_extensions         = ca_req_ext   #X.509 extensions to use when requesting a certificate

[ ca_dn ]
countryName                             = Enter Country
countryName_default                     = US
stateOrProvinceName                     = State or Province Name (full name)
stateOrProvinceName_default             = Connecticut
localityName                            = Locality Name (eg, city)
localityName_default                    = Wethersfield
organizationName                        = Organization Name
organizationName_default                = thejimmahknows
organizationalUnitName                  = Unit Name
organizationalUnitName_default          = Test Unit
commonName                              = Common Name (e.g. server FQDN or YOUR name)
emailAddress                            = Contact email for this Certificate
emailAddress_default                    = admin@example.com


[ MatchingPolicy ]
#set's what much match, optional, or must be supplied to Certificates requesting signing
countryName             = match         #Must match CA's countryName
stateOrProvinceName     = optional      #optional input
localityName            = optional      #optional input
organizationName        = supplied      #Must supply organizationName
organizationalUnitName  = optional      #optional input
commonName              = supplied      #Must be supplied
emailAddress            = supplied      #supplied for contact purposes

[ ca_req_ext ]
#default req stanza set to CA:true for when we sign our first certificate which is a CA type
basicConstraints = critical, CA:true
keyUsage = critical, keyCertSign,cRLsign
subjectKeyIdentifier = hash
authorityKeyIdentifier = keyid:always
authorityInfoAccess = OCSP;URI:http://ocsp.thejimmahknows.com:8080, caIssuers;URI:http://ocsp.thejimmahknows.com/rootCA.crt
crlDistributionPoints = URI:http://ocsp.thejimmahknows.com/rootCRL.crl

[ server_req_ext ]
#stanza used when specifiying -extension server_req_ext
basicConstraints = CA:FALSE
keyUsage = critical,digitalSignature,keyEncipherment
extendedKeyUsage = serverAuth, clientAuth
subjectKeyIdentifier = hash
authorityInfoAccess = OCSP;URI:http://ocsp.thejimmahknows.com:8080, caIssuers;URI:http://ocsp.thejimmahknows.com/rootCA.crt
crlDistributionPoints = URI:http://ocsp.thejimmahknows.com/rootCRL.crl

[ client_req_ext ]
#stanza used when specifiying -extension client_req_ext
basicConstraints = CA:FALSE
keyUsage = critical,digitalSignature
extendedKeyUsage = clientAuth
subjectKeyIdentifier = hash
authorityKeyIdentifier = keyid,issuer
authorityInfoAccess = OCSP;URI:http://ocsp.thejimmahknows.com:8080, caIssuers;URI:http://ocsp.thejimmahknows.com/rootCA.crt
crlDistributionPoints = URI:http://ocsp.thejimmahknows.com/rootCA.crl

[ ca_crl_ext ]
#default stanza for crl_ext
authorityKeyIdentifier = keyid:always
authorityInfoAccess = caIssuers;URI:http://ocsp.thejimmahknows.com/rootCA.crt

[ca_ocsp_ext ]
#stanza will be used when issuing openssl ca -config openssl-rootca.conf -extension ca_ocsp_ext
basicConstraints = CA:FALSE
keyUsage = critical, digitalSignature
extendedKeyUsage = critical, OCSPSigning
subjectKeyIdentifier = hash
authorityKeyIdentifier = keyid:always
NOTE: Most of these variables are the defaults pulled from the openssl.conf installed with my distribution.
-
Creating our CA serial file, this is nothing more than an iteration number to start with when signing certificates.
Making sure each signed certificate from the Certificate Authority has a unique serial number value. In the real world, a Certificate Authority would maintain a list of unique serial numbers for each Certificate it signs. It is only locally significant to the Certificate Authority, other CA’s will not recognize it. This may be useful to track certificates that you’ve signed with your Certificate Authority.
echo "1001 > /opt/serial
echo "1001" > /opt/crlnumber
touch /opt/index.db
- serial number file = iteration number of signed certificates, has to be an even number of characters (cannot be “101”, etc)
- crlnumber file = iteration number of the CRL certificate (more on this later)
- index.sb file = This is a database file that contains information regarding the certificates that have been signed by the CA and their serial numbers
-
Generate Certificate Authority’s key. (NOTE: Recommend 8192 key strength, I used 2048 for this demo to save space)
openssl genrsa -aes256 -out rootCA.key 2048
Generating RSA private key, 2048 bit long modulus
...........+++
...+++
e is 65537 (0x10001)
Enter pass phrase for rootCA.key:
Verifying - Enter pass phrase for rootCA.key:
-
Using the CA’s key, generate a CA certificate to be used for signing purposes in the next steps.
openssl req -config openssl-rootca.conf -x509 -new -nodes -key rootCA.key -out rootCA.crt -days 3650
Enter pass phrase for rootCA.key:
You are about to be asked to enter information that will be incorporated
into your certificate request.
What you are about to enter is what is called a Distinguished Name or a DN.
There are quite a few fields but you can leave some blank
For some fields there will be a default value,
If you enter '.', the field will be left blank.
-----
Enter Country [US]:
State or Province Name (full name) [Connecticut]:
Locality Name (eg, city) [Wethersfield]:
Organization Name [thejimmahknows]:
Unit Name [Test Unit]:
Common Name (e.g. server FQDN or YOUR name) []:MyRootAuthority
Contact email for this Certificate [admin@example.com]:
NOTE: the -config openssl-rootca.conf uses our Housekeeping config file we created above to get it’s options from.
1-way “Standard” SSL Authentication
-
Generate our web-server certificate and CSR for signing by our CA we created above
openssl req -config openssl-rootca.conf -extensions server_req_ext -new -nodes -newkey rsa:2048 -keyout web-server.key -out -web-server.csr -days 365
Generating a 2048 bit RSA private key
.............................+++
........................................................................+++
writing new private key to 'web-server.key'
-----
You are about to be asked to enter information that will be incorporated
into your certificate request.
What you are about to enter is what is called a Distinguished Name or a DN.
There are quite a few fields but you can leave some blank
For some fields there will be a default value,
If you enter '.', the field will be left blank.
-----
Enter Country [US]:
State or Province Name (full name) [Connecticut]:
Locality Name (eg, city) [Wethersfield]:
Organization Name [thejimmahknows]:
Unit Name [Test Unit]:
Common Name (e.g. server FQDN or YOUR name) []:web-server
Contact email for this Certificate [admin@example.com]:
-
Sign our web-server certificate with our MyRootAuthority CA from the previous section
openssl ca -config openssl-rootca.conf -extensions server_req_ext -in web-server.csr -out web-server.crt
Using configuration from openssl-rootca.conf
Enter pass phrase for /opt/rootCA.key:
Check that the request matches the signature
Signature ok
The Subject's Distinguished Name is as follows
countryName           :PRINTABLE:'US'
stateOrProvinceName   :ASN.1 12:'Connecticut'
localityName          :ASN.1 12:'Wethersfield'
organizationName      :ASN.1 12:'thejimmahknows'
organizationalUnitName:ASN.1 12:'Test Unit'
commonName            :ASN.1 12:'web-server'
Certificate is to be certified until Jan 15 17:38:33 2017 GMT (365 days)
Sign the certificate? [y/n]:y


1 out of 1 certificate requests certified, commit? [y/n]y
Write out database with 1 new entries
Data Base Updated
-
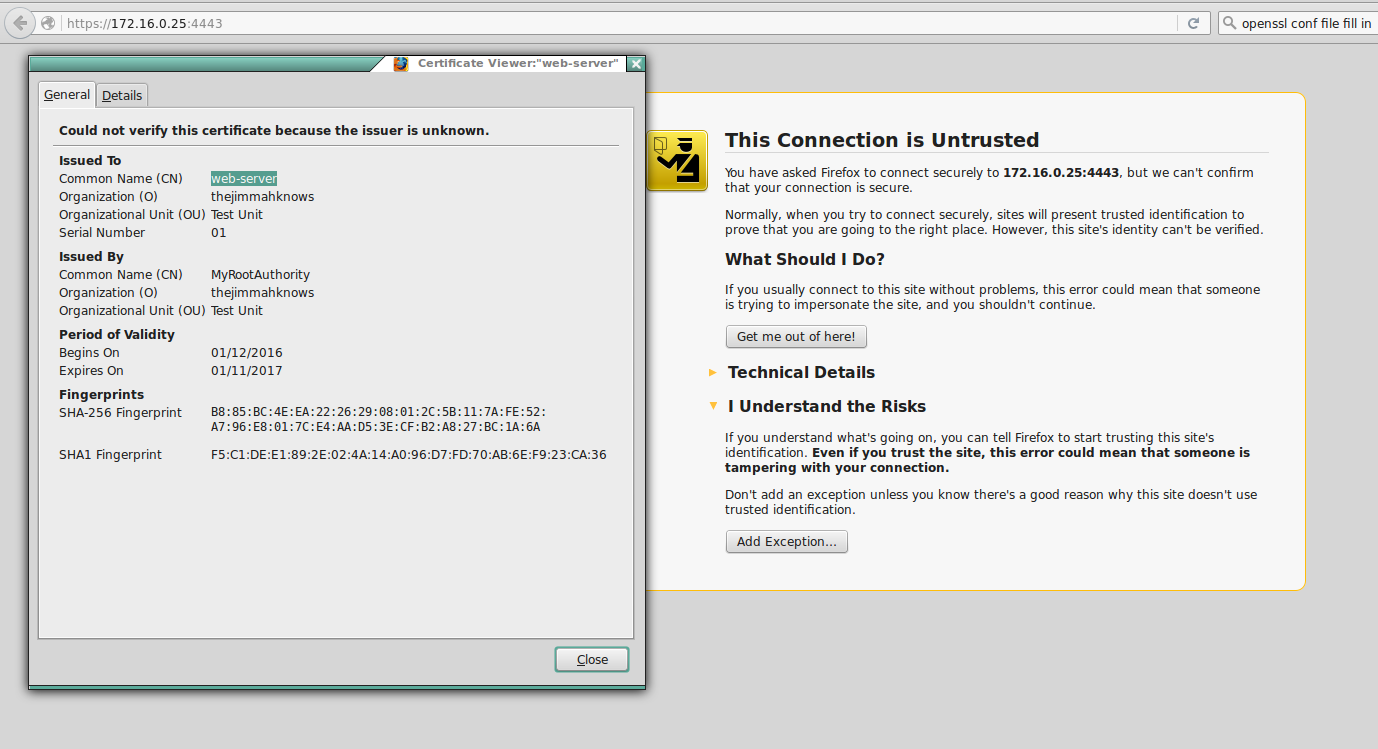
Check our web-server Certificate
openssl x509 -noout -text -in web-server.crt
Certificate:
    Data:
        Version: 3 (0x2)
        Serial Number: 4097 (0x1001)
    Signature Algorithm: sha256WithRSAEncryption
        Issuer: C=US, ST=Connecticut, L=Wethersfield, O=thejimmahknows, OU=Test Unit, CN=MyRootAuthority/emailAddress=admin@example.com
        Validity
            Not Before: Jan 16 17:38:33 2016 GMT
            Not After : Jan 15 17:38:33 2017 GMT
        Subject: C=US, ST=Connecticut, L=Wethersfield, O=thejimmahknows, OU=Test Unit, CN=web-server
        Subject Public Key Info:
            Public Key Algorithm: rsaEncryption
                Public-Key: (2048 bit)
                Modulus:
                    00:ec:79:7f:d8:6f:70:05:1b:71:2e:da:74:73:4d:
                    0b:54:5f:b2:ae:93:5d:21:2f:a3:5d:79:c0:ee:03:
                    3d:ec:87:54:4d:0b:e6:0e:8b:1f:3a:af:ff:e7:f2:
                    4b:dc:f4:e0:59:fc:5e:1b:3a:5e:5e:b7:b5:72:ed:
                    3e:e3:63:22:9f:d4:1c:c5:ed:fa:dc:4e:14:66:76:
                    f5:87:2c:e5:57:4c:3a:4a:db:c8:03:6d:b1:f5:1b:
                    73:01:2e:89:5d:fb:bc:a4:a9:d4:7d:c4:40:95:26:
                    a8:62:3f:27:bb:7f:b3:23:70:bf:12:29:74:7c:ee:
                    0d:9d:aa:29:33:3f:f5:b7:09:da:5c:e0:0a:b1:c2:
                    81:bd:cc:c3:a1:f7:27:cb:75:9a:c1:4a:0b:1b:c7:
                    4b:2f:de:3a:e9:51:c0:ee:e1:97:f3:0d:ac:6d:65:
                    0e:9c:90:46:c7:64:8b:31:ae:01:54:63:11:42:0f:
                    5b:13:9a:6a:a7:f0:fc:96:1a:7e:ea:92:44:0b:a9:
                    53:a2:40:39:98:f2:91:dd:34:af:0a:d5:7b:b3:ab:
                    dd:3f:bd:e4:b6:e2:8e:6e:05:37:e4:f8:24:85:4f:
                    dd:fa:c5:93:f4:e5:1f:36:cf:88:27:fa:41:07:f1:
                    7e:22:ca:1c:0d:e8:fc:80:c1:18:c0:54:1f:82:8a:
                    ea:1f
                Exponent: 65537 (0x10001)
        X509v3 extensions:
            X509v3 Basic Constraints:
                CA:FALSE
            X509v3 Key Usage: critical
                Digital Signature, Key Encipherment
            X509v3 Extended Key Usage:
                TLS Web Server Authentication, TLS Web Client Authentication
            X509v3 Subject Key Identifier:
                20:33:8C:4A:B5:F2:EE:B1:59:3C:EC:0B:C3:79:09:8A:09:E6:59:70
            Authority Information Access:
                OCSP - URI:http://ocsp.thejimmahknows.com
                CA Issuers - URI:http://ocsp.thejimmahknows.com/rootCA.crt

            X509v3 CRL Distribution Points:

                Full Name:
                  URI:http://ocsp.thejimmahknows.com/rootCRL.crl

    Signature Algorithm: sha256WithRSAEncryption
         00:3b:dd:ca:db:14:3e:44:72:14:36:b8:99:03:2a:8f:aa:b2:
         4d:68:3e:06:ad:db:c5:16:c4:92:aa:d2:d6:96:fe:83:81:dc:
         e8:86:f8:eb:6d:cd:d9:f4:77:4d:8f:99:6a:04:db:ee:3e:62:
         9d:a9:64:72:4e:8b:0b:ea:71:2e:2c:1e:93:1d:4f:6d:af:32:
         27:53:ae:13:54:0d:e5:10:bc:ea:2c:e1:0d:01:63:5b:bf:75:
         11:cd:d6:f3:de:31:bd:25:eb:88:42:b0:df:e5:45:0a:85:3a:
         bf:01:bd:33:7c:ad:e3:a6:48:0c:28:fe:f9:c4:2b:55:ff:8d:
         b5:fd:79:d3:f4:98:22:7a:c7:58:e7:d3:b4:71:89:c7:1c:a6:
         42:fc:ab:a9:03:02:29:73:21:21:70:83:bf:f9:96:bb:fa:68:
         bf:77:11:55:2f:50:89:35:2d:0f:00:dd:f4:62:a0:1e:25:be:
         ec:67:3c:b9:25:eb:55:13:a0:59:5a:45:1e:87:aa:3a:40:d1:
         75:3b:f9:65:6b:fe:bd:78:39:26:61:a5:54:2c:43:d5:c8:f0:
         21:96:dd:26:f5:8a:da:9f:fd:a7:21:65:15:a0:c9:3c:16:f6:
         9f:e5:60:79:db:58:88:bd:fa:c7:c7:de:1a:f6:06:63:45:28:
         f3:31:d6:82
-
Check the index.db file, So far so good!
cat /opt/index.db
V       170115175505Z           1001    unknown /C=US/ST=Connecticut/L=Wethersfield/O=thejimmahknows/OU=Test Unit/CN=web-server
V = Valid, R = Revoked
-
Configure our Apache2 Web-Server to use the certificate we just signed:
vi /etc/apache2/site-available/default.conf <VirtualHost *:443> DocumentRoot "/var/www/" SSLEngine on SSLCACertificateFile /opt/rootCA.crt SSLCertificateFile /opt/web-server.crt SSLCertificateKeyFile /opt/web-server.key # Allows PHP to read Certificate info SSLOptions +stdEnvVars </VirtualHost>- DocumentRoot = Where our webpage files are kept
- SSLEngine = Enabled mod_ssl which is needed to have apache respond to SSL type requests
- SSLCACertificateFile = The Location of our CA certificate
- SSLCertificateFile = Location of the web-server.crt file
- SSLCertificateKeyFile = Location of the web-server.key file
- SSLOptions +stdEnvVars = This allows our index.php file to read from the Web-Server’s system variables, this is required because SSL information is happening at Layer 4, where HTTP is happening at Layer
- See more Apache2.2 mod_ssl options here.
-
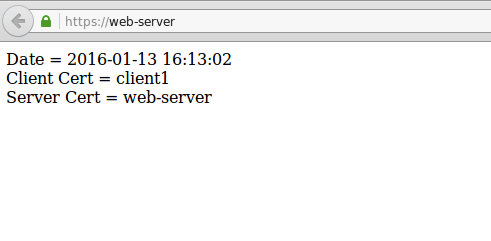
Let’s create a index.php to help us check on the certificates used to connect to the web-server:
vi /var/www/index.php <?php echo "Date = " . date('Y-m-d H:i:s') . "<br>"; echo "Client Cert = " . $_SERVER['SSL_CLIENT_S_DN_CN'] . "<br>"; echo "Server Cert = " . $_SERVER['SSL_SERVER_S_DN_CN'] . "<br>"; echo "Server Serial = " . $_SERVER['SSL_SERVER_M_SERIAL'] . "<br>"; ?> -
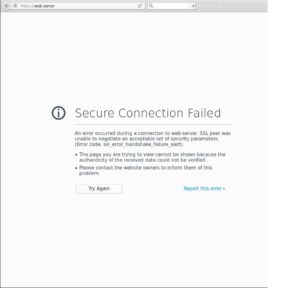
Testing with Firefox
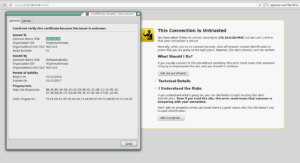
Note: “This Connection is Untrusted” makes sense, since Firefox has a list of Trusted Certificate Authorities and our MyRootAuthority we created is not one of them. We’ll add the MyRootAuthority in the next steps and re-check! -
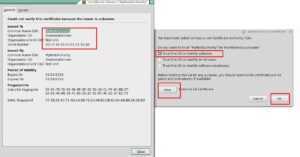
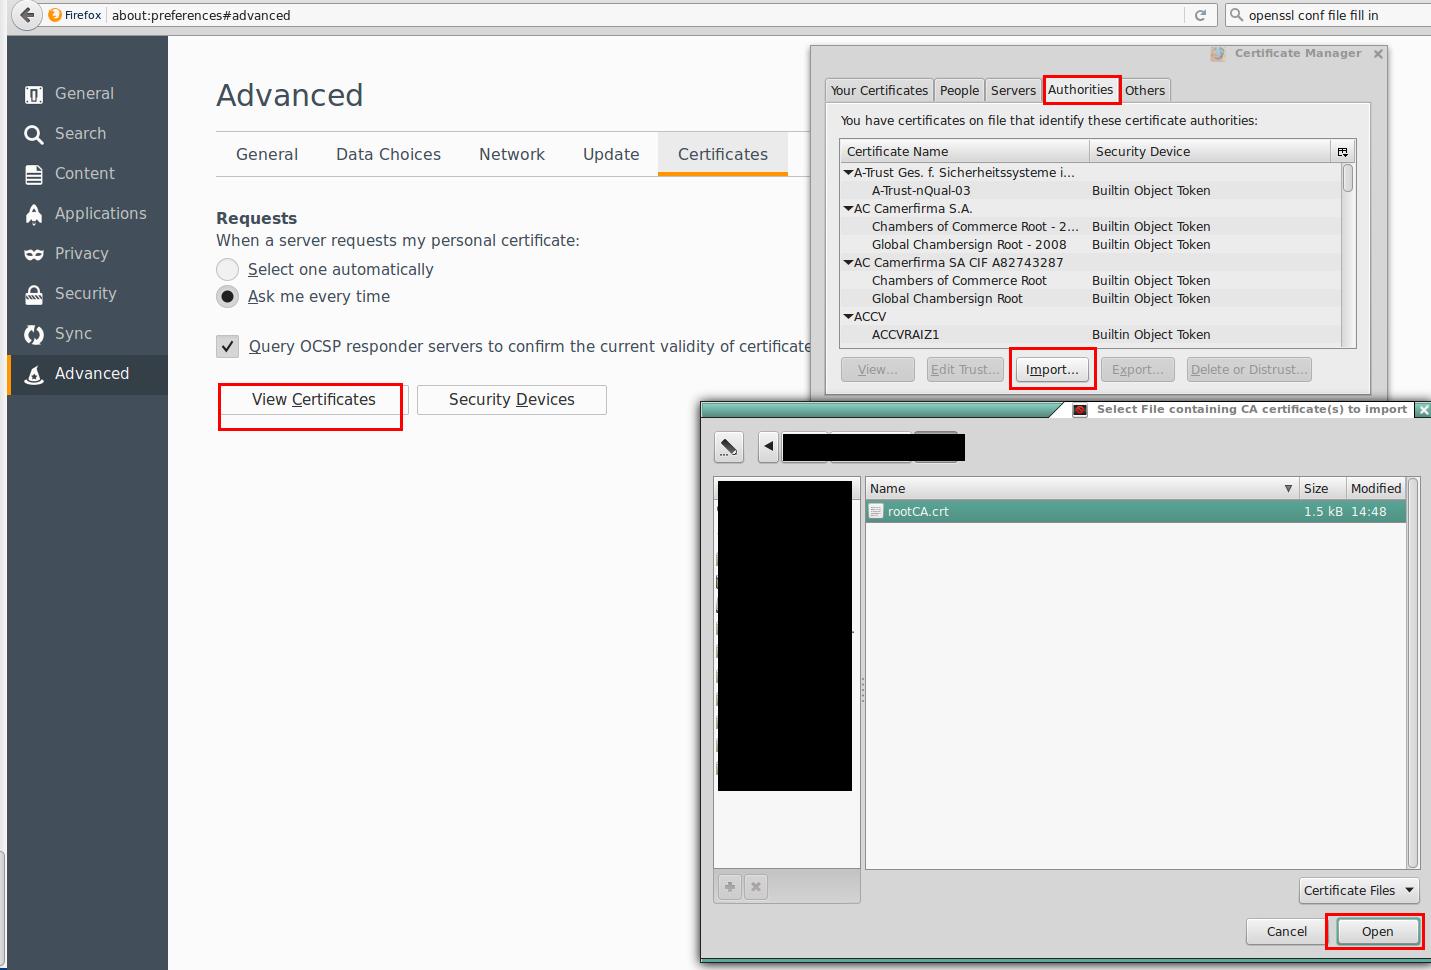
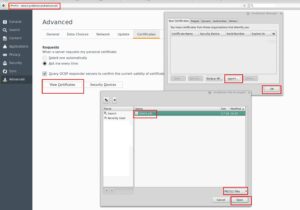
Adding the rootCA certificate to Firefox’s trusted authorities.
This is effectively the same as if you had GoDaddy or another CA sign your certificate since these third-parties root CA certificates are already loaded in your browser.

-
Re-test
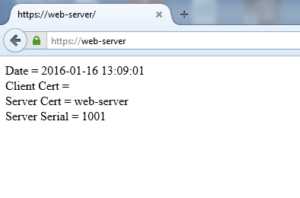
Alrighty!! So our web-server certificate is now verified trusted by our MyRootAuthority in Firefox!! Remember, this is the same way a GoDaddy or VeriSign certificate would be verified, your browser actually has all those Trusted CA Certificates locally to use when connecting to servers.


2-way “Mutual” Authentication
Moving on to 2-way “Mutual” Authentication is actually fairly straight forward as well. We only have to keep in mind a couple of things along the way. First, both our Web-Server certificate and our Client certificates must be signed by the same Certificate Authority (If using GoDaddy or Verisign works as well). Second we must make sure our host acting as a server in this client/server relationship enforces client SSL authentication, which we will be done by our Web-Server running Apache2. Let’s get to it!
-
Generate a few client certificates and CSR for signing by our CA.
- Client1
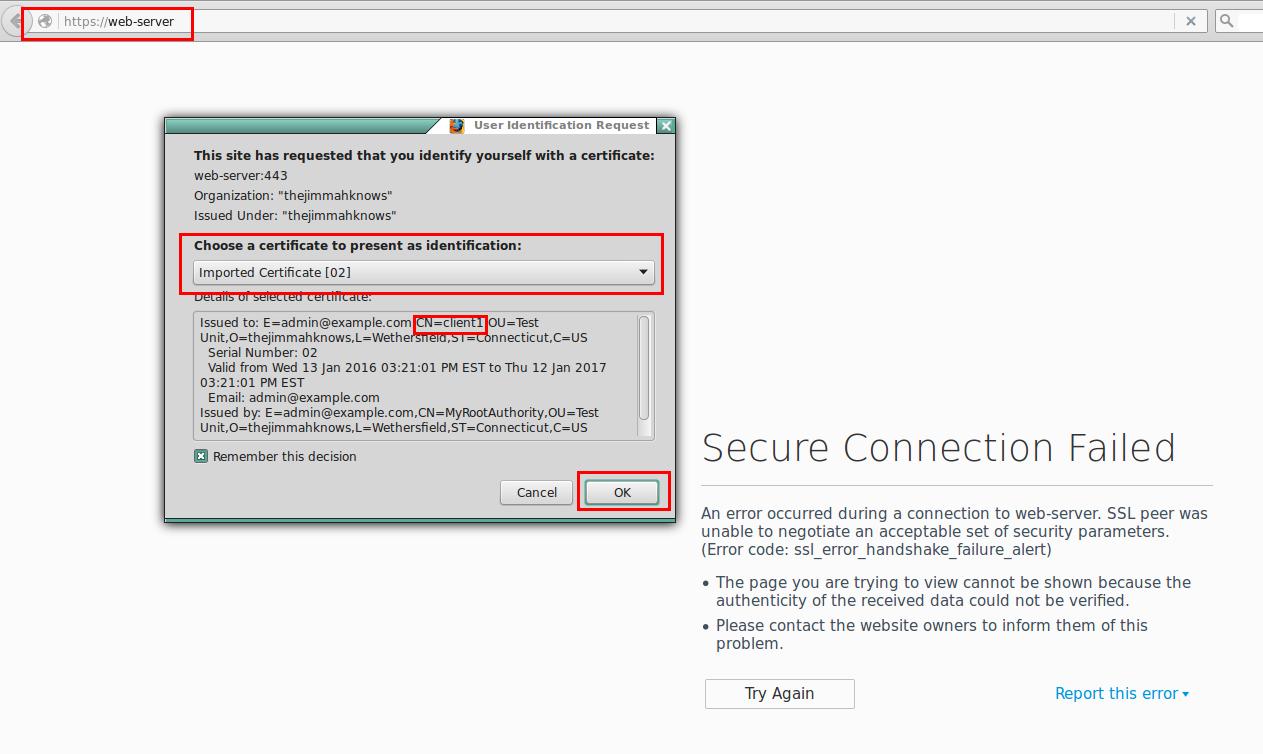
openssl req -config openssl-rootca.conf -extensions client_req_ext -new -nodes -newkey rsa:2048 -keyout client1.key -out client1.csr -days 365
Generating a 2048 bit RSA private key
...............................................................................+++
.....................................+++
writing new private key to 'client1.key'
-----
You are about to be asked to enter information that will be incorporated
into your certificate request.
What you are about to enter is what is called a Distinguished Name or a DN.
There are quite a few fields but you can leave some blank
For some fields there will be a default value,
If you enter '.', the field will be left blank.
-----
Enter Country [US]:
State or Province Name (full name) [Connecticut]:
Locality Name (eg, city) [Wethersfield]:
Organization Name [thejimmahknows]:
Unit Name [Test Unit]:
Common Name (e.g. server FQDN or YOUR name) []:client1
Contact email for this Certificate [admin@example.com]:
- Client2
openssl req -config openssl-rootca.conf -extensions client_req_ext -new -nodes -newkey rsa:2048 -keyout client2.key -out client2.csr -days 365
Generating a 2048 bit RSA private key
..................................................................................................................................................................+++
....+++
writing new private key to 'client2.key'
-----
You are about to be asked to enter information that will be incorporated
into your certificate request.
What you are about to enter is what is called a Distinguished Name or a DN.
There are quite a few fields but you can leave some blank
For some fields there will be a default value,
If you enter '.', the field will be left blank.
-----
Enter Country [US]:
State or Province Name (full name) [Connecticut]:
Locality Name (eg, city) [Wethersfield]:
Organization Name [thejimmahknows]:
Unit Name [Test Unit]:
Common Name (e.g. server FQDN or YOUR name) []:client2
Contact email for this Certificate [admin@example.com]:
- Client1
-
Sign our Client CSRs to obtain each client certificate.
- Client1
openssl ca -config openssl-rootca.conf -extensions client_req_ext -out client1.crt -in client1.csr
Using configuration from openssl-rootca.conf
Enter pass phrase for /opt/rootCA.key:
Check that the request matches the signature
Signature ok
The Subject's Distinguished Name is as follows
countryName           :PRINTABLE:'US'
stateOrProvinceName   :ASN.1 12:'Connecticut'
localityName          :ASN.1 12:'Wethersfield'
organizationName      :ASN.1 12:'thejimmahknows'
organizationalUnitName:ASN.1 12:'Test Unit'
commonName            :ASN.1 12:'client1'
emailAddress          :IA5STRING:'admin@example.com'
Certificate is to be certified until Jan 12 20:21:01 2017 GMT (365 days)
Sign the certificate? [y/n]:y


1 out of 1 certificate requests certified, commit? [y/n]y
Write out database with 1 new entries
Data Base Updated
- Client2
openssl ca -config openssl-rootca.conf -extensions client_req_ext -out client2.crt -in client2.csr
Using configuration from openssl-rootca.conf
Enter pass phrase for /opt/rootCA.key:
Check that the request matches the signature
Signature ok
The Subject's Distinguished Name is as follows
countryName           :PRINTABLE:'US'
stateOrProvinceName   :ASN.1 12:'Connecticut'
localityName          :ASN.1 12:'Wethersfield'
organizationName      :ASN.1 12:'thejimmahknows'
organizationalUnitName:ASN.1 12:'Test Unit'
commonName            :ASN.1 12:'client2'
emailAddress          :IA5STRING:'admin@example.com'
Certificate is to be certified until Jan 12 20:26:20 2017 GMT (365 days)
Sign the certificate? [y/n]:y


1 out of 1 certificate requests certified, commit? [y/n]y
Write out database with 1 new entries
Data Base Updated
- Client1
-
Check the database file, index.txt
cat /opt/index.db
V       170115175505Z           1001    unknown /C=US/ST=Connecticut/L=Wethersfield/O=thejimmahknows/OU=Test Unit/CN=web-server
V       170115181345Z           1002    unknown /C=US/ST=Connecticut/L=Wethersfield/O=thejimmahknows/OU=Test Unit/CN=client1
V       170115181400Z           1003    unknown /C=US/ST=Connecticut/L=Wethersfield/O=thejimmahknows/OU=Test Unit/CN=client
NOTE: See the list of certificates we just signed and their corresponding serial numbers (starting with 1001).
-
Modify our Apache2.conf file to Enforce Client SSL Verification
vi /etc/apache2/sites-available/default.conf

Listen 443
<VirtualHost *:443>
        DocumentRoot           "/var/www/"
        ServerName              web-server

        SSLEngine               on
        SSLCACertificateFile   /opt/rootCA.crt
        SSLCertificateFile     /opt/web-server.crt
        SSLCertificateKeyFile  /opt/web-server.key
#       SSLCARevocationFile    /opt/rootCRL.crl
        SSLStrictSNIVHostCheck on
        SSLVerifyClient        require
        SSLVerifyDepth         1
# Allows PHP to read Certificate info
        SSLOptions +stdEnvVars
</VirtualHost>
Let’s walk through what we changed.
- SSLCACertficateFile = Only the rootCA.crt file from above is required, the rootCA.key is only used when signing certificates to be seen as valid.
- SSLCARevocationFile = The location of the CRL certificate file denoting revoked certificates. (More on this later), it is commented out for now…
- *SSLCARevocationPath = If we were not using a browser as our client in this case and rather a server, such as Apache2-to-Apache2 communication, you can use this option to tell Apache to use this path as the CRL path of the far end.
- SSLStrictSNIVHostCheck = Sets whether or not the client is allowed to access the VirtualHost if the name doesn’t match.
- SSLVerifyClient = Does the client need to present a Certificate. Required, means certificate has to be validated.
- SSLVerifyDepth = Tells Apache how deep it should verify before deciding if the client connection has a valid certificate. (In some scenarios you may have a Root CA, a Intermediate CA, a sub CA, etc)
- SSLOptions +stdEnvVars = This allows our index.php file to read from the Web-Server’s system variables, this is required because SSL information is happening at Layer 4, where HTTP is happening at Layer 7.
- More information, see http://httpd.apache.org/docs/2.2/mod/mod_ssl.html
-
Let’s do a quick test….
O No!!! Our connection was reject because we didn’t supply a Cilent Certificate to the Web-Server
-
Prepare our Client Certificates
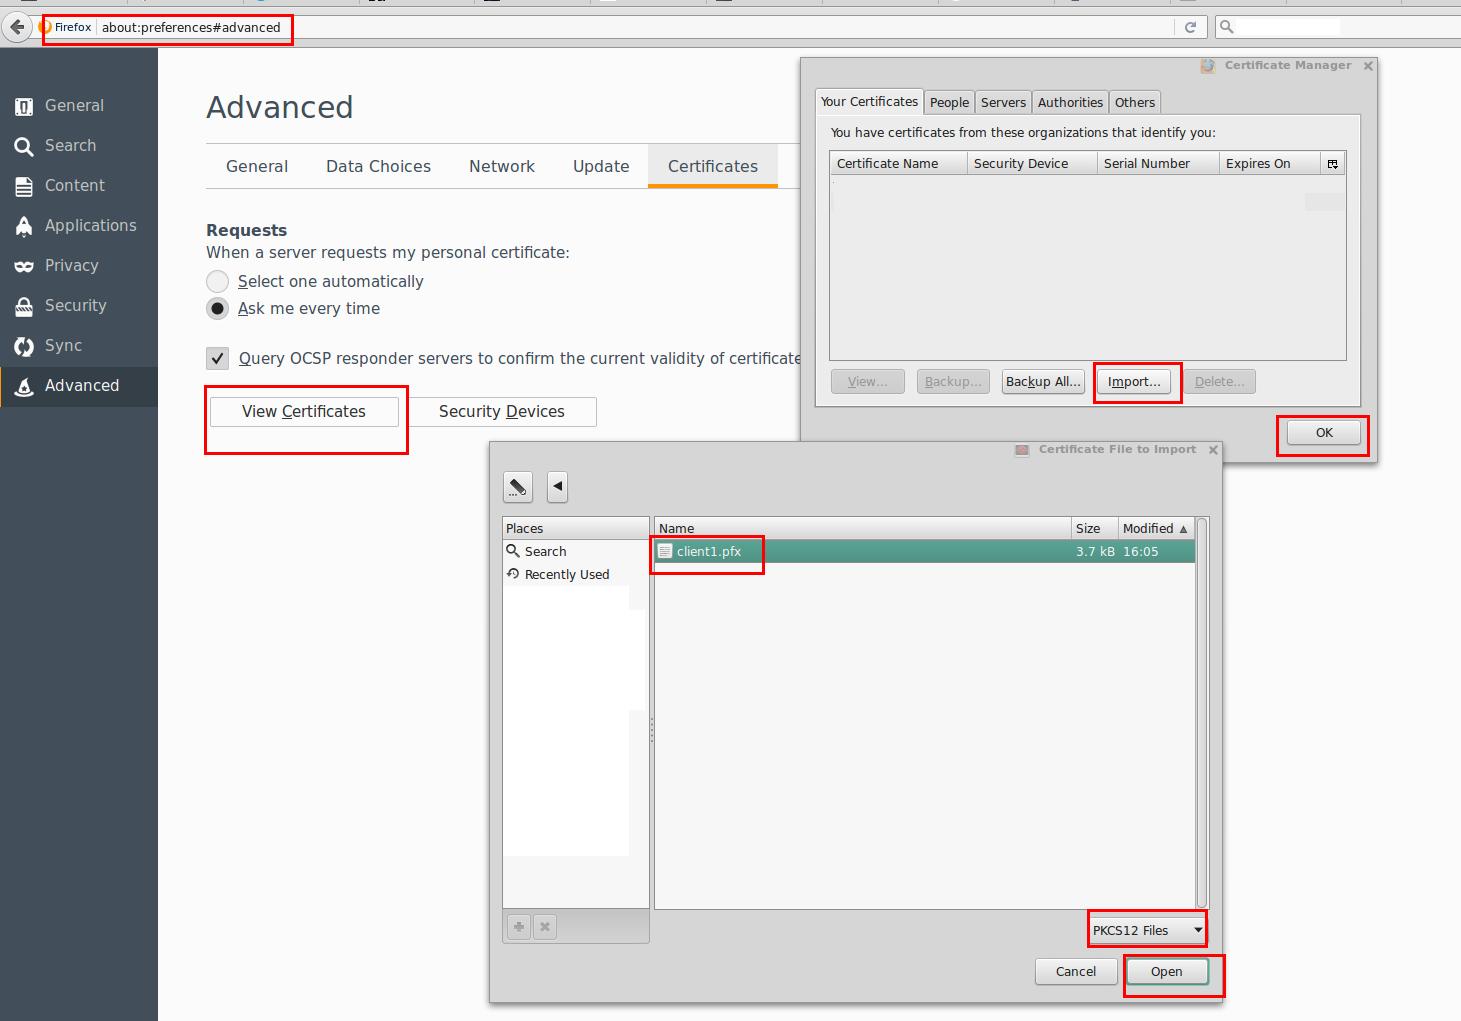
- Create a PKCS12 file containing both the client certificate and key to be imported into Firefox
openssl pkcs12 -export -out client1.pfx -inkey client1.key -in client1.crt
Enter Export Password:
Verifying - Enter Export Password:
- Copy it and import it into Firefox, like this…
- Refresh the Page and Choose the certificate we just imported
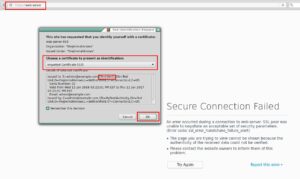
- Success!!! and Success!!
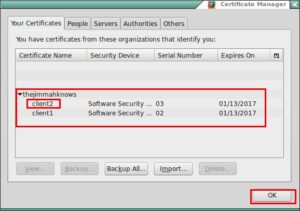
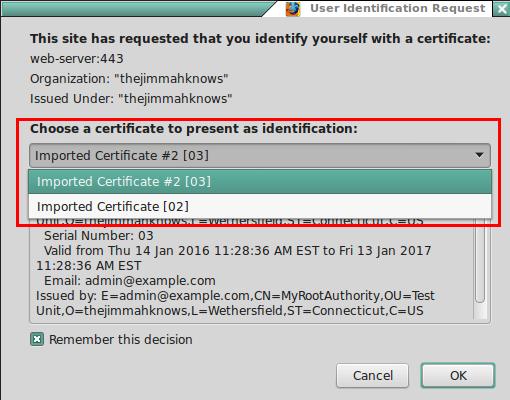
- Add the client2.pfx to Firefox
- Using the same steps above convert the client2.crt and client2.key into a client.pfx file and copy it into Firefox.
openssl pkcs12 -export -out client2.pfx -inkey client2.key -in client2.crt
- Browse to the web-site again you will be prompted to choose which Client Certificate to authenticate with..(You may have to restart Firefox)
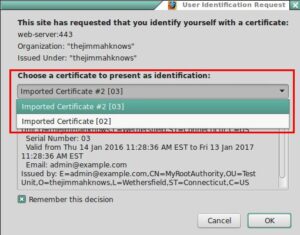
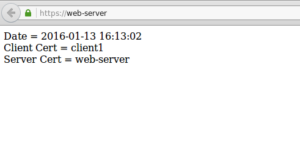
NOTICE: As we can see from out PHP page, the server is receiving our Client #2 Certificate
- Using the same steps above convert the client2.crt and client2.key into a client.pfx file and copy it into Firefox.
- Create a PKCS12 file containing both the client certificate and key to be imported into Firefox


Advanced SSL Authentication:
-
Certificate Revocation List
- So the last SSL Authentication item I wanted to go over is the generation and use of Certificate Revocation Lists(CRL). A CRL is used to provide either party a list of certificates that have been revoked by the Certificate Authority. As you can recall, once a certificate is signed by a Certificate Authority(CA) it is known to be trusted, and there is nothing stopping the information regarding a certificate and if it’s been revoked and shouldn’t be trusted. CRL to the rescue!!. There are several ways to make each party aware of the CRL, one can copy the file to both parties and when a new CRL is generated copy it to only the parties that are trusted(i.e. don’t copy it to a party you just revoked!). The other way we can distribute the CRL is make the CRL file publicially accessible via the web, such as http://web-server/crl.pem or something similar and have a manual download periodically. We also will have to regenerate our CRL everytime we want to revoke a certificate that has been signed by this Certificate Authority, regenerating our CRL “updates” our CRL file with the most current list of revoked certificates under this CA. As you might be thinking, this seems really labor intensive on Administrators…and you are right! Escpecially in scenarios with over 100 client certificates, etc. Later we will review two(2) common ways we can automatically distribute Revocation Lists, but for now let’s do it by hand.
- Generating our CRL
openssl ca -config openssl-rootca.conf -gencrl -out rootCRL.crl
Using configuration from openssl-rootca.conf
Enter pass phrase for /opt/rootCA.key:
openssl crl -in rootCRL.crl -noout -text
Certificate Revocation List (CRL):
        Version 2 (0x1)
    Signature Algorithm: sha256WithRSAEncryption
        Issuer: /C=US/ST=Connecticut/L=Wethersfield/O=thejimmahknows/OU=Test Unit/CN=MyRootAuthority/emailAddress=admin@example.com
        Last Update: Jan 16 18:50:22 2016 GMT
        Next Update: Feb 15 18:50:22 2016 GMT
        CRL extensions:
            X509v3 Authority Key Identifier:
                keyid:E3:A6:FD:69:23:0A:25:AF:7B:77:7A:B8:03:0B:B6:8A:CF:F2:B2:B8

            Authority Information Access:
                CA Issuers - URI:http://ocsp.thejimmahknows.com/rootCA.crt

            X509v3 CRL Number:
                4097
No Revoked Certificates.
    Signature Algorithm: sha256WithRSAEncryption
         25:7c:50:9c:09:9d:a2:a6:4d:81:0a:87:24:eb:24:35:f8:80:
         e1:a2:4f:c2:39:a9:3b:dc:fb:d5:ab:ff:54:f7:26:4f:b1:9f:
         17:d5:99:85:74:05:2a:e1:dc:67:54:9d:29:2d:b6:26:44:bf:
         1a:1f:d8:2c:96:cd:f4:8d:fe:44:26:d0:d1:df:d9:13:96:40:
         23:a5:bf:d9:20:29:03:d9:5b:57:49:60:22:8e:67:0d:51:f4:
         0c:da:81:6f:ca:f9:d6:93:b6:b5:a5:f3:5a:bb:67:b7:1f:ef:
         11:e4:36:38:81:60:45:fe:97:69:ae:2e:07:c9:0a:4e:4b:80:
         05:d8:62:c3:32:99:51:15:e2:0b:ff:ff:05:55:3e:fa:28:4c:
         b4:35:e9:bf:db:85:f0:1c:bc:7c:79:50:7c:3a:16:a4:b7:25:
         23:df:76:03:f7:7c:0a:75:bb:56:b1:cd:1a:b0:ca:e1:26:04:
         51:0a:0b:ff:e7:8c:2f:41:2d:d4:a2:3a:43:58:61:03:fa:a1:
         6e:ba:e8:60:15:14:e9:9f:fe:2e:d8:55:4b:4f:7d:5c:24:b1:
         13:47:89:23:87:5f:c0:8e:56:88:eb:a6:d1:86:bb:9a:2b:be:
         9d:c5:05:70:ce:10:d1:3f:6f:8f:84:1e:21:63:1c:5b:e8:95:
         99:df:20:9c
NOTE: Take a look at the Certificate(cat /opt/rootCRL.crl) and it is prefixed with BEGIN X509 CRL to tell us what type of certificate it is.
- Activate CRL checking in Apache2 with the SSLCARevocationFile option
vi /etc/apache2/sites-available/default.conf

Listen 443
<VirtualHost *:443>
        DocumentRoot           "/var/www/"
        ServerName              web-server

        SSLEngine               on
        SSLCACertificateFile   /opt/rootCA.crt
        SSLCertificateFile     /opt/web-server.crt
        SSLCertificateKeyFile  /opt/web-server.key
        SSLCARevocationFile    /opt/crl.pem
        SSLStrictSNIVHostCheck on
        SSLVerifyClient        require
        SSLVerifyDepth         1
# Allows PHP to read Certificate info
        SSLOptions +stdEnvVars
</VirtualHost>
NOTE: As of right now, you will still be able to connect with Firefox using either the client1.pfx or the client2.pfx.
- Revoke the client2 Certificate
openssl ca -config openssl-rootca.conf -revoke client2.crt
Using configuration from openssl-rootca.conf
Enter pass phrase for /opt/rootCA.key:
Revoking Certificate 1003.
Data Base Updated
We are not done yet, we can still access the web-server because a new CRL has not be generated.
cp /opt/rootCRL.crl /opt/rootCRL.crl.old

openssl ca -config openssl-rootca.conf -gencrl -out rootCRL.crl
Using configuration from openssl-rootca.conf
Enter pass phrase for /opt/rootCA.key:
 openssl crl -noout -text -in rootCRL.crl
Certificate Revocation List (CRL):
        Version 2 (0x1)
    Signature Algorithm: sha256WithRSAEncryption
        Issuer: /C=US/ST=Connecticut/L=Wethersfield/O=thejimmahknows/OU=Test Unit/CN=MyRootAuthority/emailAddress=admin@example.com
        Last Update: Jan 16 18:58:21 2016 GMT
        Next Update: Feb 15 18:58:21 2016 GMT
        CRL extensions:
            X509v3 Authority Key Identifier:
                keyid:E3:A6:FD:69:23:0A:25:AF:7B:77:7A:B8:03:0B:B6:8A:CF:F2:B2:B8

            Authority Information Access:
                CA Issuers - URI:http://ocsp.thejimmahknows.com/rootCA.crt

            X509v3 CRL Number:
                4098
Revoked Certificates:
    Serial Number: 1003
        Revocation Date: Jan 16 18:55:22 2016 GMT
    Signature Algorithm: sha256WithRSAEncryption
         55:a4:8e:b1:ae:0f:a6:4d:10:1a:95:4f:a9:75:57:c1:8d:f4:
         1f:77:bc:c8:e4:41:cf:96:19:75:10:5a:1b:79:0b:cb:cb:7d:
         74:f7:f7:2a:77:93:ec:c5:61:bd:30:32:3b:ce:5c:ba:d7:7c:
         76:61:4b:82:54:3a:c0:da:02:2c:88:28:f9:59:c4:a3:da:39:
         92:31:25:90:ab:57:80:48:b1:80:2a:ea:62:07:4e:ad:0b:54:
         ad:79:51:33:2a:b1:11:c5:0a:5b:f2:57:71:01:30:ac:cf:25:
         45:c0:ac:59:3a:58:b0:61:71:eb:4d:9b:68:5b:d7:47:4e:fb:
         67:06:7a:6d:79:87:58:7f:e3:83:1a:c9:ea:21:8f:dd:48:dd:
         ae:7a:07:88:37:90:0f:44:fc:fd:8c:a4:5d:5c:53:10:fb:03:
         b0:c5:f7:b5:08:3b:be:97:bd:ee:ff:a0:14:01:0f:cd:31:44:
         f7:c6:71:e6:ab:9b:13:20:d2:d6:88:89:5f:ca:a2:44:b6:a0:
         01:dd:13:ed:b7:40:48:32:76:73:51:2c:21:b1:74:4d:8b:ab:
         a0:fb:a3:c3:1e:7f:2e:5b:c4:1e:a3:e2:50:d6:9e:9d:69:51:
         d8:6e:57:9e:39:7f:31:38:95:f3:c3:63:5b:33:14:10:44:ae:
         db:e8:e5:de
NOTE: See the Revoked Certificates section? That is where a list of Certificates with their Serial Number will be listed.
- Reboot Apache2 to pick up the new CRL.pem, we must do this since we are using the SSLCARevocationFile option.
service apache2 restart
- Browse back to the http://web-server page
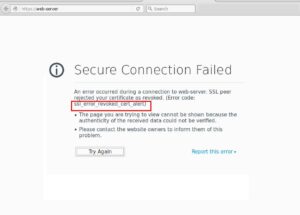
Sweet! We have been rejected because our client2 certificate has been revoked.

Publicizing Certificate Revocation Information:
There are two main distribution methods used when publicizing Certificate Revocation information. CRL Distribution Points(CDP) and Online Certificate Status Protocol(OCSP). Both are used to accomplish the same thing and allow each party to check the revocation of the other’s certificate. Both however work in completely different ways and are used/enforced differently depending on the application using them.
- Certificate Revocation List(CRL) Distribution Point (CDP) relies on the x.509 extension crlDistirbutionPoint to be embedded into the certificate. CDPs use this crlDistirbutionPoint value as a target to query against asking for a CRL. Very simlilar to our local CRL above. The enforcement and checking of this x.509 extension is the applications responsibility, the application has to look for and check the target location for a CRL and act accordingly. All of these things must add up to accomplish the desired functionality of Certificate Revocation checking. Because of all these varilables that must be performed and exectued witout issues, many applications consider CDP optional, and in most cases if the CDP cannot be contacted, mark the certificate as valid!! I believe Internet Explorer is the only browser I could find that you could enforce CDP checking, and the inability to contact the CDP marks the certificate as untrusted. Both Chrome and Firefox did not even check with the CDP, and continued on in marking the certificate as valid
- Let’s take a look at a CDP extension a well known server, like google.com
openssl s_client -connect google.com:443 | openssl x509 -noout -text
Look for this section:
            X509v3 CRL Distribution Points:

                Full Name:
                  URI:http://pki.google.com/GIAG2.crl
We see the section is marked as X509v3 CRL Distribution Points…CDP!! Within the secion is the target to download the CRL file.
Download the CRL and view it with openssl
-
wget http://pki.google.com/GIAG2.crl
openssl crl -inform DER -in GIAG2.crl -noout -text
Certificate Revocation List (CRL):
        Version 2 (0x1)
    Signature Algorithm: sha1WithRSAEncryption
        Issuer: /C=US/O=Google Inc/CN=Google Internet Authority G2
        Last Update: Jan 15 01:00:03 2016 GMT
        Next Update: Jan 25 01:00:03 2016 GMT
        CRL extensions:
            X509v3 Authority Key Identifier:
                keyid:4A:DD:06:16:1B:BC:F6:68:B5:76:F5:81:B6:BB:62:1A:BA:5A:81:2F

            X509v3 CRL Number:
                990
Revoked Certificates:
    Serial Number: 377AE3B09D40E542
        Revocation Date: Oct  2 10:23:22 2015 GMT
        CRL entry extensions:
            X509v3 CRL Reason Code:
                Key Compromise
As we can see there has been a revoked certificate within Google’s CRL with Serial Number: 377AE3B09D40E542. Pretty neat!
- Creating our own CRL and publishing it requires a few steps
- Adding crlDistributionPoint = URI:http://ocsp.thejimmahknows.com/rootCRL.crl to our x.509 extension server_req_ext, will add the extension to any new Certificates we sign with our Root Certificate Authority using openssl -config root_openssl.conf -extensions server_req_ext.
crlDistributionPoints = URI:http://ocsp.thejimmahknows.com/rootCRL.crl
- Adding crlDistributionPoint = URI:http://ocsp.thejimmahknows.com/rootCRL.crl to our x.509 extension server_req_ext, will add the extension to any new Certificates we sign with our Root Certificate Authority using openssl -config root_openssl.conf -extensions server_req_ext.
- Let’s take a look at a CDP extension a well known server, like google.com
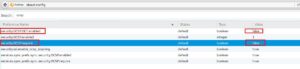
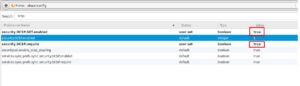
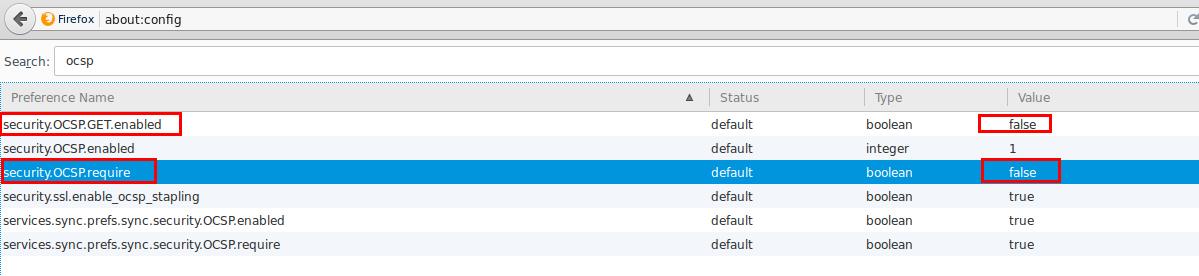
- Online Certificate Status Protocol (OCSP) is another way of handling automatic Certificate Revocation. The main difference between CDP and OCSP is the way they perform both the accounting and client connections to query for revoked certificates. OCSP is protocol based and is simliar to HTTP in that it relies on requests/response method, similarly to many tcp service. A difference in accounting, OCSP will actually query the index.db file for the R/V flags rather than downloading a CRL from a distribution point. Another thing to keep in mind is compatibility as OCSP is not supported in all web browsers. Ricky Donato over at fir3net.com has a great write up and outline of the differences between CRL and OCSP, I suggest a read. And to his point I had to manually enable OCSP in Firefox, and even then there was compatablity issues. Here are some screenshots in getting OCSP enabled in Firefox:

- Adding authorityInfoAccess = OCSP;URI:http://ocsp.thejimmahknows.com:8080 to our x.509 extensions, server_req_ext, will add the extension to any new Certificates we sign with our Root Certificate Authority using openssl -config rootca-openssl.conf -extensions server_req_ext.
authorityInfoAccess = OCSP;URI:http://ocsp.thejimmahknows.com:8080
- OCSP Responder is the service that listens to OCSP requests coming in from clients.
- Start it up
openssl ocsp -index index.db -port 8080 -rsigner ocsp.crt -rkey ocsp.key -CA rootCA.crt -text -out /opt/log.txt
- Check against it
openssl ocsp -issuer rootCA.crt -CAfile rootCA.crt -cert web-server.crt  -url http://ocsp.thejimmahknows.com:8080
Response verify OK
web-server.crt: revoked
	This Update: Jan 15 20:15:55 2016 GMT
	Reason: superseded
	Revocation Time: Jan 15 20:08:22 2016 GMT
openssl ocsp -issuer rootCA.crt -CAfile rootCA.crt -cert web-server2.crt  -url http://ocsp.thejimmahknows.com:8080
Response verify OK
web-server2.crt: good
	This Update: Jan 15 20:16:26 2016 GMT
- Start it up
- Again this works in theory, however I was unable to get it to function properly with Firefox, even when enabling the OCSP config flags shown above. I continued to recieve and error message on the OCSP responded of “malformed request”. If any expters out there reading this arctile figure out a way to get OCSP working with Firefox, let me know n the comments please!
- Adding authorityInfoAccess = OCSP;URI:http://ocsp.thejimmahknows.com:8080 to our x.509 extensions, server_req_ext, will add the extension to any new Certificates we sign with our Root Certificate Authority using openssl -config rootca-openssl.conf -extensions server_req_ext.
- In summary, Automatic publication of revocation lists should work in theory, but there so many unknown variables that it tends to fall short. Does the client application support CDP or OCSP or neither? Will the client application enforce revoked certificates found via CDP or OCSP? What is the default behvior of an application that cannot reach either the CDP or OCSP? Turstwave has a tremendous write up going into more detail regarding CDP, OCSP, and EV. Both CRL and OCSP use a signed Certificate file from the Certificate Authority to prove their validity to the client as a revocation entity.

Concept review and thoughts…
- SSL authentication is very powerful and versatile. We can verify the authenticity of a communication between two parties by issuing Certificates from a Trusted Certificate Authority. Whether that authority is publically known, such as GoDaddy, VeriSign, or Symantec, or a private Certificate Authority we set up using openssl.
- Private CA: When setting up a private Certificate Authority using openssl, I would suggest thinking about who out of this relationship you want to manage and be the authoritative entity. Making the decisions on signing certificates as trusted and in good standing.
- Keep in mind when deciding who will be the Private Certificate Authority in this relationship and the concept of CRLs. Remember CRLs are published by the Certificate Authority, so understand that the Certificate Authority makes revocation decisions.
- 2-Level CA: In a real world environment your Root Certificate Authority would be offline, meaning kept on a system that is not turned on. Root Certificate Authority’s certificates are usually in the span of 10-20 years. Hence the need for a subordinate root Certificate Authority with a shorter validity period that would perform actual signing of end-user certificates, such as our web-server, etc. This is commonly referred to as a 2-level Certificate Authority.
- Trusting Public CA’s, if both parties of a communication use and trust Public CA’s, such as Godaddy or Verisign, then the client and server of a 2-way SSL handshake will be considered trusted and authenticate successfully.
- With the above being true, consider an additional form of authentication before authorizing.
- Authority Info Access(AIA) is an x.509 extension that provide\s details about how to access information regarding revocation extensions Certificate Authority.
Helpful links:
- https://www.trustwave.com/Resources/SpiderLabs-Blog/Defective-By-Design—-Certificate-Revocation-Behavior-In-Modern-Browsers/
- isrlabs.net/wordpress/?p=169
- http://withagrainofsalt.co.uk/2013/07/21/creating-a-ca-using-openssl-with-ocsp/
- http://security.stackexchange.com/questions/86907/is-there-any-use-in-an-aia-extension-in-a-certificate-directly-issued-by-a-root
- https://blog.hqcodeshop.fi/archives/145-Certificate-Authority-setup-Doing-it-right-with-OpenSSL.html
- http://pki-tutorial.readthedocs.org/en/latest/expert/root-ca.conf.html
- http://www.mad-hacking.net/documentation/linux/security/ssl-tls/creating-ca.xml
- http://jpmens.net/2009/04/29/openssl-issuing-distribution-point-idp-in-crl/
- https://scotthelme.co.uk/certificate-revocation-google-chrome/
- http://pki-tutorial.readthedocs.org/en/latest/expert/
- http://www.securesenses.net/2013/05/x509-certificates-critical-vs-non.html

“How is mutual trust obtained? Both the server and client must generate their own SSL certificate and keys, and both must be signed by the same Certificate Authority. This ensures that both the server and the client’s certificate are trusted.”
As far as I’m aware, the only requirement is that each side trusts the other. I have never heard of the requirement that both certificates must come from the same CA. Is it the most common scenario? Yes, because in a 2-way authentication, the same entity is most likely creating the certificates for both sides of the connection. But I don’t know of any reason why the certificates can’t be created by two mutually trused CA’s.
Hi JR,
The scenario I mentioned with a third party CA signing both is when mutual trust has to be verified completely independent of the two parties asking for trust. This parent CA is trusted by both parties and can vouch for each party asking for authenticity. Hope that helps!