An interesting question came up the other day, we have multiple endpoints sending syslogs into a F5 VIP fronting a syslog collector…all on port 514. Our logging team wanted to change the port from 514 to different ports depending on the originating endpoint. Without changing each endpoints configuration to the desired new port, we thought maybe we could do this with an iRule.
when CLIENT_ACCEPTED {
#Grab CLLIENT IP
set clientIP [IP::client_addr]
#set default syslog port
set destSyslogPort 514
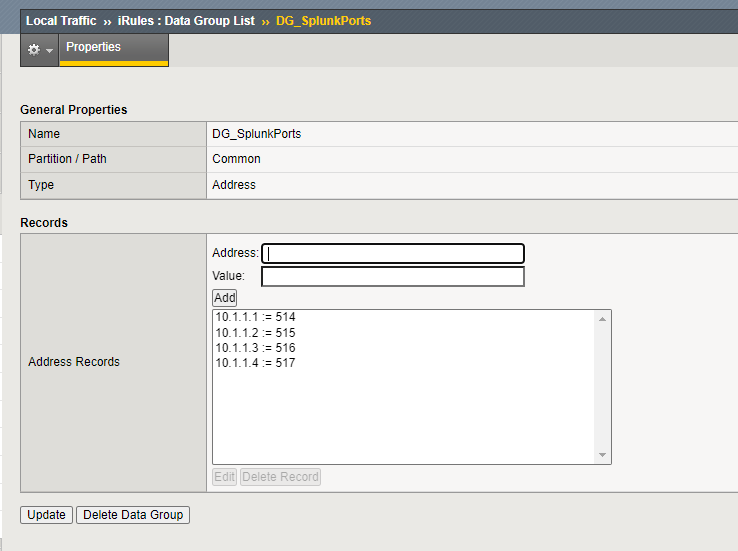
#check IP against DataGroup
if {[class match $clientIP equals DG_SplunkPorts] } {
#get corrisponding port fro DG_SplunkPorts
set destSyslogPort [class lookup $clientIP DG_SplunkPorts]
} else {
#set as default 514
set destSyslogPort 514
}
}
when LB_SELECTED {
LB::reselect node [LB::server addr] $destSyslogPort
}
First we grab the $clientIP, as we will need this to lookup the corresponding value in the DataGroup. We also need to set the variable $destSyslogPortto 514 by default in case the $clientIPis not found…Next we use a class match statement to search for the value, if any, using the $clientIP. With the found port value, or the default, we then need to modify the LB selection process.
At this point the F5 has already chosen a backend server to load balance to, so we need to intercept this with the ‘when LB_SELECTED‘ event. Within this event we tell the F5 to ‘reselect’ the chosen backend node t, in this case [LB::server addr] which is same node already selected, cleverly retaining the same backend node selected. Lastly we set the destination port with $destSyslogPort.
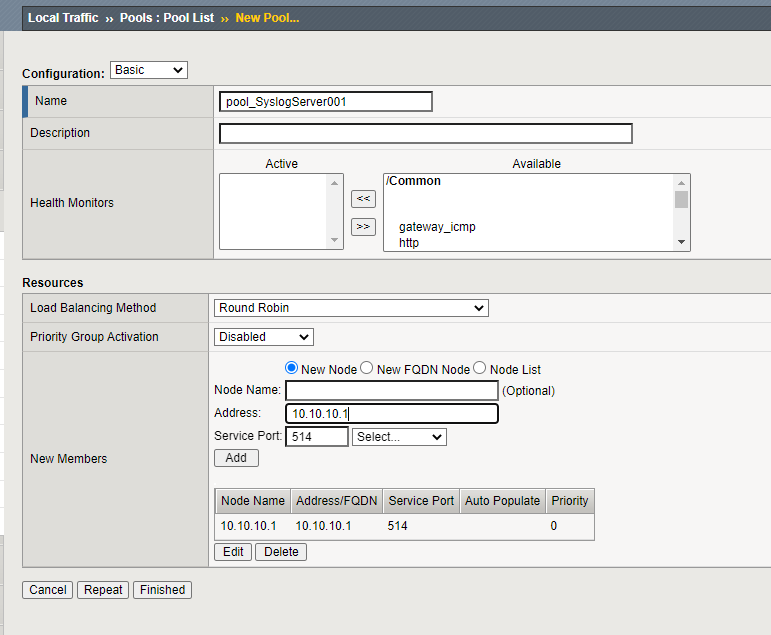
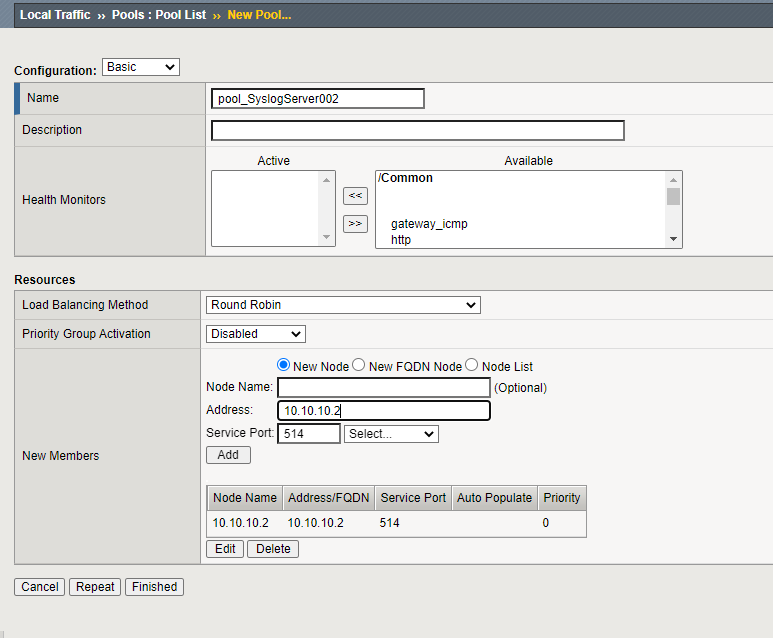
First lets create two(2) pools with a single node in each. These will be used in our iRule to clone the UDP datagram to both.
pool_SyslogServer001
pool_SyslogServer001
Now that we created the two(2) pools with single nodes in each, we can craft the irule to utilize HighSpeedLogging(HSL) in an iRule and tie it alltogether.
when CLIENT_ACCEPTED {
    set syslog_pool1 [HSL::open -proto UDP -pool pool_SyslogServer001]
    set syslog_pool2 [HSL::open -proto UDP -pool pool_SyslogServer002]
}
when CLIENT_DATA {
  HSL::send $syslog_pool1 [UDP::payload]
  HSL::send $syslog_pool2 [UDP::payload]

}
Each HSL send destination requires a unique pool with one node in it.
Cannot change source address (has to be self IP F5 LTM)
SIDEBAND_syslog_cloning
Now a different approach is to use iRule sideband method. Sideband was introduced in TMOS-LTMv11.0.0 so it will be needed for the SIDEBAND method to be available for use. It pretty much opens a TCP or UDP connection when the iRule get triggered.
when CLIENT_ACCEPTED {

  # grab UDP payload
  set data [UDP::payload]

  # create connection objects to both servers
  set conn_id1 [connect -protocol UDP -myaddr 1.1.1.1 -timeout 100 -idle 30 10.10.10.1:514]
  set conn_id2 [connect -protocol UDP -myaddr 1.1.1.1 -timeout 100 -idle 30 10.10.10.2:514]

  # send sideband request to server1
  send -timeout 1000 $conn_id1 $data
  close $conn_id1
  # send sideband request to server1
  send -timeout 1000 $conn_id2 $data
  close $conn_id2
}
Pros
Cons
More control, we can change things like source address and timeouts
No pools needed, can craft connection object directly in iRule
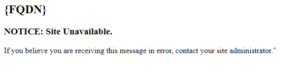
I wrote a iRule post located here, where I describe the essentials behind how beneficial iRules can be and the many use cases they have. I stumbled across a situation the other day for a client. This client had an F5 VIP load balancing 2 web servers of theirs. Now if those web servers for some reason are not available due to their healthcheck monitor failing, the users of that web site will receive a white page as the F5 will not proxy the traffic because there are no available pool members. I thought what if this was a big site, should users be left in the dark about a web site they use frequently when it’s not available? Then the idea of having the F5 LTM bounce back a well-formed splash page. This splash page would inform the user that the web site temporarily down, and if they believe this result is in error to contact their helpdesk.
This situation can be remedied with a couple of lines in an iRule.
when HTTP_REQUEST {
    #check if no members available
    if { [active_members [LB::server pool]] == 0 } {
       #create data variables with HTML content to send to client
       set httphost [string tolower [HTTP::host]]
       set data "<h2>$httphost</h2><h3>NOTICE: Site Unavailable.</h3>If you believe you are receiving this message in error, contact your site administrator."
       #send the HTML string
       HTTP::respond 200 content $data
    }
    #unset variables
    unset $httphost
    unset $data
}
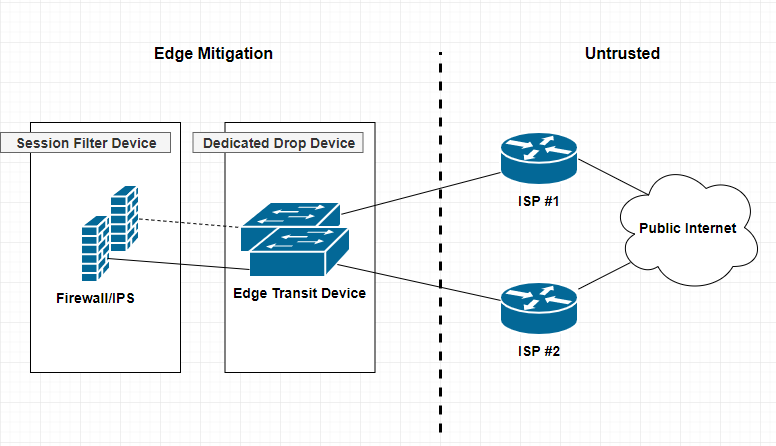
A dedicated drop device is a network appliance, usually a router or L3 switch that sites at the very edge of your network infrastructure. Beyond the firewall, and usually acts a as either layer 2 or 3 transit devices for your ISP interconnect uplinks for public or untrusted segments. Distinguishing a dedicated drop devices in your infrastructure interconnected chain of paths can enhance and offload many irrelevant packet transactions from ever hitting your Firewall mitigation appliances. The thought around this approach is to remove processing cycles away from your more expensive security appliances such as firewalls or IPS, allowing said devices to dedicate their efforts toward more complicated session and/or application driven attacks.
I’ve recently posted two articles covering two different VPN connection methods. SSL Remote VPN and IPSec Remote VPN via Cisco ASA security applicance. In the article I promised I would go thru and do a deteail compare and contrast of them. So Let’s get start!!
As promised here is the follow up post I mentioned here regarding setting up an Cisco AnyConnect remote access. Luckly the process is very similar to a remote access IPSec tunnel in the previous article with a few exceptions. Lets work through the differences between Cisco AnyConnect and a standard remote access IPSec Client VPN.
Comparison
SSL Remote VPN
IPSec Remote VPN
Cost
$$ per Connection, SSL certificate costs
Usually none, no SSL certificate costs
Capacity
Seats limited to licensing
Limited to Crypto Hardware
Performance
SSL with DTLS = Very Fast
IPsec without NAT-T = fast
Vulnerability
SSL vulnerabilties released frequently
IPSec requires pre-shared key
Requirements
SSL requires TCP 443, DTLS requires UDP 443
IPSec requires IP Protcol 50 (ESP) and UDP 500(IKEv1), NAT-T requires UDP 4500
Connection Considerations
SSL requires TCP 443 outbound for clients
IPSec requires both Layer 3 and Layer 4 protocols
NOTE: The table here is a quick reference when comprising SSL remote VPN with IPSec remote VPN. There are many things to consider when choosing between the two. SSL VPN is newer than IPSec, however the answer on which is better is not so straight forward.
IPSec remote VPN utilizes a variety of protocols and ports to form a successful tunnel. If you remember from my article on IPSec and NAT-Traversal, port requirements are UDP 500 for IKEv1 exchange, IP Protocol 50 for ESP communication, and if negotiated UDP 4500 for NAT-T. Most of the time these ports and protocols will not be allowed access outbound to the Internet. For instance, many guest networks like hotels and conferences only allow web browsable ports, such as 80(HTTP) and 443(HTTPS) outbound. That is a lot of firewall exceptions to establish an IPSec remote VPN.
SSL remote VPN introduces many connection and scalability improvements, making remote VPN functionality easier for the end user. SSL remote VPN solves the IPSec issues of a opening ports to establish a VPN session. Remote users no longer connect differently depending on where they are nor do they need to know how they are connected to the Internet, no fancy ports need to be opened, no issues with NAT-Traversal, etc. SSL remote VPN uses a very common trusted port for communication TCP 443 (and UDP 443, more on that later). This port is 99% of the time open to communicate with the Internet web sites. Using a commonly allowed port eliminates the issues seen with IPSec when establishing a VPN.
The trade-off, SSL remote VPN communicates via SSL/TLS. As stated this requires TCP, which is a stateful transport protocol. The issue arises when you have a remote host operating an application that uses TCP as well, such as web browser or Remote Desktop Connection. The scenario is now TCP on top of TCP, resulting in heavy overhead. Imaging the following scenario, you have a SSL remote VPN host connected, they then open a RDP session to a server on your network. So far so good. Now what happens when either the RDP session or the SSL remote VPN session requires a re-transmission because of connectivity problems. TCP re-transmission storms. Both the VPN session and RDP session will require re-transmissions, generating heavy overhead. Now this is not to say that either session will not recover, cause they will unless the connection is completely severed, TCP will do its job. Datagram Transport Layer Security(DTLS) to the rescue!!!
Datagram Transport Layer Security (DTLS)
DTLS is the savior and its what makes SSL client VPNs a very competitive remote access VPN technology. DTLS was designed to secure traffic similar to TLS, but without having to rely so heavily on the underlying TCP transport. TLS relies on TCP to guarantee delivery in the event of message fragmentation, message reordering, and message loss. So getting ride of any one of those TCP features will break the TLS crypto logic. DTLS solution to these issues is as follows:
Message Fragmentation — Fragmentation occurs when a packet datagram is too large to fit within an MTU (usually 1500bytes’ish). Fragmentation is detected and handled by the transport technology (TCP/UDP). TCP has mechanisms built in to solve this while UDP does not. DTLS solves this issue by introducing its own fragmentation offset and length value in the DTLS message itself. This ensure that both ends of the communication are provided fragmentation information regardless of the underlying transport.
Message Reordering — Reordering occurs for several reasons, a common reason is delayed delivery of the underlying network. Reordering isn’t a huge issue for transport technologies like TCP because it uses sequence numbering to ensure the original data is reassembled properly. TLS requires the sequential delivery of packets to preform it’s crypto logic, meaning TLS needs the previous packet to be able to decrypt the next packet N+1. DTLS solves this by adding it’s own sequence numbering to the application, allowing it to not be dependent on the underlying transport technology.
Message Loss — Packet loss occurs when a packet in a data stream never reaches its destination in a certain period of time. Message loss is handled very similar to Message Recording. For TLS and it’s TCP transport, re-transmissions are triggered for lost packets when sequence numbering doesn’t compute correctly for a agreed upon window. DTLS fixes this by adding a simple re-transmission timer to it’s application logic, thereby allowing it to re-transmit packets without relying on the transport protocol.
Keep in mind that DTLS built-in functionality of these usually transport specific recovery mechanisms creates the need for additional RAM/memory on the server-side. Another cool fact is most of these “fixes” come from IPSec ESP technology! See RFC4347 for more information.
I have a few Debian servers that are behind a firewall and they don’t have direct access to the internet. “Protected Servers”. I occasionally have to update their packages via a web proxy in the DMZ. I know there a countless ways to do this, but I wanted a one-liner that i can use without having to modify the apt-get application or my hosts default proxy settings.
Hello! I posted an article a while back on how to use a web proxy to block unwanted content. While this is good and fun, we need an easy way to configure clients to use the proxy. For this article I will be over both PAC file deployments and WPAD deployments. We will use the example proxy server of 172.16.0.5:3128. Let’s go!
First a few common ways clients are configured to use a Web Proxy:
Manual configuration — Client manually inputs configuration data into each of their browsers to use the web proxy for each protocol (HTTP, HTTPS, FTP, etc).
PAC File –– A PAC(Proxy Auto-configuration) file, is a method where the client’s browser is configured with the location of the PAC file via http:// or https:// to be downloaded automatically .
WPAD — WPAD (Web Proxy Automatic Detection) is the automatic and transparent configuration of client’s to use and send their web-traffic to a proxy server. This deployment of PAC files using already existing network protocols such as DNS or DHCP options.
GPO — GPO( Group Policy Objects deployments are primarily used in Windows Domain environments. User will obtain proxy configuration automatically through these Group Policy Objects upon log-in. (not-covered in this article)
Like many of you I tend to browse Imgur from time to time. I noticed a few times some folks were showing off their build of a Smart Mirror and I thought to myself that would make a great thejimmahknows post! So here we go!
I wanted to put together a quick tutorial for setting up a Cisco ASA – AnyConnect with SSL/TLS. I’ve done it a few times and I always have to re-lookup each step and the order in which to do it, so why not make a quick post about it to remember!
Optional: Destroy Current Trustpoint
You will have to destroy or clear out the current trustpoint if it already exists. This must be done if you are going to re-generate the key, which is best practice when renewing a Certificate due to expiration or one that has been compromised.
asa01(conf)# no crypto ca trustpoint oldtrustpoint.trustpoint
It will warn you that it will destroy any certificates within the trustpoint.
Generate a Key
Here we start with the generation of our key, using 2048 bits. the key name can be anything you want, but I like call it by the service I will be putting it on, for my case for this tutorial is accessthejimmahknowscom.key
newtrustpoint.trustpoint — The name I gave to this trustpoint which will tie everything together.
subject-name— This command holds the distinguished name of the Certificate’s profile, see RFC3039
keypair — This is what key to pair the trustpoint with, we generated this in the previous step.
fqdn — This is the main FQDN of our service that will use the trustpoint
enrolment terminal — This tells the Cisco ASA to output the CSR (which we will create in the next step) to the terminal screen. Otherwise you will have to SFTP to the ASA and download it.
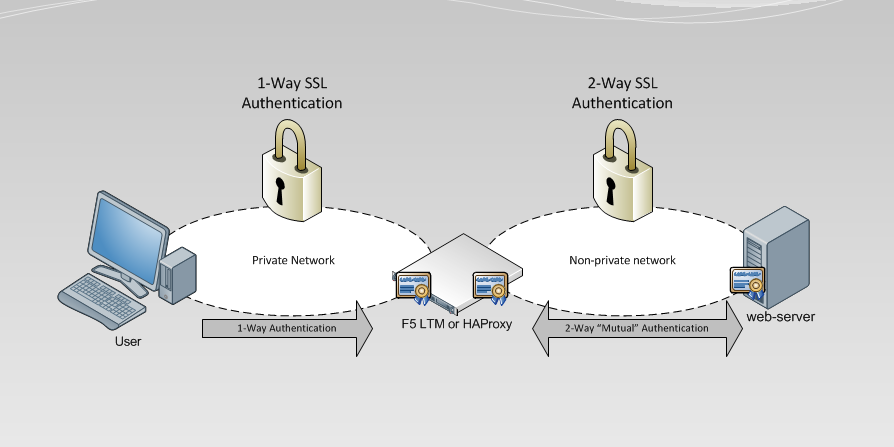
So a recent post I published talked about 1-Way vs 2-way SSL Authentication in some decent detail. We learned that 2-Way “Mutual” SSL Authentication can be used to enforce both parties attempting to communicate securely to provide authenticity. In other words, prove to each other that they are who they say they are. This can be very powerful from a security standpoint, but is it practical? The answer is, yes and no. The constraint comes from the aspect of administration (actually create certificates for each client) and manageability (keep accounting and maintaining actively lists of trusts) with the trade-off of proper authenticity. For example at first administering and managing 10 client certificates may be okay, but then imaging 100, or even a 1,000! So in this post I wanted to approach the idea of utilizing some tools we can use to offload some of this administration and management while maintaining Mutual Authentication with another entity. The idea revolves around one major assumption, users of a particular service (In this case a web-server) reside on a privately controlled and trusted network
My idea is if we have a group of clients residing on an internal privately addressed network, we can use either an F5 LTM or HAProxy to proxy our users’s connections destined for a service that is enforcing 2-Way SSL “Mutual” Authentication. The F5 LTM or HAProxy would perform the 2-Way SSL Mutual Authentication on behalf of each connecting user, eliminating the technical need to generate certificates for each client, while maintaining an element of mutual trust to the end service.
The basic idea is: (notice only our F5 LTM/HAproxy and the web-server perform 2-Way “Mutual” Authentication)