Cisco

Cisco AnyConnect SSL/TLS Trustpoint

I wanted to put together a quick tutorial for setting up a Cisco ASA – AnyConnect with SSL/TLS. I’ve done it a few times and I always have to re-lookup each step and the order in which to do it, so why not make a quick post about it to remember!

Optional: Destroy Current Trustpoint

You will have to destroy or clear out the current trustpoint if it already exists. This must be done if you are going to re-generate the key, which is best practice when renewing a Certificate due to expiration or one that has been compromised.

asa01(conf)# no crypto ca trustpoint oldtrustpoint.trustpoint
  • It will warn you that it will destroy any certificates within the trustpoint.
Generate a Key

Here we start with the generation of our key, using 2048 bits. the key name can be anything you want, but I like call it by the service I will be putting it on, for my case for this tutorial is accessthejimmahknowscom.key

asa01(conf)# crypto key generate rsa label accessthejimmahknowscom.key modulus 2048
Setting up the trustpoint locale and generate a CSR for submission

    First we need to set up a trustpoint object, with our locale properties, etc

asa01(conf)# crypto ca trustpoint newtrustpoint.trustpoint
asa01(config-ca-trustpoint)# subject-name CN=access.thejimmahknows.com,O=thejimmahknows,C=US,St=Connecticut,L=Wethersfield
asa01(config-ca-trustpoint)# keypair accessthejimmahknowscom.key
asa01(config-ca-trustpoint)# fqdn access.thejimmahknows.com
asa01(config-ca-trustpoint)# enrollment terminal
asa01(config-ca-trustpoint)# exit
  • newtrustpoint.trustpoint — The name I gave to this trustpoint which will tie everything together.
  • subject-name This command holds the distinguished name of the Certificate’s profile, see RFC3039
  • keypair — This is what key to pair the trustpoint with, we generated this in the previous step.
  • fqdn — This is the main FQDN of our service that will use the trustpoint
  • enrolment terminal — This tells the Cisco ASA to output the CSR (which we will create in the next step) to the terminal screen. Otherwise you will have to SFTP to the ASA and download it.
Continue reading…

CiscoASA — AnyConnect SSL VPN Setup

As promised here is my article on how to setup a SSL remote VPN, an alternative to IPSec Remote VPN from this article. What’s great is the steps to setup an SSL remote VPN service are very similar to IPSec remote VPN!! So let’s get started.

As with IPSec remote VPN we will need similar design considerations for SSL remote VPN.

  • First, a subnet is required for client’s to be put on when successfully authenticated and authorized via the SSL remote VPN. This can be the same subnet as one already existing on your network or a separate one with a firewall in-between The later being best in practice and security.
  • Secondly, deciding on split-tunneling vs all-tunneling. The difference being on the client would you like all traffic to be forced across the tunnel or allow clients to communicate with both their local network and the networks on the otherside of the VPN. For best practice and security, all-tunneling is recommended.
  • Third, Access Lists and tunneled networks. Here we will decided what SSL remote VPN users will have have access to in our other networks. We will also, in the case of split-tunneling, create an access-list of what networks to tunnel for the Remote VPN user.
  • Fourth, provisioning standard network services for VPN user’s. Remote VPN user’s will need a default gateway, DNS servers, domain suffix, an address pool, proxy settings, etc.

Continue reading…

Cisco ASA — Easy Remote Client VPN Solution

I’ve posted an article on Client VPN setup using OpenVPN and I noticed I didn’t have one regarding Cisco ASA. A Cisco ASA being a very common Security Appliance used by small and large companies. This article will cover how to setup a standard remote client VPN utilizing IPsec as the crypto carrier. Cisco also has their own proprietary remote client VPN solution called AnyConnect. I will be posting an article after this one on how to set an AnyConnect solution up and include what the differences are between it and the standard IPsec remote client VPN contained in this article.

A remote client VPN is something very common in workplace now-a-days. It allows users to appear as if they are on the company’s internal network over an insecure medium(e.g. Internet, untrused Network, etc). It does so by using IPsec. IPsec is a tried and true Layer 3 securing technique that requires both parties involved to mutually authenticate each other before passing traffic.

A few things to keep in mind regarding remote client VPNs.

  • First, a subnet is required for client’s to be put on when successfully authenticated and authorized via the remote client VPN. This can be the same subnet as one already existing on your network or a separate one with a firewall in-between The later being best in practice and security.
  • Secondly, deciding on split-tunneling vs all-tunneling. The difference being on the client would you like all traffic to be forced across the tunnel or allow clients to communicate with both their local network and the networks on the otherside of the VPN. For best practice and security, all-tunneling is recommended.
  • Third, Access Lists and tunneled networks. Here we will decided what Remote VPN users will have access to other networks. We will also, in the case of split-tunneling, create an access-list of what networks to tunnel for the Remote VPN user.
  • Fourth, provisioning standard network services for VPN user’s. Remote VPN user’s will need a default gateway, DNS servers, domain suffix, an address pool, proxy settings, etc.

Continue reading…

Squid Proxy — Transparent SSL Web Proxy redirection using WCCP, Cisco ASA, and Squid 3.4+

I’ve posted a few articles on how to set up a Forwarding Proxy using Squid, and using benefits like caching and content blocking (Ads, adult, gambling, etc). This can bring centralized web security and delivery to you and your users.  However, users need to be expliclty configured to use the Proxy service. This means having their web browser like Firefox or even Internet Explorer set with the DNS or IP address of the Proxy server. This can be an issue if youhave little or no management of the user’s Web Browsers configuration.  This is where a content-routing protocol like WCCP(Web Cache Communication Protocol) comes into play. With WCCP we can influence specific user traffic to be encapsulated and re-routed to your Proxy server. The difference between this and some of the other ways to force web traffic to your Proxy server(like iptables redirection) is the original Web packet generated by the user’s device is not altered. Instead it is encapsulated when it reaches your WCCP receiver running on an upstream egress router(user gateway towards Internet). It is then re-routed via this encapsulation to your Proxy server which is WCCP aware.

Before we begin, you will need a few things:

  • Squid Proxy Server 3.4+ compiled with WCCP
  • Router or Security device capable of running the WCCPv2 service(See vendor list here…)
  • Some knowledge of Web Proxy Technology.
  • A Web Browser to test with.
  • Your favorite beverage and some patients.

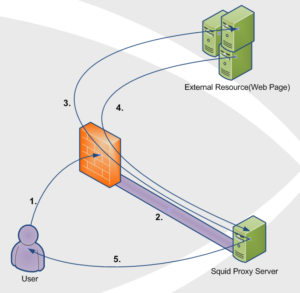
Topology

Notice: Cisco ASA only supports having the user subnet(s) and the cache-engine(Squid Proxy server) behind the same Cisco ASA interface(inside,dmz,outside,etc). The reason for this is the WCCP processing on the ASA happens after interface ACL, meaning for example ACL on your inside interface are processed before any WCCP manipulation can begin.

  1. User requests a web resource on outside interface(usually the Internet) of Router/Firewall.
  2. WCCP Server (Router/Firewall) catches this interesting traffic(traffic we want to redirect) and encapsulates it within a GRE tunnel to the WCCP Client(Squid Proxy Server) on the other end of the tunnel.
  3. WCCP Client (Squid Proxy Server) decapsulates the GRE payload and fetches the original client request just like an ordinary Web Proxy would.
  4. WCCP Client receives a response from the external web server.
  5. WCCP Client (Squid Proxy Server) serves the web page back to the original User by spoofing the source IP address(This is key). Spoofing is done by rewriting the source IP address field of the packet with the External Resource’s IP address. This makes it look like the packet the user receives is from the external web site.

Continue reading…

Cisco ASA 5505 Memory Upgrade

Hi Folks! So I was trying to update my Cisco ASA 5505 my buddy gave me from version 8.2 to 9.1. However upon reloading the device with the new 9.1 image file I got a warning on the console! I received the error of purchase Cisco item “ASA5505-MEM-512=”


Continue reading…

Cisco IOS –DHCP/DNS Authoritative Server on Router

I was trying to set up a SOHO router for a small client the other day and was having difficulty getting the DNS server to function the way I wanted on the router. I could get the DNS server to run on the Cisco Router, but it would only work on external domains. Any static record I added would not be resolvable for clients.

For starters, I will assume you have your own Cisco router running 12.4+ IOS firmware with ipservices.

DHCP first…

  1. First, let’s set up DHCP on the Router
    R1(config)# interface fastEthernet 0/1
    R1(config)# ip address 10.0.0.1 255.255.255.0
    R1(config)# no shutdown
    
  2. Enable DHCP service on that interface
    R1(config)# ip dhcp-server 10.0.0.1
  3. Configure DHCP settings
    R1(config)# ip dhcp pool dhcp-pool
    R1(config-dhcp)# network 10.0.0.0 255.255.255.0
    R1(config-dhcp)# domain-name yourdomain.local
    R1(config-dhcp)# dns-server 10.0.0.1
    R1(config-dhcp)# default-router 10.0.0.1
    R1(config-dhcp)# lease 7

    Continue reading…

Cisco IOS — Link Aggregation with LACP and NIC Teaming

Hi All!, been awhile since I posted an article and I don’t think I have ever posted one on Network Link Aggregation!! Link Aggregation is the physical combining of network links into one logical link. There are two main advantages to this practice. First is the increase throughput that you obtain by combining links, for example combining 2x 1GB links will increase your total bandwidth to 2GB.(Keep in mind this will not change your latency…) Secondly, link aggregation grants the benefits of redundancy. Imagine the setup above. If 1 of the 1GB links fails, you would still have the other 1GB link to fall back on, woot!.

Wikipedia Image
–Image From Wikipedia
Continue reading…