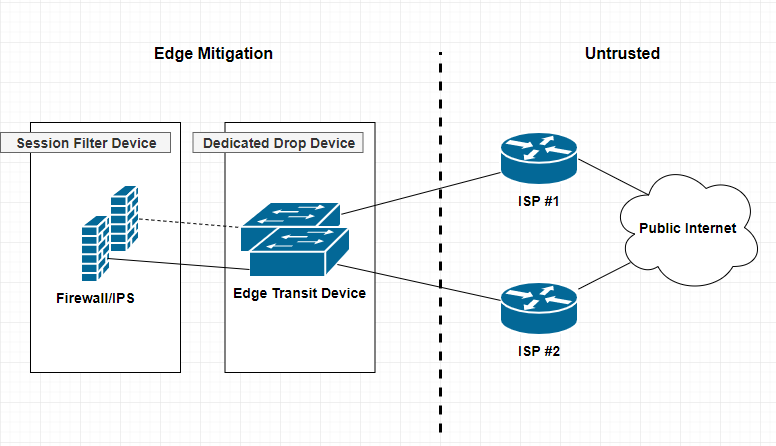
A dedicated drop device is a network appliance, usually a router or L3 switch that sites at the very edge of your network infrastructure. Beyond the firewall, and usually acts a as either layer 2 or 3 transit devices for your ISP interconnect uplinks for public or untrusted segments. Distinguishing a dedicated drop devices in your infrastructure interconnected chain of paths can enhance and offload many irrelevant packet transactions from ever hitting your Firewall mitigation appliances. The thought around this approach is to remove processing cycles away from your more expensive security appliances such as firewalls or IPS, allowing said devices to dedicate their efforts toward more complicated session and/or application driven attacks.
This my first ever post and I feel it’s a pertinent one to mention.
What is it and why is it bad?
Security through obscurity can be said to be bad because it often implies that the obscurity is being used as the principal means of security. Obscurity is fine until it is discovered, but once someone has worked out your particular obscurity, then your system is vulnerable again. [source: https://en.wikipedia.org/wiki/Security_through_obscurity]
Security is an often overlooked topic in organizations. I’ve heard many different arguments for why things were configured a certain way. Once thing that stands is security through obscurity should never be overlooked. Things are always secure, until they’re not. You should never expose something publicly that is not meant to be exposed publicly.
I’ve recently posted two articles covering two different VPN connection methods. SSL Remote VPN and IPSec Remote VPN via Cisco ASA security applicance. In the article I promised I would go thru and do a deteail compare and contrast of them. So Let’s get start!!
As promised here is the follow up post I mentioned here regarding setting up an Cisco AnyConnect remote access. Luckly the process is very similar to a remote access IPSec tunnel in the previous article with a few exceptions. Lets work through the differences between Cisco AnyConnect and a standard remote access IPSec Client VPN.
Comparison
SSL Remote VPN
IPSec Remote VPN
Cost
$$ per Connection, SSL certificate costs
Usually none, no SSL certificate costs
Capacity
Seats limited to licensing
Limited to Crypto Hardware
Performance
SSL with DTLS = Very Fast
IPsec without NAT-T = fast
Vulnerability
SSL vulnerabilties released frequently
IPSec requires pre-shared key
Requirements
SSL requires TCP 443, DTLS requires UDP 443
IPSec requires IP Protcol 50 (ESP) and UDP 500(IKEv1), NAT-T requires UDP 4500
Connection Considerations
SSL requires TCP 443 outbound for clients
IPSec requires both Layer 3 and Layer 4 protocols
NOTE: The table here is a quick reference when comprising SSL remote VPN with IPSec remote VPN. There are many things to consider when choosing between the two. SSL VPN is newer than IPSec, however the answer on which is better is not so straight forward.
IPSec remote VPN utilizes a variety of protocols and ports to form a successful tunnel. If you remember from my article on IPSec and NAT-Traversal, port requirements are UDP 500 for IKEv1 exchange, IP Protocol 50 for ESP communication, and if negotiated UDP 4500 for NAT-T. Most of the time these ports and protocols will not be allowed access outbound to the Internet. For instance, many guest networks like hotels and conferences only allow web browsable ports, such as 80(HTTP) and 443(HTTPS) outbound. That is a lot of firewall exceptions to establish an IPSec remote VPN.
SSL remote VPN introduces many connection and scalability improvements, making remote VPN functionality easier for the end user. SSL remote VPN solves the IPSec issues of a opening ports to establish a VPN session. Remote users no longer connect differently depending on where they are nor do they need to know how they are connected to the Internet, no fancy ports need to be opened, no issues with NAT-Traversal, etc. SSL remote VPN uses a very common trusted port for communication TCP 443 (and UDP 443, more on that later). This port is 99% of the time open to communicate with the Internet web sites. Using a commonly allowed port eliminates the issues seen with IPSec when establishing a VPN.
The trade-off, SSL remote VPN communicates via SSL/TLS. As stated this requires TCP, which is a stateful transport protocol. The issue arises when you have a remote host operating an application that uses TCP as well, such as web browser or Remote Desktop Connection. The scenario is now TCP on top of TCP, resulting in heavy overhead. Imaging the following scenario, you have a SSL remote VPN host connected, they then open a RDP session to a server on your network. So far so good. Now what happens when either the RDP session or the SSL remote VPN session requires a re-transmission because of connectivity problems. TCP re-transmission storms. Both the VPN session and RDP session will require re-transmissions, generating heavy overhead. Now this is not to say that either session will not recover, cause they will unless the connection is completely severed, TCP will do its job. Datagram Transport Layer Security(DTLS) to the rescue!!!
Datagram Transport Layer Security (DTLS)
DTLS is the savior and its what makes SSL client VPNs a very competitive remote access VPN technology. DTLS was designed to secure traffic similar to TLS, but without having to rely so heavily on the underlying TCP transport. TLS relies on TCP to guarantee delivery in the event of message fragmentation, message reordering, and message loss. So getting ride of any one of those TCP features will break the TLS crypto logic. DTLS solution to these issues is as follows:
Message Fragmentation — Fragmentation occurs when a packet datagram is too large to fit within an MTU (usually 1500bytes’ish). Fragmentation is detected and handled by the transport technology (TCP/UDP). TCP has mechanisms built in to solve this while UDP does not. DTLS solves this issue by introducing its own fragmentation offset and length value in the DTLS message itself. This ensure that both ends of the communication are provided fragmentation information regardless of the underlying transport.
Message Reordering — Reordering occurs for several reasons, a common reason is delayed delivery of the underlying network. Reordering isn’t a huge issue for transport technologies like TCP because it uses sequence numbering to ensure the original data is reassembled properly. TLS requires the sequential delivery of packets to preform it’s crypto logic, meaning TLS needs the previous packet to be able to decrypt the next packet N+1. DTLS solves this by adding it’s own sequence numbering to the application, allowing it to not be dependent on the underlying transport technology.
Message Loss — Packet loss occurs when a packet in a data stream never reaches its destination in a certain period of time. Message loss is handled very similar to Message Recording. For TLS and it’s TCP transport, re-transmissions are triggered for lost packets when sequence numbering doesn’t compute correctly for a agreed upon window. DTLS fixes this by adding a simple re-transmission timer to it’s application logic, thereby allowing it to re-transmit packets without relying on the transport protocol.
Keep in mind that DTLS built-in functionality of these usually transport specific recovery mechanisms creates the need for additional RAM/memory on the server-side. Another cool fact is most of these “fixes” come from IPSec ESP technology! See RFC4347 for more information.
Hello! I posted an article a while back on how to use a web proxy to block unwanted content. While this is good and fun, we need an easy way to configure clients to use the proxy. For this article I will be over both PAC file deployments and WPAD deployments. We will use the example proxy server of 172.16.0.5:3128. Let’s go!
First a few common ways clients are configured to use a Web Proxy:
Manual configuration — Client manually inputs configuration data into each of their browsers to use the web proxy for each protocol (HTTP, HTTPS, FTP, etc).
PAC File –– A PAC(Proxy Auto-configuration) file, is a method where the client’s browser is configured with the location of the PAC file via http:// or https:// to be downloaded automatically .
WPAD — WPAD (Web Proxy Automatic Detection) is the automatic and transparent configuration of client’s to use and send their web-traffic to a proxy server. This deployment of PAC files using already existing network protocols such as DNS or DHCP options.
GPO — GPO( Group Policy Objects deployments are primarily used in Windows Domain environments. User will obtain proxy configuration automatically through these Group Policy Objects upon log-in. (not-covered in this article)
TLS Authentication or SSL authentication is nothing more than proving the authenticity of one or both parties in the formation of an TLS “Secure” connection.
1-way “Standard” TLS Authentication is the most common, you use this every time you log into Facebook, your bank website, google, etc. The point of this type of authentication is for you (as the client) to verify the authenticity of the web site you are connecting to and form a secure channel of communication.
2-way “Mutual” mTLS Authentication is less common than the traditional “one-way” TLS authentication we are a custom to when visiting secured websites. When we connect to our banking website or our favorite web e-mail site, we as the client are verifying the identify of the site we are requesting content from. This “one-way” authentication allows us as the client to connect with confidence that the web site we are receiving content from has been verified. this authenticity check is performed by our client browser with a little help from a third-party certificate authority.
Let’s first review a one-way TLS connection.
The Client browsers receives https://google.com in it’s address barf
Client browsers knows based on https:// that this connection will require an SSL handshake and sends a CLIENT_HELLO to the destined web server (google). This includes other things like SSL/TLS version, acceptable ciphers, etc
The web server receives the CLIENT_HELLO request and sends a SERVER_HELLO back to the client. SERVER_HELLO contains SSL version, acceptable ciphers, and the server certificate.
The client receives the servers certificate and it is verified against a list of known Certificate Authorities.
If the certificate is proven to be in good standing, the client sends back a pre-master secret is encrypted inside the server’s certificate. Remember only the server can decrypt anything encrypted with it’s certificate because only the server has the decryption key. Server Certificate encrypts, Server Key decrypt’s.
At this point both client and server have the pre-master secret and can calculate a master secret to use to symmetrically encrypt and decrypt data between them.
So as we can see from a traditional TLS handshake, the client is never verified as authentic. Now, in most situations this is fine, as most connect types of this nature only need to verify the server because that is where the content is coming from.
The difference: In a 2-way mutual authenticated TLS handshake, the server will ask the client to send its own certificate for verification. Just like the client asking for the server’s certificate in the 1-way TLS handshake above, the server will perform verification of the client certificate before continuing to the pre-master and master secret phase of the SSL handshake. If authenticity of the client cannot be verified the server closes the connection.
How is mutual trust obtained? Both the server and client must generate their own TLS certificate and keys, and both must be signed by the same Certificate Authority. This ensures that both the server and the client’s certificate are trusted. This allows authentication to remain asymmetrical, instead of symmetrical. For example, rather than have a shared password that 3 clients and the server use to encrypt and decrypt data. Each client and the server have their own certificates and keys that will be used for communication with the server. Asymmetrical authentication and encryption is better at enforcing authenticity because everyone has their own cert and key used to establish a secure connection with the server. Symmetrical authentication is faster at encrypting and decrypting but suffers from having every client use the same key.
What happens if a client key is compromised? In the symmetrical authentication scenario, mentioned previously, you would have a serious security issue on your hands. Each client would be at risk and the likely hood of eavesdropping would increase. An attacker only has to obtain one key to gain visibility into every connection. Asymmetrical on the other hand has a different way of handling this. Because each client has it’s own certificate and key pair, and the signing of each certificate is performed by a third-party Certificate Authority, one simply has to revoke the compromised client in the form of a CRL certificate(more on this later). Other client connections will not be compromised or have to be re-generated. The server verifying the client certificate will fail only for the revoked for the compromised client.
What happens if my Certificate Authority’s key is compromised? This is the worst case scenario that can happen in your PKI infrastructure.An attacker can impose and generate a new certificate authority certificate and start signing certificates that can be used to fake authenticity. In essence break the certificate authority’s trust. Keep in mind a Certificate Authority key cannot decrypt your connections.
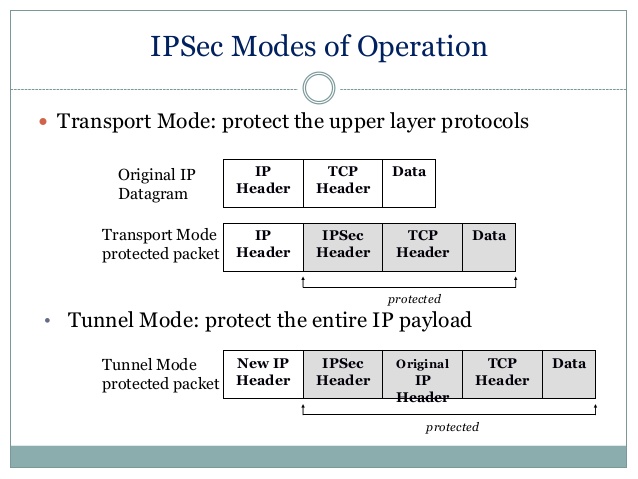
Most of the time when we are trying to establish a site-to-site or LAN-to-LAN connectivity between two independent parties over an untrusted medium we rely on IPsec. Internet Protocol Security (IPSec) is a open standard suite of protocols used to authenticate and encrypt IP Packets in a connection. This ensures data integrity and data confidentiality. IPsec can be used in a variety of ways, to secure host-to-host communication, network-to-network communication, host-to-network. The most common type is network-to-network. An argument can be made that host-to-host is the same as network-to-network with /32s (i.e. 192.168.1.1/32 to 192.168.255.1/32). Anyway!
IPsec allows us to form a secure virtual communication link over a untrusted medium such as the internet to allow LAN to LAN communication. Sound familar? VPN anyone? For instance if CompanyA with 192.168.1.0/24 address space and CompanyB with 172.16.1.0/24 address space require hosts on each of their networks to talk to one another, this can be accomplished by utilizing a IPsec tunnel. Hosts at CompanyA would be able to traverse the IPsec tunnel to CompanyB as it appears to them to be nothing more than another routed LAN. It’s a cheap and easy way to create this linked infrastructure without the need to buy or lay-down physically dedicate cabling. Why not piggy back and on an already existing insecure circuit and make it secure with IPSec!!
Phase 1 and Phase 2 ???
“Phase 1” — Before IPsec can even begin to send your data, there is a negotiation and the establishment of an agreed upon method to create and secure this connection. The negotiation is performed by Internet Key Exchange (IKE), which consists of (I think) 3 different Key Management protocols. ISAKMP, Oakley, SKEME. All of which are used based on how you want to setup the key exchange, ISAKMP being the most popular. The main point of this Phase 1 is two things, one to agree upon a way to protect this negoitation, followed by authenticating each endpoint to form a trust relationship. This all happens bidirectionally. Once both of those have been completed we have a successfully formed a IKE Security Association(SA) that maintains this trust. IKE uses the key exchange algorithm called Diffie-Hellman to establish a secret key between each end. After this secure channel is setup it will be used in the next phase to negotiate the IPsec SAs, creatively called “Phase 2”. Keep in mind thata single Phase 1 SA can house multiple IPSec SAs!!!, unless you are using Perfect Forward Security(PFS). PFS make it so each IPSec tunnel has only 1 unique Phase 1 SA, that way if Phase 1 is ever compromised it won’t jeopardize all your IPSec tunnels under a single Phase 1 SA. Did I lose you? 🙂
“Phase 2” — IKE is used to negotiate IPSec SAs and how IPSec should be protected. In this Security Association (SA), the actual networks at each end of the tunnel must be agree upon. If they are not, Phase 2 will never come up as their SA are in mismatch. Furthermore, in this Phase 2 an agree upon Transform-set is established. The Transform-Set is the method on how the packets will be encrypted and transmitted out the tunnel interface. How should we transform the packets through the tunnel?Phase 2 also uses the key exchanged from Phase 1 to be used when encrypting the data. If PFS is used, keys are derived independently and not from Phase 1. The cost being time, benefit being a single key compromise does not compromise all IPSec tunnels. Keep in mind Phase 2 is required to be completed at both ends. If not the opposing side won’t know how to decrypt the data!!
So in summary IKE is used to protect Phase 1 and Phase 2, IPSec is used to send the packets. If you want to understand these steps further, I recommned reading this overview. It is a great explaination. Also if you haven’t already bookmark PacketLife.net!!
Openswan U2.6.37/K3.2.0-4-amd64 w/NetKey Support connecting to a Cisco ASA 5505 running version 9.1(3). I include the versioning because I read a lot of articles where the version of OpenSwan matters tremendously, and also seems to influence what types of issues you might run into. The version I am running uses a fairly new feature called NetKey. From my research this was introduced to make configuring a IPSEC tunnel easier and not require the re-compiling of the Linux Kernel. Continue reading…
Resetting the Windows administrator’s password or Linux root account password is a common troubleshooting practice when faced with systems infected with mailware, data corruption, and system recoveries. This article does not prompt malicious use, but instead stress the point that an account password does not protect your data.
In principle, passwords are stored locally, anything stored locally can be obtained and modified by slaving that physical data. For example, a hard drive can be removed, added to a different computer already running it’s own OS. That drive will now show up as a slave drive and the contents easily accessible. The following tutorial does not use any third party tools, and only relies on the initial media used to install the OS.
Hello, hello! Recently I posted a two part article on creating a Guest wireless network using OpenWRT, VLANs, and Firewall rules. Now we left things kinda open from a security standpoint. WE gave our Guest users full Internet access with no restrictions on sites, bandwidth usage, or ports!! Yikes! For this article I am going to walk you through the steps to close those gaps. We are going to first configure a Web Proxy server that will proxy outbound Internet connections. This allows us to check where and what are Guests are trying to get their hands on. Good and bad. We will also force Guests to connect to this Web Proxy server transparently. What I mean by that is the Guests will not be required to do anything on their side to connect, our firewall will take care of that. And lastly, I want only allow limited bandwidth of HTTP traffic. You will see later on how we can accomplish this. I’ve expanded upon this article of mine that uses squid proxy to filter Ads. Continue reading…
Most firewalls in the consumer world are ones that are either bought at Bestbuy or supplied by your ISP as an all-in-one type of network device. These devices, such as the Linksys WRT54GL, are good enough for most user’s home setups. Providing Wireless and Wired network access with built in Firewall security. Blocking most inbound network threats , and other unwanted requests that are not pre-established (i.e. return path from an outbound request). Some of these consumer routers can be even further enhance with a rich set of plugins and network tools by using custom firmwares. DD-WRT, Tomato, or openWRT are all interdependent communities, who develop custom firmware to be used with these consumer all-in-one routers. You can check your devices compatibility with their firmware at each of their websites.
I for one own a Linksys WRT54GL router and have used both DD-WRT and Tomato. Both of these custom firmwares as well as the stock firware(Linksys) provide enough security, accessibly, and capacity for a typical consumer. However, that’s not what this article is about! This article is how to setup your own Network Firewall using a standalone Linux box! Woot!.
Hi all! It’s seems to be difficult to keep up with the EasyList expression lists, and to make matters more confusing, the conversion from one EasyList expression list to SquidGuard can be cumbersome. There are a few article out on Google that people have posted their own SED files to convert from EasyList to squidGuard, that will manipulate the EasyList expression list and convert it to be compatible with SquidGuard. However, most are outout of date and will cause squidGuard to fail to initialize the expression list when issuing a