jim

What is NAT-Traversal??

Hi All, been awhile since my last post, however I believe this to be a good one!. So…the question arose the other day regarding NAT-Traversal. What is that? Why do we have it? What does it do? Most network engineers have heard of NAT-traversal before when configuring their Firewalls and VPN Clients, etc. But, I wanted to take a minute to explain where NAT-Traversals (NAT-T) need came from and the reason we still use it.

In order to understand NAT-Traversal, we need to understand two Networking concepts. First we need to understand “The Network Flow”. HOw do two hosts on a Network maintain a communication session. The second, is Network Address Translation. Yes NAT’ing, is a big part of IPv4 networks, they are so common place that you are probably using NAT’ing right now when reading this article.

The Network Flow.

So in a typical end-to-end connectivity the network traffic flow is maintained by 4 main parameters.

  1. Destination IP
  2. Destination Port
  3. Source IP
  4. Source Port

These 4 parameters provide a seamless flow of packets back and forth to each end-to-end device within a communication. It is how packets carrying your data arrive at their destination and it is how a return response knows how to get back to the requesting device. The IP requirement is usually pretty straight forward, it’s like the address of a house. You have to know the TO and FROM fields when sending a mail letter. So where does this port information come into play?? So Port number is like a sub-address of where the mailbox is located on a house. Usually a home will only have one mailbox, but imagine the same scenario with an apartment building or housing complex..Many mailboxes at a single address. Now depending on where you live you may need to prepend or add a apartment number to the address. Translate this same concept to port numbers. If my address is 123 North St and I am sending to 789 South St. My courier knows how to drive to each destination, but it doesn’t know where to put the actual mail envelopes since it is an apartment building with hundreds of apartments. This is where the port number comes in. So if on my envelope I put 123 North St. Apt#100 and I am sending to 789 South St. Apt#201. My mail will be delivered not only to the correct address but the correct mailbox.

I like using the apartment analogy, because it makes us think about Address and Ports being used together to deliver mail. An address and port combination is called a Socket in the networking world.

Now in a typical request scenario, a client forms the TCP/IP datagram. A Client’s machine fills in the destination IP and Destination Port based on the target and application type generating the request. For example, when you type http:// in your browser, the browser application knows to use port 80 as the Destination Port. The client then fills in it’s own IP address for the Source IP, and the OS chooses a Source Port at random. We call this random Source Port, the Ephemeral Port.

A typical TCP/IP communication header.

Sent Packet:

Dst IP Dst Port Src IP Src Port
192.168.10.10 80 192.168.1.100 49152

Return Packet:

Dst IP Dst Port Src IP Src Port
192.168.1.100 49152 192.168.10.10 80

Continue reading…

F5 BIGIP — Configuring the F5 AOM (Always On Management) interface

The F5’s AOM (Always On Management) interface module is one of the fundamental administrative features offered by BIGIP appliances. If you are familiar with System or Blade management devices, it is the similar to ILO (Integrated Lights Out), with a few extra features. One of the features that I like about the AOM is its integrated menu that can be called up in the console at anytime by pressing ( This is helpful in situations where a bad image or upgrade has corrupted the base OS, making it difficult to reboot the appliance via the CLI.

SSH to the F5 Appliance and get onto the AOM adapter:

SSH to your F5 Appliance using an username with TMSH access and gain bash access by running…

user@(ltm01)(cfg-sync In Sync)(Active)(/Common)(tmos)# run /util bash

Under bash, SSH to the AOM adapter

[user@ltm01:Active:IN Sync] ~ # ssh aom

You are now connected to the AOM adapter. Now we need to configure the adapter:

root@ltm01:~# netconfig
AOM Linux Management Network Configuration
Use DHCP for ipv4?                      no
Host name(optional):                    ltm01-aom
IPv4 or IPv6 address (required):        10.0.0.2
Network mask (required):                255.255.255.0
Broadcast IP address (optional:
Default gatewahy IP address (optional): 10.0.0.1
Nameserver IP address (optional):

NOTICE: We needed to connect to the AOM adapter via ssh aom because no IP was set. Now you can SSH directly to the IP we just assigned the AOM module!!
Continue reading…

VBscript — IP Blocklist to Cisco ASA access-list

**This article is old, see new Blocklist2ACL 2.0 project.**


Hi folks! A little script I wrote with VBscript that pulls in IP blocklists from different third party URLs and converts them in to well-formatted Cisco ASA access-lists.  The idea stemed from the old days of running PeerGuardian and Moblock to inhibit known malicious or unwanted IP address from attempting to connect and stopping them right then and there on your computer’s firewall. It is similar to URL Blocklists that focus on URLs and Domain Names, but instead filering is done by IPs only. I wanted to take this IP Blocklist concept that has primarly been done at the Desktop Fireweall layer and abstract it to the Network Firewall. In this case a Cisco ASA that way all traffic that any connection that crosses the Firewall will be filtered by this list.

The script is fairly straightforward and the source code is below so you may look through it. Feel free to improve upon it and share it with others. I have a few years of writing vbscripts, but am in no way a professional coder. Also, if you by any chance know Linux Shell or Qt and could potentially port this to Linux or even better JAVA for platform independence, let me know!! That would be sweet.

Video Tutorial

Continue reading…

What the IPSEC are you talking about?

What is IPsec?

Most of the time when we are trying to establish a site-to-site or LAN-to-LAN connectivity between two independent parties over an untrusted medium we rely on IPsec. Internet Protocol Security (IPSec) is a open standard suite of protocols used to authenticate and encrypt IP Packets in a connection. This ensures data integrity and data confidentiality. IPsec can be used in a variety of ways, to secure host-to-host communication, network-to-network communication, host-to-network. The most common type is network-to-network. An argument can be made that host-to-host is the same as network-to-network with /32s (i.e. 192.168.1.1/32 to 192.168.255.1/32). Anyway!

IPsec allows us to form a secure virtual communication link over a untrusted medium such as the internet to allow LAN to LAN communication. Sound familar? VPN anyone? For instance if CompanyA with 192.168.1.0/24 address space and CompanyB with 172.16.1.0/24 address space require hosts on each of their networks to talk to one another, this can be accomplished by utilizing a IPsec tunnel. Hosts at CompanyA would be able to traverse the IPsec tunnel to CompanyB as it appears to them to be nothing more than another routed LAN. It’s a cheap and easy way to create this linked infrastructure without the need to buy or lay-down physically dedicate cabling. Why not piggy back and on an already existing insecure circuit and make it secure with IPSec!!

Phase 1 and Phase 2 ???

“Phase 1” — Before IPsec can even begin to send your data, there is a negotiation and the establishment of an agreed upon method to create and secure this connection. The negotiation is performed by Internet Key Exchange (IKE), which consists of (I think) 3 different Key Management protocols. ISAKMP, Oakley, SKEME. All of which are used based on how you want to setup the key exchange, ISAKMP being the most popular. The main point of this Phase 1 is two things, one to agree upon a way to protect this negoitation, followed by authenticating each endpoint to form a trust relationship. This all happens bidirectionally. Once both of those have been completed we have a successfully formed a IKE Security Association(SA) that maintains this trust. IKE uses the key exchange algorithm called Diffie-Hellman to establish a secret key between each end. After this secure channel is setup it will be used in the next phase to negotiate the IPsec SAs, creatively called “Phase 2”. Keep in mind thata single Phase 1 SA can house multiple IPSec SAs!!!, unless you are using Perfect Forward Security(PFS). PFS make it so each IPSec tunnel has only 1 unique Phase 1 SA, that way if Phase 1 is ever compromised it won’t jeopardize all your IPSec tunnels under a single Phase 1 SA. Did I lose you? 🙂

“Phase 2”IKE is used to negotiate IPSec SAs and how IPSec should be protected. In this Security Association (SA), the actual networks at each end of the tunnel must be agree upon. If they are not, Phase 2 will never come up as their SA are in mismatch. Furthermore, in this Phase 2 an agree upon Transform-set is established. The Transform-Set is the method on how the packets will be encrypted and transmitted out the tunnel interface. How should we transform the packets through the tunnel? Phase 2 also uses the key exchanged from Phase 1 to be used when encrypting the data. If PFS is used, keys are derived independently and not from Phase 1. The cost being time, benefit being a single key compromise does not compromise all IPSec tunnels. Keep in mind Phase 2 is required to be completed at both ends. If not the opposing side won’t know how to decrypt the data!!

So in summary IKE is used to protect Phase 1 and Phase 2, IPSec is used to send the packets. If you want to understand these steps further, I recommned reading this overview. It is a great explaination. Also if you haven’t already bookmark PacketLife.net!!

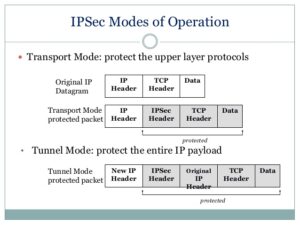
Tunnel vs Transport ??

Difference between Tunnel and Transport mode is in Tunnel mode the complete Original IP packet header information is encapsulated and encrypted, in Transport mode only the TCP/UDP payload is encrypted.

***Source– https://www.slideshare.net/keshabnath/ip-security-19425154***

The Design:


Openswan U2.6.37/K3.2.0-4-amd64 w/NetKey Support connecting to a Cisco ASA 5505 running version 9.1(3). I include the versioning because I read a lot of articles where the version of OpenSwan matters tremendously, and also seems to influence what types of issues you might run into. The version I am running uses a fairly new feature called NetKey. From my research this was introduced to make configuring a IPSEC tunnel easier and not require the re-compiling of the Linux Kernel.
Continue reading…

Linux — Reset ethX naming for Ubuntu/Debian

I stumbled across this issue a long time ago and it is still present today. Adding or removing NIC’s from a Linux box, or even replacing them renumbers or messes with the numbering for each NIC. For example if you have 1 NIC and add a second, sometimes it won’t show up as eth0 and eth1, it will show up as eth0 and rename1. Or even sometimes, your original eth0 will be renamed to rename1 and the new NIC will be named eth0 when added. Yikes! Talk about confusion.

It appears that this naming information is stored in a file located in  /etc/udev/rules.d/70-persistent-net.rules

So if you want to reset the numbering completely, delete this file and reboot! Now you have clean eth# numbering again!

rm /etc/udev/rules.d/70-persistent-net.rules 
reboot


NOTE: You can also manipulate and edit this file rather than deleting it.

Reset Windows Administrator and the Linux Root passwords with Pictures!!

Resetting the Windows administrator’s password or Linux root account password is a common troubleshooting practice when faced with systems infected with mailware, data corruption, and system recoveries. This article does not prompt malicious use, but instead stress the point that an account password does not protect your data.
In principle, passwords are stored locally, anything stored locally can be obtained and modified by slaving that physical data. For example, a hard drive can be removed, added to a different computer already running it’s own OS. That drive will now show up as a slave drive and the contents easily accessible. The following tutorial does not use any third party tools, and only relies on the initial media used to install the OS.

Continue reading…

Creating a Public DNS Server and advertising an Authoritative Domain

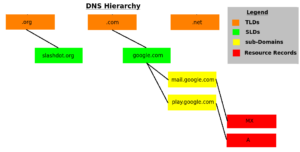
Hi All, so you’ve probably heard of goDaddy.com to register DNS names publicly. However have you ever done a dig or nslookup on your registered name? It probably returns the name you queryied and the IP address just as you expected, however this is because dig is by default recusive. This means that it will ask it’s known DNS server if it knows the DNS resolution for your query, if not, forward it on and on and on until it is found through the DNS hiearchy or it times out. See the diagram below.

DNS Hierarchy

Let’s walk through this.

  • TLD (Top-Level Domains) — These are the highest level on the DNS hierarchy. You can find a list here.
  • SLD (Secondary Level Domains) — These are they domain names you are most familary with, like google.com, slashdot.org, thejimmahknows.com. Notice each of there suffix’s
  • Sub Domains — Logically grouped resources, such as mail.google.com and linux.slashdot.org. Can have multiple prefix subdomains (i.e. a.b.c.d.google.com)
  • Resource Records — There are several different types. The most common are A reocrds, MX records, and CNAME records.

Continue reading…

F5 BIGIP — iRule Block URI for external Client’s only

So, I had a cool question asked to me today regarding an F5 VIP used by a web application.
“Can we block a certain URI from external client’s but allow internal client’s to visit it?”

Of course there is!! Now there are probably a billion different ways to do this, but this is what I came up with.

First the condition, we want only 10.0.0.0/8 hosts to be able to access this restricted URI. Anyone else should be dropped. I say dropped and not denied, because that way if a user tries to navigate to the URI that shouldn’t it just timesout, and doesn’t give them any more information then they need. Second, I want to log blocks, so I can see it working and get an idea of how many times it gets hit. Lastly we need to know the Virtual server to apply the iRule to.

Here is the finished iRule, hope it helps!

when RULE_INIT {
	set static::drop_notallowed 0

}

when CLIENT_ACCEPTED {
	if {not [IP::addr [IP::client_addr] equals 10.0.0.0/8]} {
                log local0. "[IP::client_addr] does not match 10.0.0.0/8 AND access URI = /restricted-URI/"
		set static::drop_notallowed 1
	}
}

when HTTP_REQUEST {
	if { [string tolower [HTTP::uri]] starts_with "/restricted-URI" }{
		if {$static::drop_notallowed==1}{
			drop
		}
	}

}

Continue reading…

Linux Fibre Channel SCSI Target using SCST

Fibre channel or Fiber Channel is also another way to present SCSI devices over a network medium using a complete different protocol suite then my previous article on iSCSI. With Fiber Channel transfer speeds and protocol delivery is much faster than iSCSI. The fundamental difference between the two is iSCSI uses TCP/IP protocol suite to deliver SCSI messages, and Fiber Channel uses Fiber channel to deliver SCSI message. This means that you will have to have network equipment that is Fiber Channel capable, such as Fiber Channel switches, Fiber Channel HBA (similar to TCP/IP NICs), etc. For the purposes of this article I will not go into how Fiber Channel works, or how it does it’s job of delivering SCSI messages two and from SCSI initiators and SCSI targets. This article will step through how to turn a Linux machine into a Fiber channel SCSI Target. There are a few things you will need to even attempt this:

  • A Linux machine running Kernel 3.2+
  • SCST and SCSTAdmin (see below steps)
  • A separate machine that will act as a Fiber channel initiator, this can be another Linux machine, or an ESX host, etc
  • At least two(2) Fiber channel HBA’s with one physical WWN port each installed in both machines
  • A OM2 or 3 Multi-mode Fiber cable with connectors capable of being used with the HBAs
  • Enough disk space to create a Virtual Disk so we may present it as a LUN
  • And lastly, some excitement!! you are about to enter the new world of Fiber Channel!!

Continue reading…

Cisco ASA 5505 Memory Upgrade

Hi Folks! So I was trying to update my Cisco ASA 5505 my buddy gave me from version 8.2 to 9.1. However upon reloading the device with the new 9.1 image file I got a warning on the console! I received the error of purchase Cisco item “ASA5505-MEM-512=”


Continue reading…