Hi All, so you’ve probably heard of goDaddy.com to register DNS names publicly. However have you ever done a dig or nslookup on your registered name? It probably returns the name you queryied and the IP address just as you expected, however this is because dig is by default recusive. This means that it will ask it’s known DNS server if it knows the DNS resolution for your query, if not, forward it on and on and on until it is found through the DNS hiearchy or it times out. See the diagram below.
DNS Hierarchy
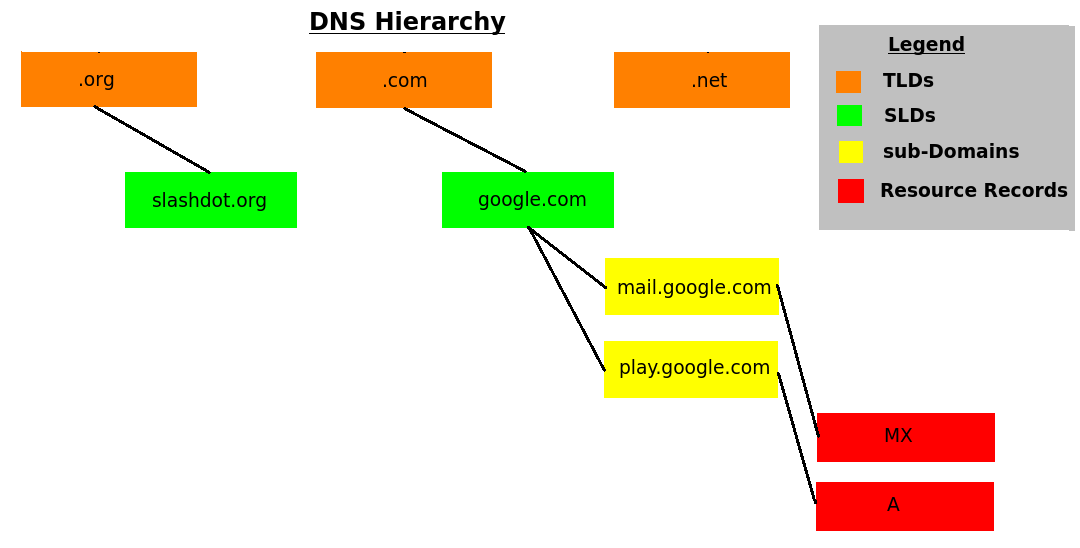
Let’s walk through this.
- TLD (Top-Level Domains) — These are the highest level on the DNS hierarchy. You can find a list here.
- SLD (Secondary Level Domains) — These are they domain names you are most familary with, like google.com, slashdot.org, thejimmahknows.com. Notice each of there suffix’s
- Sub Domains — Logically grouped resources, such as mail.google.com and linux.slashdot.org. Can have multiple prefix subdomains (i.e. a.b.c.d.google.com)
- Resource Records — There are several different types. The most common are A reocrds, MX records, and CNAME records.
DNS Hierarchy Process — dig google.com
- Client crafts a DNS query containing a name (google.com) and record type.
- Client sends crafted DNS query to it’s local DNS server (by default)
- Local DNS Server checks query name against it’s authoritative domains.
- Assuming Local DNS Server is a forwarder and recursion is enabled, the query will be forwarded on to designated Forwarder. This is usually an ISPs or publicly known DNS servers, such as OpenDNS.
- If ISP or Forwarder does not contain a cached entry, it will then use it’s internal “root hints” which contain information regarding the appropriate Top-Level Domain server.
- Top Level Domain servers contains a list of referral records that on the nameservers to use for Secondary Level Domain, in this case google.com’s nameservers (ns1.google.com).
- This referral is returned to the original Forwarder, and the Forwarder asks the nameservers directly for the query (google.com)
- The nameserver is authoritative and owns that domain “zone” and replies with the appropriate resource record.
Creating a BIND server
Installing and Configuring BIND
- Install on debian
apt-get install bind9
**This will install bind9 and all is dependencies.
- Edit the named.conf.options file
options {
        listen-on { 192.168.255.100; };
        listen-on port 53 { any; };

        #working directory
        directory "/opt/";

        dump-file "/opt/bind.db";

        #allow queries
        allow-query-cache { none; };
        allow-query { any; };
        recursion no;
        dnssec-enable no;

        auth-nxdomain no;    # conform to RFC1035
};


zone "thejimmahknows.com" IN {
        type master;
        file "/opt/zones/thejimmahknowscom.zone";
        allow-update { none; };
};
Options:
-
- listen-on — Sets which interface to bind to.
- listen-on port — Sets the port to listen on, This should always be 53 which is the default.
- directory — Sets the working directory for bind.
- dump-file —
- allow-query — This sets who is allowd to query this nameserver, you want this to be any since it will be publicly facing.
- allow-query-cache — This should be disabled since you are authoratative and should always respond directly.
recusion — This allows recursion to happen, however we don’t want our bind server to send out referrals and only respond to our own domains.
-
- dnssec-enable — Enable or disable DNSSEC.
- auth-nxdomain — Sets the AA bit when a domain not found or doesn’t exist rsponse is sent back. Default is yes.
Zone object
-
-
- zone “thejimmahknows.com” — Zone configuration object
- type master — Sets type, either master or slave.
- file {path} — Designates path to zone file.
- allow-update — If dyanmic updates or type is slave is used, however we want this disabled because we don’t want anyone sending updates to our nameserver!!
-
- Configure Zone file
vi /opt/zones/thejimmahknowscom.zone$ttl 1800 @ IN SOA thejimmahknows.com. jim@techjockey.net. ( 1111111111 ;Serial 600 ;Refresh 60 ;Retry 86400 ;Expire 300 ;Minimum ) ;Nameservers IN NS ns1.thejimmahknows.com. IN NS ns2.thejimmahknows.com. ;Resolve Nameserver IPs ns1 IN A 68.99.157.15 ns2 IN A 108.82.254.4 ;Define hosts resolutions @ IN A 68.99.157.15 @ IN A 108.82.254.4 smtp IN A 68.99.157.15 smtp IN A 108.82.254.4 MX records thejimmahknows.com. IN MX 10 smtp.thejimmahknows.com. ;CNAMEs www IN CNAME @Start of Authority:
- $ttl 1800 — Sets the TTL (Time to Live) for responses
- @ IN SOA — Start of Authority record, defines that we are authoratative for the listed domain.
- Serial — Each time we update this zone file, we will need to increment it. This is used when multiple DNS servers share the same zone information. Higher Serial number is treated as newer.
- Refresh — Time when any slave DNS servers will try to fetch zone information from master DNS server.
- Retry — Time between retries to fetch information from master.
- Expire — Specifies when SOA is not valid from slave or secondary DNS servers perspective.
- Minimum — Time for resolvers to treat NXDOMAIn (not found) records valid
Resource Records:
- IN NS — Nameserver delegation records, required so we pass the query to either of our nameservers. ns1 or ns2
- {subdomain} IN A — Standard Host A record. sub-domain to IP resolution
- {mail domain} IN MX — MX record, used for mail servers to forward mail to the correct host. Note, mail domain is what name comes after @ in email address./li>
- {subdomain} IN CNAME — Standard CNAME record for www
Registering domains and configuring registry to use nameservers
-
- Decided on a Domain Name Registrar.A Domain Name Registrar is a organization entity that has been accredited by ICANN or equivalent governing body to register Domain Name information to an Registry. Registrar vs Registry? Just remember a registrar is a organization that has been accredited and authorized to register domain names with a Registry. A Registry is the actually organization that maintains a working database of all domain names for a specific Top-Level-Domain. So a Registrar can registers domains in different TLDs (so .net .com .org) as long as it is accredited and authorized with a Registry within those TLDs. Make sense?Here is a list of Registrars, http://www.internic.net/alpha.html. So if you thought there was only Godaddy! Think again. GoDaddy just does a funominal job of marketing.Have you ever used WHOIS? A great public service for querying DNS name information. When you use this you are pulling the data from the Reigsiry, not the Registrar! Try it, http://ping.eu/ns-whois/
Here’s an example:
You pick the name thejimmaknows.com, because it’s an awesome name of course, and set up an account with GoDaddy as your Registrar. GoDaddy will charge you based on their own fees and the fees of the actual registry, if applicable. Once you pay GoDaddy, it will send the registration information to the Registry that handles the .com TLD database. GoDaddy needs to supply a few things to this Registry for it to be accepted thou. Besides having to be accredited and authorized in order to create and modify registries, GoDaddy also sends the domain name you are trying to register with the authoritative nameservers responsible for that domain. NOTICE: If you do not mange your own nameserver, GoDaddy will use it’s own nameservers. You may have seen these, usually something like ns67.domaincontrol.com or something similar.
- Decided on a Domain Name Registrar.A Domain Name Registrar is a organization entity that has been accredited by ICANN or equivalent governing body to register Domain Name information to an Registry. Registrar vs Registry? Just remember a registrar is a organization that has been accredited and authorized to register domain names with a Registry. A Registry is the actually organization that maintains a working database of all domain names for a specific Top-Level-Domain. So a Registrar can registers domains in different TLDs (so .net .com .org) as long as it is accredited and authorized with a Registry within those TLDs. Make sense?Here is a list of Registrars, http://www.internic.net/alpha.html. So if you thought there was only Godaddy! Think again. GoDaddy just does a funominal job of marketing.Have you ever used WHOIS? A great public service for querying DNS name information. When you use this you are pulling the data from the Reigsiry, not the Registrar! Try it, http://ping.eu/ns-whois/
-
- Telling your domain Registrar about your nameserversI found this great article on hostgator that lists several different Registrars and how to config each to use a private nameserver! http://support.hostgator.com/articles/hosting-guide/lets-get-started/dns-name-servers/how-do-i-update-my-name-server-ips
. I will walk through the GoDaddy.So the general idea is, we have a domain name, thejimmahknows.com, already registred with GoDaddy. GoDaddy has gone ahead and register the name with a Registry and is also using it’s own nameservers as the authoritative entity. What we first have to do is to tell GoDaddy about our own nameservers. First we must create two(2) NS records under our DNS zone file on GoDaddy. Once these records are saved it is safe to move forward with re-pointing to these nameservers for our domain (thejimmahknows.com). You cannot do this with out existing NS records because then there is no way to know how to find an authoratitve anwsser for the name thejimmahknows.com!!! Yikes. This is important as if you ever find yourself needing to update or change a public nameserver’s IP, make sure you do each nameserver one at a time!!Changing GoDaddy Nameservers
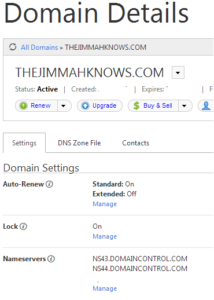
- Log in and find the domain name you will be using with your nameservers.In my case thejimmahknows.com name. You will see from the Nameservers row that the current nameservers are NS43.DOMAINCONTROL.COM and NS44.DOMAINCONTROL.COM. These are two(2) GoDaddy DNS nameservers.

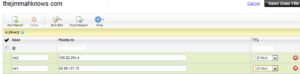
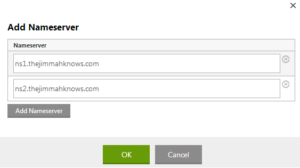
- Next step, create the A records for each nameserver we will use under the zone file. This will tell GoDaddy and once we change it over the Registry how to get to these nameservers. Don’t forget to SAVE!!

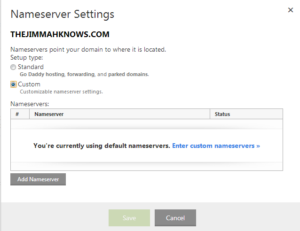
- Last step, here we actually change the nameservers used for this domain (thejimmahknows.com) to our nameservers we supplied in the last step.


That’s it! It will take a few minutes to update this information and propagate. For me it was under 5 minutes.
NOTICE: If you receive an error when adding the nameservers. Please go back to the second(2) step where we added the ns1 and ns2 A records. GoDaddy will not re-point the nameservers until it updates the proper registries.
- Log in and find the domain name you will be using with your nameservers.In my case thejimmahknows.com name. You will see from the Nameservers row that the current nameservers are NS43.DOMAINCONTROL.COM and NS44.DOMAINCONTROL.COM. These are two(2) GoDaddy DNS nameservers.
- Telling your domain Registrar about your nameserversI found this great article on hostgator that lists several different Registrars and how to config each to use a private nameserver! http://support.hostgator.com/articles/hosting-guide/lets-get-started/dns-name-servers/how-do-i-update-my-name-server-ips


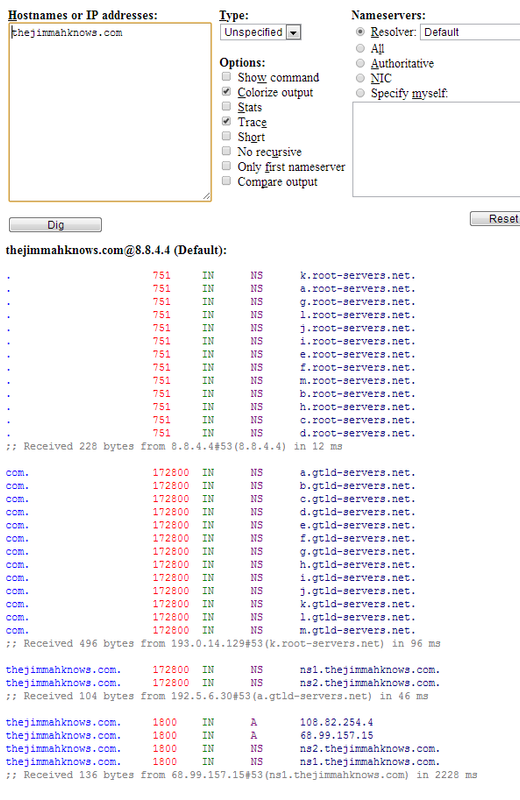
- Verify with http://digwebinterface.com/This site is great, it allows you to do an Online DIG against domains. Helpful to not only show resolutions, but tracing information of where the records are coming from.
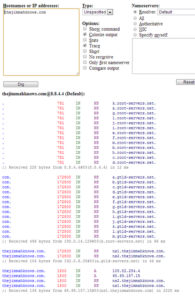
 From the screenshot we see the first DNS server received the query for thejimmahknows.com was 8.8.4.4. Next it enumerated a list of all the root servers for the .com TLD provided by 193.0.14.129. A TLD server was selected as having a referral for thejimmahknows.com NS record, in this case 192.5.56.30. The referral NS record contained two(2) namerservers that we just created ns1 and ns2 with their corresponding A records. Lastly we see the actual finished response of two(2) A records for thejimmahknows.com, 108.82.254.4 and 68.99.157.15. In this case the IPs are the same since the nameserver and A record for thejimmahknows reside on the same public IPs to conserve space. This many times is different. See the bottom comment, received by 68.99.157.15! That’s me! So the original query for thejimmahknows.com was successfully and authoritatively responded by my nameservers! Wahoo. Let’s look at another example:

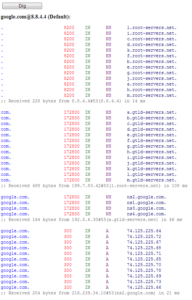 This is a more typical DIG trace. As we see it is very similar at first. Querying for a root server to help us find the Nameservers authoritative for google.com. The difference here is as I stated above, usually the nameservers and the A records for a name you are querying will not be the same. In google case, query for google.com returns many 74.15.225.x addresses, however the nameserver responding to the query ns2.google.com is a 216.239.34.10. See the difference. Again I just want to illistrate different setups, small vs large organizations. Either way will work. If you would like to look a little deeper, try querying for ns1 and ns2.google.com.
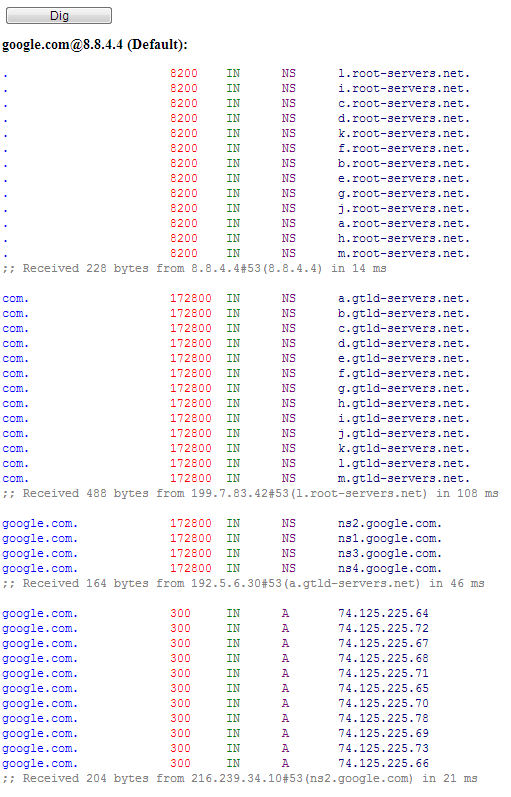
OPTIONAL: Reverse Lookup Zone Sub-Delegation
This next part is optional as reverse DNS provides the functionality of querying IP address to domain names. So for instances if I tried to do a nslookup on 1.1.1.1 I would get something.example.com back. Most applications utilize Forward Lookup Zones, the only applications or services I can think of that do require Reverse Lookup Zones are SMTP servers,
Here is a great article from SimpleDNS.com that outlines the process of creating these public PTR records. http://support.simpledns.com/KB/a100/how-do-i-get-reverse-dns-my-ip-addresses-delegated.aspx As we can read from the article, PTR records are hierarchy IP based, so the modification of such records has to be delegated just as a Forward Lookup Zone would be. However the catch here is that if you do not own your IP addresses, they are leased to you by an ISP like ATT or Level3, you will need to ask them to delegate or enter in themselves the Pointer Records (PTR) you need.
Example 1: ISP will enter PTR for you and they are using BIND:
In this example you do not have any configurations to do. you would simply ask your ISP of the IP address in question to add the PTR record with the domain name.
Example 2: ISP delegates an IP block to you, and you handle PTRs yourself:
Your ISP will need to delegate IP PTR space to your nameservers. On your nameservers you would need to create another zone file, like we did above, but for a Reverse Lookup Zone. .
This example assumes you own 1.1.1.0/24 IP block.
$ttl 1800
$ORIGIN 0.1.1.1.IN-ADDR.ARPA.
@            IN  SOA   ns1.domain.com. email@domain.com (
                              1111111111  ; Serial
                              600         ; Refresh
                              60          ; Retry
                              86400       ; Expire
                              300         ; Minimum
                              )
              IN  NS      ns1.domain.com.
              IN  NS      ns2.domain.com.
;Define Host PTRs
1            IN  PTR   sub1.domain.com.
2            IN  PTR   sub2.domain.com.
NOTICE: Under Define Host PTRs you specify the host bit only. So 1 would mean 1.1.1.1 with PTR record of sub1.domain.com
http://www.zytrax.com/books/dns/ch9/reverse.html has great information on how to set this up with your ISP. This is a great reference for DNS related configurations and I highly recommend bookmarking it if you are responsible for DNS and use BIND.
I know this optional section may be a bit vague. If readers want me to elaborate more on the subject, let me know and I will put together a new post explaining Reverse Lookup Zones.
Thanks for reading!!
Sources:

awesome article. superlike !!!
Thank you for the kind words!
great stuff, thanks much!