Security

What the IPSEC are you talking about?

What is IPsec?

Most of the time when we are trying to establish a site-to-site or LAN-to-LAN connectivity between two independent parties over an untrusted medium we rely on IPsec. Internet Protocol Security (IPSec) is a open standard suite of protocols used to authenticate and encrypt IP Packets in a connection. This ensures data integrity and data confidentiality. IPsec can be used in a variety of ways, to secure host-to-host communication, network-to-network communication, host-to-network. The most common type is network-to-network. An argument can be made that host-to-host is the same as network-to-network with /32s (i.e. 192.168.1.1/32 to 192.168.255.1/32). Anyway!

IPsec allows us to form a secure virtual communication link over a untrusted medium such as the internet to allow LAN to LAN communication. Sound familar? VPN anyone? For instance if CompanyA with 192.168.1.0/24 address space and CompanyB with 172.16.1.0/24 address space require hosts on each of their networks to talk to one another, this can be accomplished by utilizing a IPsec tunnel. Hosts at CompanyA would be able to traverse the IPsec tunnel to CompanyB as it appears to them to be nothing more than another routed LAN. It’s a cheap and easy way to create this linked infrastructure without the need to buy or lay-down physically dedicate cabling. Why not piggy back and on an already existing insecure circuit and make it secure with IPSec!!

Phase 1 and Phase 2 ???

“Phase 1” — Before IPsec can even begin to send your data, there is a negotiation and the establishment of an agreed upon method to create and secure this connection. The negotiation is performed by Internet Key Exchange (IKE), which consists of (I think) 3 different Key Management protocols. ISAKMP, Oakley, SKEME. All of which are used based on how you want to setup the key exchange, ISAKMP being the most popular. The main point of this Phase 1 is two things, one to agree upon a way to protect this negoitation, followed by authenticating each endpoint to form a trust relationship. This all happens bidirectionally. Once both of those have been completed we have a successfully formed a IKE Security Association(SA) that maintains this trust. IKE uses the key exchange algorithm called Diffie-Hellman to establish a secret key between each end. After this secure channel is setup it will be used in the next phase to negotiate the IPsec SAs, creatively called “Phase 2”. Keep in mind thata single Phase 1 SA can house multiple IPSec SAs!!!, unless you are using Perfect Forward Security(PFS). PFS make it so each IPSec tunnel has only 1 unique Phase 1 SA, that way if Phase 1 is ever compromised it won’t jeopardize all your IPSec tunnels under a single Phase 1 SA. Did I lose you? 🙂

“Phase 2”IKE is used to negotiate IPSec SAs and how IPSec should be protected. In this Security Association (SA), the actual networks at each end of the tunnel must be agree upon. If they are not, Phase 2 will never come up as their SA are in mismatch. Furthermore, in this Phase 2 an agree upon Transform-set is established. The Transform-Set is the method on how the packets will be encrypted and transmitted out the tunnel interface. How should we transform the packets through the tunnel? Phase 2 also uses the key exchanged from Phase 1 to be used when encrypting the data. If PFS is used, keys are derived independently and not from Phase 1. The cost being time, benefit being a single key compromise does not compromise all IPSec tunnels. Keep in mind Phase 2 is required to be completed at both ends. If not the opposing side won’t know how to decrypt the data!!

So in summary IKE is used to protect Phase 1 and Phase 2, IPSec is used to send the packets. If you want to understand these steps further, I recommned reading this overview. It is a great explaination. Also if you haven’t already bookmark PacketLife.net!!

Tunnel vs Transport ??

Difference between Tunnel and Transport mode is in Tunnel mode the complete Original IP packet header information is encapsulated and encrypted, in Transport mode only the TCP/UDP payload is encrypted.
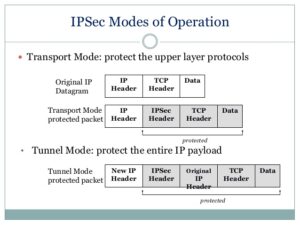
***Source– https://www.slideshare.net/keshabnath/ip-security-19425154***

The Design:


Openswan U2.6.37/K3.2.0-4-amd64 w/NetKey Support connecting to a Cisco ASA 5505 running version 9.1(3). I include the versioning because I read a lot of articles where the version of OpenSwan matters tremendously, and also seems to influence what types of issues you might run into. The version I am running uses a fairly new feature called NetKey. From my research this was introduced to make configuring a IPSEC tunnel easier and not require the re-compiling of the Linux Kernel.
Continue reading…

OpenWRT — Multiple Access Points With 802.1Q (part2)

Welcome back!

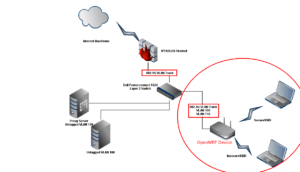
In the last part, part 1, we configured our OpenWRT device, got it to emit two(2) Access Point SSIDs (insecureWiFi & secureWiFi), created two(2) VLANs to separate traffic frames, and created a trunk to our PoweConnect switch! Wow!
For this part, part 2, we will be creating another VLAN Trunk from our Dell PowerConnect switch to our Linux router, designing and configuring some Firewall rules.
Continue reading…

OpenWRT — Multiple Access Points With 802.1Q (part1)

I set out on this home project with the intent of providing wireless internet to friends and family when visiting. I wanted to provide internet without allowing any malicious clients from consuming all my bandwidth and/or crippling my internal home network. There are many Wireless Access Points(WAP) that are capable of broadcasting multiple SSIDs. Cisco makes a few from their Aironet series, however they seem to be pretty expensive. I settled with a Netgear WNDR3700 after reading a few posts on hardforum.com that had success running OpenWRT.

OpenWRT is an third-party firmware designed for consumer based Access Points, such as Netgear, Linksys, Dlink, etc. OpenWRT adds many additional features, including the two features I needed. Support for 802.1Q trunking and gives the ability to run multiple SSID wireless signals.

Topology


Continue reading…

Linux — IPTABLES Network Firewall

Most firewalls in the consumer world are ones that are either bought at Bestbuy or supplied by your ISP as an all-in-one type of network device. These devices, such as the Linksys WRT54GL, are good enough for most user’s home setups. Providing Wireless and Wired network access with built in Firewall security. Blocking most inbound network threats , and other unwanted requests that are not pre-established (i.e. return path from an outbound request). Some of these consumer routers can be even further enhance with a rich set of plugins and network tools by using custom firmwares. DD-WRT, Tomato, or openWRT are all interdependent communities, who develop custom firmware to be used with these consumer all-in-one routers. You can check your devices compatibility with their firmware at each of their websites.

I for one own a Linksys WRT54GL router and have used both DD-WRT and Tomato. Both of these custom firmwares as well as the stock firware(Linksys) provide enough security, accessibly, and capacity for a typical consumer. However, that’s not what this article is about! This article is how to setup your own Network Firewall using a standalone Linux box! Woot!.

Why build a standalone Network Firewall?

Continue reading…

OpenVPN — Creating a Client VPN Setup

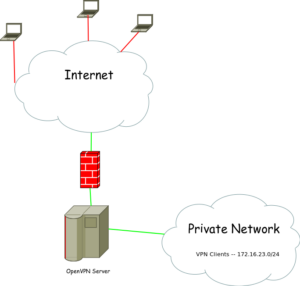
Before we begin I want to clearly identify the scope of this tutorial. There are different types of VPN, we will be creating a Client VPN which implies a many to one relationship. We will have multiple clients connecting via VPN to a single OpenVPN server. This OpenVPN server will assign IP addresses to each successfully authenticated client. Using this IP Address, client’s may, depending on your network security, access devices on a private network. Effectively appearing as if the Client was directly tied into the Private Network. If you are looking for a site-to-site VPN tunnel via IPSEC this is out of the scope of this tutorial.

Our Simple Client VPN Topology


Continue reading…

Linux — IPTABLES NAT, Dynamic NAT, NAT Overloading/Masquerade

If you have had experience with NATs via Cisco Routers or read about them in your CCNA studies, there are 3 Network Address Translation(NAT) types. Technically, two, see here, plus a third special case.

  • Static NAT, one-to-one mapping
  • Dynamic NAT, pool-to-pool mapping
  • Dynamic NAT with PAT Overload, many-to-one mapping

So as you can see the two types are static NAT and Dynamic NAT, with the special case of Dynamic NAT with PAT overload.

Continue reading…

Linux — SSH Key Based Authentication

There are many articles and tutorials out there on how to configure SSH to use public key authentication. I wanted to share my findings on the subject and identify some interesting connections I made when setting it up myself. The following instructions will show you how to setup SSH key based authentication, using Ubuntu 12.04, on a local and remote machines.

SquidProxy — Network Adblocking using Squid1.4

I originally discovered Adblock Plus when I first downloaded Firefox many years ago. Since then I’ve installed the Adblock plugin right after Firefox, etc. It’s become so standard that I almost think Firefox should just bundle them together. Including it in it’s default install exe.

Adblock Plus works as if it were a local content policy,  filtering each request you make with Firefox. Each URL, each domain, each link you navigate to is check based on a static blacklist of expressions and URLs. If a match is found, Adblock Plus simply discards the content from rendering. The discarding and allowing content to load is managed by the Content Policy engine within Firefox. Adblock Plus simply utilizes this in order to block the unwanted contents. Or at least this is my comprehension of how it works. :-p

Setting up your own Network wide Adblocker

The purpose of this guide and tutorial is to instruct you on how to set up your own network based adblocker. Expections after completion is every client browser on the network will benefit from adblocking. I will include as much as possible, and feel free to ping me with questions or comment down below.

You will need:

  1. Computer that will be running the Web Proxy. (For this article, see specs below)
  2. OS that will host the Proxy Software. (For this article, Ubuntu 12.04 32-bit Server)
  3. Proxy software that allows rewrite engines/programs. (squidGuard)
  4. Content-Control-Software or URL Redirect Application(This will consume your blacklists)
  5. URL and RegExp Blacklists consumable by your Content-Control-Software (Here are some free ones)
  6. Optional: ipTables for transparent proxy redirection
  7. Patients and enthusiasm :-p

Continue reading…

Linux — Encrypt files with CCrypt, AxCrypt, and OpenSSL

Are you someone who keeps a text file on their Desktop with all there passwords in it? Do you write you account information and passwords on a sticky-note? I sure hope not! But if you do, consider encrypting that password file with high-grade encryption using reliable freeware.

I will review three free encryption applications; CCrypt, AxCrypt, and OpenSSL.

Continue reading…