I’ve posted an article on Client VPN setup using OpenVPN and I noticed I didn’t have one regarding Cisco ASA. A Cisco ASA being a very common Security Appliance used by small and large companies. This article will cover how to setup a standard remote client VPN utilizing IPsec as the crypto carrier. Cisco also has their own proprietary remote client VPN solution called AnyConnect. I will be posting an article after this one on how to set an AnyConnect solution up and include what the differences are between it and the standard IPsec remote client VPN contained in this article.
A remote client VPN is something very common in workplace now-a-days. It allows users to appear as if they are on the company’s internal network over an insecure medium(e.g. Internet, untrused Network, etc). It does so by using IPsec. IPsec is a tried and true Layer 3 securing technique that requires both parties involved to mutually authenticate each other before passing traffic.
A few things to keep in mind regarding remote client VPNs.
- First, a subnet is required for client’s to be put on when successfully authenticated and authorized via the remote client VPN. This can be the same subnet as one already existing on your network or a separate one with a firewall in-between The later being best in practice and security.
- Secondly, deciding on split-tunneling vs all-tunneling. The difference being on the client would you like all traffic to be forced across the tunnel or allow clients to communicate with both their local network and the networks on the otherside of the VPN. For best practice and security, all-tunneling is recommended.
- Third, Access Lists and tunneled networks. Here we will decided what Remote VPN users will have access to other networks. We will also, in the case of split-tunneling, create an access-list of what networks to tunnel for the Remote VPN user.
- Fourth, provisioning standard network services for VPN user’s. Remote VPN user’s will need a default gateway, DNS servers, domain suffix, an address pool, proxy settings, etc.
Configuring the Server Side (Cisco ASA):
-
First Step: Create an Address Pool for VPN clients.
Decided on the subnet you will be assigning to remote VPN clients. For this article I will choose 172.21.1.0/24, staring at .10 and ending at .250.
ciscoasa(config)# ip local pool obj-RemoteVPNPool l 172.21.0.10-172.21.0.250 mask 255.255.255.0
Second Step: Make ACLs for allowed communication and networks to push accross the tunnel for the client. (assuming networks we want to allow communication with are 192.168.1.0/24 and we will force it to be tunneled as well)
ciscoasa(config)# object-group network obj-VPN-NETWORK
ciscoasa(config-network-object-group)# network-object 172.21.0.0 255.255.255.0

ciscoasa(config)# object-group network obj-PROTECTED-NETWORK
ciscoasa(config-network-object-group)# network-object 192.168.1.0 255.255.255.0

ciscoasa(config)# access-list vpnACL extened permit ip object-group obj-VPN-NETWORK object-group obj-PROTECTED-NETWORK
Next step: Make an additional ACL to identify the traffic we would like the remote client to know about on the other side of the tunnel (For Split-Tunneled scenarios).
ciscoasa(config)# access-list tunneledNets standard permit 192.168.1.0 255.255.255.0
ciscoasa(config)# access-list tunneledNets standard permit 192.168.2.0 255.255.255.0
ciscoasa(config)# access-list tunneledNets standard permit 192.168.3.0 255.255.255.0
Moving on: We have to create an identify NAT because our VPN traffic communicating with our Proected networks will travers two different interfaces on the Cisco ASA. We will not be performing an NAT manipulation, but the statement is required because of Cisco ASA standard security policy when traversing traffic between different interfaces.
ciscoasa(config)# nat (outside,inside) source static obj-VPN-NETWORK obj-VPN-NETWORK destination obj-PROTECTED-NETWORK obj-PROTECTED-NETWORK
VPN Attributes: Let’s set up group-policy to tie together all the attributes we are going to send to the remote client when they connect.
ciscoasa(config)# group-policy ClientVPN_GroupPolicy internal
ciscoasa(config)# group-policy ClientVPN_GroupPolicy attributes
ciscoasa(config-group-policy)# banner value Welcome to thejimmahknows VPN
ciscoasa(config-group-policy)# vpn-idle-timeout 30
ciscoasa(config-group-policy)# vpn-session-timeout none
ciscoasa(config-group-policy)# vpn-filter value vpnACL
ciscoasa(config-group-policy)# vpn-tunnel-protocol ikev1
ciscoasa(config-group-policy)# ipsec-udp enable
ciscoasa(config-group-policy)# split-tunnel-policy tunnelspecified
ciscoasa(config-group-policy)# split-tunnel-network-list value tunneledNets
ciscoasa(config-group-policy)# dns-server value 192.168.1.3 192.168.3.4
ciscoasa(config-group-policy)# default-domain value internaldomain.local
ciscoasa(config-group-policy)# split-tunnel-all-dns enable
ciscoasa(config-group-policy)# address-pools value obj-RemoteVPNPool
ciscoasa(config-group-policy)# ipv6-address-pools none
Let’s step thru this:
- ClientVPN_GroupPolicy {internal/external} — Where to get attributes from? Internal = from this ASA, External = from external server like RADIUS or Cisco ACS
- ClientVPN_GroupPolicy attributes — First we have to create a new group policy whcih will push down to the cilent all the network services we want to assign them.
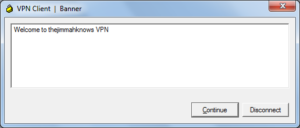
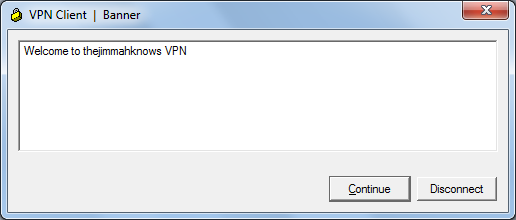
- banner value {your text} — This is not technically needed, however I like it because it gives the user a pop-up from their VPN software that they have successfully connected.
- vpn-idle-time {min} — Helpful to terminate VPN connections that are idle for too long.
- vpn-session-timeout {min} —
- vpn-filter value {your ACL} — This is where you set the ACL with the networks your VPN Network is allowed to communicate with others inside your network.
- vpn-tunnel protocol {ikev1} — Tells client to use ikev1 to establish a connection.
- ipsec-udp {enable/disable} — This will enable IP NAT traversal, which is 99% of the time needed. If you don’t enable it, only one client will be able to connect in from the same remote network at a time. See What is IPsec NAT-Traversal
- split-tunnel-policy {tunnelspecified/tunnelall} — Sets the split-tunneling policy, if any.
- split-tunnel-network-list {standard ACL} — what networks on far side to tell the client about.
- dns-server value {dns servers} — Specify the DNS servers to have your remote VPN clients use.
- default-domain value {windows domain name} — Supplied to client for DNS suffix.
- split-tunnel-all-dns {enable/disable} — Tells client whethers to ask far end of the tunnel for DNS reslution or use local network DNS. Best practice is to enable this and force remote VPN clients to always ask far end for DNS resolution.
- address-pools value {IP pool object} — Where to get IPs for remote VPN clients from.
- ipv6-address-pools {IP pool object/none} — IPv6 pools? Nah.
- NOTE:For more information and other attributes, see the Cisco documentation here.
Proxy settings?: We can also try to push down Web Proxy settings to Internet Explorer using the following
ciscoasa(config)# group-policy ClientVPN_GroupPolicy attributes
ciscoasa(config-group-policy)# msie-proxy method modify
ciscoasa(config-group-policy)# msie-proxy pac-url value http://proxyserver:8080/proxy.pac
IPSec Phase1: Here we set up Phase 1 to be used by this IPsec tunnel.
ciscoasa(config)# crypto ikev1 policy 1
ciscoasa(config-ikev1-policy)# authentication pre-share
ciscoasa(config-ikev1-policy)# encryption 3des
ciscoasa(config-ikev1-policy)# hash sha
ciscoasa(config-ikev1-policy)# group 2
ciscoasa(config-ikev1-policy)# lifetime 86400
ciscoasa(config)# crypto ikev1 enable outside
NOTE: The Cisco VPN Client v5 will match the first IKEv1 policy you have for Phase 1. Don’t forget to enable it on the outside interface!
IPSec Phase 2: Continuing on in building our Transport tunnel, we now have to create a Crypto Map (in this case Dynamic), and a Transform set.
ciscoasa(config)# crypto ipsec ikev1 transfrom-set VPN-TRANSFORM-SET esp-3des esp-sha-hmac
ciscoasa(config)# crypto dynamic-map VPN-DynamicCryptoMap 11 set ikev1 transform-set vpnTS
ciscoasa(config)# crypto map outside-cmap 65535 ipsec-isakmp dynamic VPN-DynamicCryptoMap
ciscoasa(config)# crypto map outside-cmap interface outside
NOTE: dynamic-map is used here because the remote endpoint’s address could be anything. Unlike other IPsec tunnels where we know both endpoint address are predetermined and it is part of the Security Association (SA). Specifying the dynamic-map keyword tells the ASA not to perform peer IP validation after initiating the tunnel. For more info on static tunnels read my other post here.
Last Step: Putting it all together with a Tunnel Group object.
ciscoasa(config)# tunnel-group VPN-TunnelGroup type remote-access
ciscoasa(config)# tunnel-group VPN-TunnelGroup general-attributes
ciscoasa(config-tunnel-general)# default-group-policy ClientVPN-GroupPolicy
ciscoasa(config)# tunnel-group VPN-TunnelGroup ipsec-attributes
ciscoasa(config-tunnel-ipsec)# ikev1 pre-shared-key ****
NOTE: Type remote-access = tells ASA this is a remote-access tunnel and not a Site-to-Site tunnel. We also bind what Group Policy to use with this tunnel here. Don’t forget to set the Phase1 pre-shred-key here!!
Creating users within the LOCAL user-table on your Cisco ASA
ciscoasa(config)# username testuser password *****
ciscoasa(config)# username testuser attributes
ciscoasa(config-username)# vpn-framed-ip-address 172.21.0.55
Configuring the Client Side
Windows — Using Cisco VPN Client
- Download software here
- Install (duh!)
- Configuration:
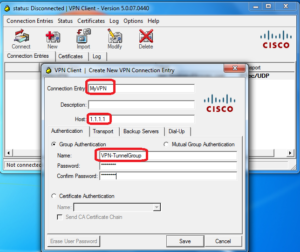

- Wahoo!!


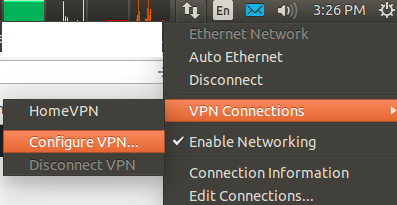
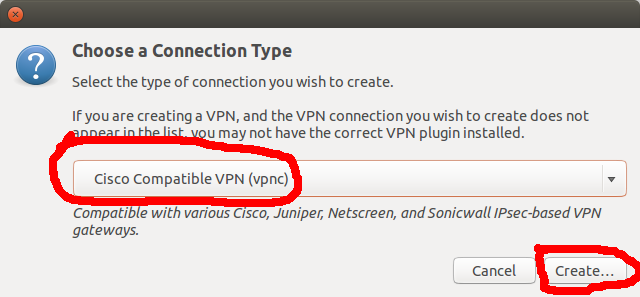
Ubuntu — Using vpnc package
- Install
sudo apt-get install network-manager-vpnc vpnc
- Configure:
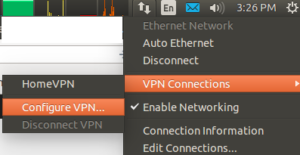
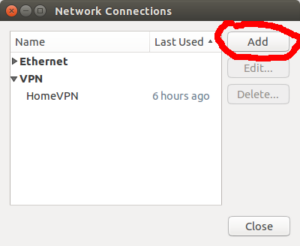


- Tada!!


Hi,
can you show me the Configuration of the Ubuntu Openvpn Client?