Welcome back!
In the last part, part 1, we configured our OpenWRT device, got it to emit two(2) Access Point SSIDs (insecureWiFi & secureWiFi), created two(2) VLANs to separate traffic frames, and created a trunk to our PoweConnect switch! Wow!
For this part, part 2, we will be creating another VLAN Trunk from our Dell PowerConnect switch to our Linux router, designing and configuring some Firewall rules.
Now, back to our topology….
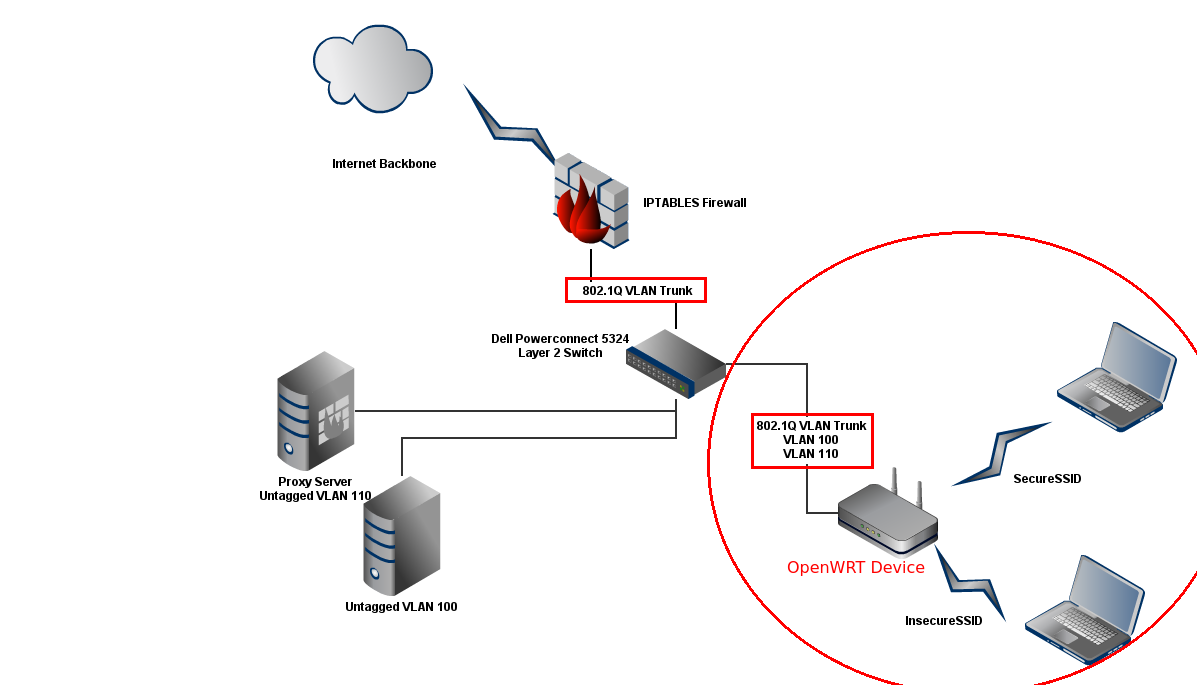
Topology

Creating the 802.1Q Trunk Link
-
Installing and Configuring VLANs on Linux
I am using a home based Linux router, running Ubuntu 12.04 server. Here is where I run my IPTABLES and firwall rules. Look back at our topology diagram. Do you see the Trunk between the Dell PowerConnect switch and the IPTABLES firewall? Great, we need to prepare each side of the Trunk link. Let’s start with the Linux IPTABLES side.
NOTICE: eth1 is the physical interface of the Trunk link.
sudo apt-get install vlan
Load the 802.1Q module
sudo modprobe 8021q
Have the module automatically load on startup by adding “8021q” at the end of the /etc/modules file:
sudo echo "8021q" >> /etc/modules
-
Adding VLANs to our eth0 interface
The next step will add the VLAN tags to the eth1 interface, so we must specify 100 and 110. Once we add the first VLAN tag the interface will be converted into a Trunk interface.
sudo vconfig add eth1 100
sudo vconfig add eth1 110
ifconfig
You should see two(2) new interfaces called eth1.100 and eth1.110. Seem familar? It’s because back when we did it under OpenWRT, it was linux too!
-
Adding IPs to each VLAN interface
I am picking the first host address in each subnet, remember our subnets are 192.168.0.0/24 and 192.168.1.0/24.
sudo ip addr add 192.168.0.1 eth1.100
sudo ip addr add 192.168.1.1 eth1.110
Let’s also add these address to the /etc/network/interfaces config, so they will remain permanant.
In your /etc/network/interfaces add:auto eth1.100 iface eth1.100 inet static address 192.168.0.1 netmask 255.255.255.0 network 192.168.0.0 broadcast 192.168.0.255 vlan_raw_device eth1 auto eth1.110 iface eth1.110 inet static address 192.168.1.1 netmask 255.255.255.0 network 192.168.1.0 broadcast 192.168.1.255 vlan_raw_device eth1NOTICE: vlan_raw_device, denotes the physical interface to bind/attach itself to.
-
Creating Trunk Link on PowerConenct
We did this in part 1, so quickly create a Trunk link on port g21. g21 is connected to eth1 on our Linux router.
SW1 configure
SW1(config) interface ethernet g21
SW1(config-if) switchport mode trunk
switchport trunk allowed 100
switchport trunk allowed 110
Basic IPTABLES
-
- We now have to give both networks Internet access, but deny the insecure network(192.168.1.0/24) to our secure network (192.168.0.0/24). Assume for this tutorial that on our Linux Router, the eth0 interface is a public interface.
On the Linux Router…
-
Allow Secure to Insecure Network
iptables -I FORWARD -s 192.168.0.0/24 -d 192.168.1.0/24 -p all -j ACCEPT
-
Deny Insecure to Secure Network
iptables -A FORWARD -s 192.168.1.0/24 -d 192.168.0.0/24 -p all -j DROP
-
Masquerade Internet bound traffic
iptables -t nat -A POSTROUTING -s 192.168.0.0/24 -o eth0 -j MASQUERADE
iptables -t nat -A POSTROUTING -s 192.168.1.0/24 -o eth0 -j MASQUERADE
NOTICE: This will allow full Internet access for both networks. You may want to filter your Insecure network to only HTTP and HTTPS.
Verifying It All Works
-
Set OpenWRT IPs
Log back onto the OpenWRT Web Configuration page. Browse to the Insecure Interface and make sure it has an IP address set on the 192.168.0.0/24 network, next do the same thing for the Secure Interface. For my example OpenWRT has an IP address of 192.168.0.2 on the Secure network and 192.168.1.2 on the Insecure network.
-
Try to Ping each IP
Try to ping each IP 192.168.0.2 and 192.168.1.2 from an end user device on the Secure network. My laptop has an IP of 192.168.0.155. I get a 100% echo response from both OpenWRT IPs. This will verify that our new Trunk and our routing is working, since the Linux router needs to route from 192.168.0.0 to 192.168.1.0 networks.
-
Connecting Wirelessly
Go ahead and set a static IP address or use OpenWRTs DHCP feature, to assign an insecure network IP. Such as 192.168.1.54. Try to ping a computer on the Secure network. Does it reply? If so, recheck your IPTABLES. Else, try to ping an outside website or Google at 8.8.8.8. Do a traceroute. Does it receive a response? Awesome!
Congrats!!! You have two working Access Points using one Wireless Router!!
See part 1, part 2
Sources:

Nice clear instructions, thanks. I’m running OpenWrt 14.07 Barrier Breaker on an Huawei HG556a. I had no idea OpenWrt could make my device support two SSIDs.
Thanks.
Explain very clearly. Thanks again!
Using a router with openwrt B.B without wifi, and linking ubiquiti picostation (openwrt C.C) with dual ssid. How could I do?
Regards.
Frank (italy)
If I understand correctly, assuming you are trying to segregate each SSID traffic, you could just trunk (tag VLANs) from the Openwrt router you have to the Ubiquiti. You then would use the Openwrt router to route between VLANs. Hope that helps!